Ridgid K-375R Owners Manual - Page 7
Machine Assembly, Machine Inspection
 |
View all Ridgid K-375R manuals
Add to My Manuals
Save this manual to your list of manuals |
Page 7 highlights
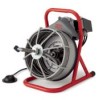
Kollmann K-375R 1/2″ Cage Machine Figure 4 - T-205 "C" Cutter: Used for general cleaning to remove materials clinging to pipe walls. Machine Assembly WARNING To prevent serious injury, proper assembly of the Drain Cleaner is required. The following procedures should be followed: Instructions For Mounting Drum 1. Align bearing bore in back of drum with shaft. Let drum slide down shaft so that the locking mechanism catches. In locked position, drum will rotate freely but should not slide forward without pulling the release pin. 2. Engage V-belt drive with drum. Push down on top of motor so that you depress the two large springs underneath the motor table and slip belt over drum (Figure 5). NOTE! Make sure belt properly contacts drive pulley before slipping over drum. Instructions For Mounting Belt Guard Fasten guard to motor using the two (2) wing nuts. Adjust guard so that it is approximately 1/4″ from drum (Figure 6). WARNING Gap between belt guard and drum should not exceed 1/2″ to prevent fingers being caught between belt and pulley. Do not operate this machine without a belt guard. Machine Inspection WARNING To prevent serious injury, inspect your Drain Cleaning Machine. The following inspection procedures should be performed before each use. 1. Make sure the Drain Cleaning Machine is unplugged and the directional switch is set to the OFF position (Figure 6). 2. Make sure the foot switch is present and attached to the Drain Cleaning Machine (Figure 6). Do not operate the machine without a foot switch. 3. Inspect the power cord, Ground Fault Circuit Interrupter (GFCI) and plug for damage. If the plug has been modified, is missing the grounding prong or if the cord is damaged, do not use the Drain Cleaning Machine until the cord has been replaced. Belt Guard Electrical Switch Figure 5 - Push down on motor, slip belt over drum. GFCI and Plug Figure 6 - K-375R Drain Cleaner Foot Switch 4. Inspect the Drain Cleaning Machine for any broken, Ridge Tool Company 5
-
 1
1 -
 2
2 -
 3
3 -
 4
4 -
 5
5 -
 6
6 -
 7
7 -
 8
8 -
 9
9 -
 10
10 -
 11
11 -
 12
12 -
13
-
14
-
15
-
16
-
17
-
18
-
19
-
20
-
21
-
22
-
23
-
24
-
25
-
26
-
27
-
28
-
29
-
30
-
31
-
32
-
33
-
34
-
35
-
36
-
37
-
38
-
39
-
40
-
41
-
42
-
43
 |
 |
