Ridgid K-380 Owners Manual
Ridgid K-380 Manual
 |
View all Ridgid K-380 manuals
Add to My Manuals
Save this manual to your list of manuals |
Ridgid K-380 manual content summary:
- Ridgid K-380 | Owners Manual - Page 1
K-380 Drain Cleaning Machine OPERATOR'S MANUAL • Français - 13 • Castellano - pág. 27 WARNING! Read this Operator's Manual carefully before using this tool. Failure to understand and follow the contents of this manual may result in electrical shock, fire and/or serious personal injury. - Ridgid K-380 | Owners Manual - Page 2
Damaged or Worn Cable ...9 To Install Replacement Cable ...9 Accessories Cable Selection ...10 Additional Tools Available for 3/8″ & 1/2″ Cable ...10 Maintenance Instructions Lubrication ...10 Autofeed Assembly ...10 Cables ...11 Machine Storage ...11 Service and Repair ...11 Trouble Shooting ...12 - Ridgid K-380 | Owners Manual - Page 3
K-380 Drain Cleaning Machine K-380 Drain Cleaner Record Serial Number below and retain product serial number which is located on nameplate. Serial No. - Ridgid K-380 | Owners Manual - Page 4
to follow all instructions listed below may result in electric shock, fire, and/or serious personal injury. SAVE THESE INSTRUCTIONS! Work Area Safety • Keep your work area clean and well lit. Cluttered benches and dark areas invite accidents. • Do not operate power tools in explosive atmospheres - Ridgid K-380 | Owners Manual - Page 5
foot switch and cable. • Use foot switch to operate machine while maintaining good footing and balance. Do not operate machine in (REV) reverse. Operating machine in reverse can result in cable damage and is used only to back tool out of an obstruction. • Keep hands away from rotating drum and guide - Ridgid K-380 | Owners Manual - Page 6
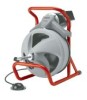
Gloves & Std. Equipment - Autofeed - C-45 IW 1/2″ x 75′ Solid Core (Integral Wound) Cable - T-260 Tool Set K-380 Machine w/Gloves & Std. Equipment - Two-Wheel Cart - Autofeed - C-45 IW 1/2″ x 75′ Integral Wound Cable - T-260 Tool Set Auto Feed Assembly Two-Wheel Transport Cart 4 Ridge Tool Company - Ridgid K-380 | Owners Manual - Page 7
Make sure the foot switch is present and attached to the Drain Cleaning Machine (Figure 4). Do not operate the machine without a foot switch. Figure 2 - Placing Mounting Bracket Into Auto Feed 3. Attach autofeed onto the front frame of the K-380 using the two (2) 5/16″ x 1″ flat head screws. Insert - Ridgid K-380 | Owners Manual - Page 8
may ignite. 2. Position the Drain Cleaning Machine within 2′ of sewer inlet. Greater distance can result in cable twisting or kinking. 3. Position the air foot switch pedal for easy operator accessibility. Machine is designed for one person operation. 4. Make sure FOR/OFF/REV switch is in the OFF - Ridgid K-380 | Owners Manual - Page 9
Operating Position Using Manual Feed Machines 1. Pull sufficient cable out of the drum to start tool and cable into the sewer inlet. Push cable into inlet as far as it will go. 2. Move FOR/OFF/REV switch into FOR (forward) position. Grasp cable with two gloved hands and pull approximately 1 foot - Ridgid K-380 | Owners Manual - Page 10
used to clean the cable and tool as they are retrieved. 8. Turn FOR/OFF/REV Switch to OFF position and remove cord from power source. 9. Pull remaining cable and tool from sewer and hand feed cable back into machine. Using Autofeed Machines 1. Manually pull sufficient cable out of the drum to start - Ridgid K-380 | Owners Manual - Page 11
pulling the cable from the drain a foot at a time as the autofeed is used. NOTE! It is recommended that a continuous flush of water be used to clean cable and tool as they are retrieved. 11. When the tool is just inside the sewer inlet, release the air foot switch pedal and allow the machine to - Ridgid K-380 | Owners Manual - Page 12
. 3. Retighten the screw to clamp the cable against the back wall of the drum. Accessories WARNING Only the following RIDGID products have been designed to function with the K-380 Drain Cleaning Machine. Other accessories suitable for use with other tools may become hazardous when used on the - Ridgid K-380 | Owners Manual - Page 13
with drain cleaners. This machine can cause serious injury in the hands of untrained users. Service and Repair WARNING The "Maintenance Instructions" will take care of most of the service needs of this machine. Any problems not addressed by this section should only be handled by an authorized RIDGID - Ridgid K-380 | Owners Manual - Page 14
K-380 Drain Cleaning Machine Chart 1 Trouble Shooting PROBLEM POSSIBLE REASONS SOLUTION Cable kinking or breaking. Cable is being forced. Cable used in incorrect pipe diameter. Motor switched to reverse. Cable exposed to acid. Cable worn out. Do Not Force Cable! Let the cutter do the work. - Ridgid K-380 | Owners Manual - Page 15
Dégorgeoir K-380 Dégorgeoir K-380 Inscrivez ci-dessous le numéro de série de la plaque signalétique l'appareil pour future référence. N° de série : - Ridgid K-380 | Owners Manual - Page 16
Dégorgeoir K-380 Table des matières Fiche d'enregistrement du numé d'avancement automatique...18 Inspection de l'appareil...19 Préparation de la machine et du chantier Débouchage des éviers...20 Utilisation de l'appareil lectrique ...26 Garantie à vie ...Page de garde 14 Ridge Tool Company - Ridgid K-380 | Owners Manual - Page 17
380 Consignes générales de sécurité MISE EN GARDE ! Familiarisez-vous avec l'ensemble des instructions. Le respect des consignes suivantes vous permettra d'éviter les risques de choc électrique, d'incendie et de blessure corporelle grave. CONSERVEZ CES INSTRUCTIONS type d'ap- Ridge Tool Company 15 - Ridgid K-380 | Owners Manual - Page 18
poignées de la machine propres, sèches et origine. Suivez les instructions de la section 380. Tout manque de compréhension et de respect des consignes du mode d'emploi vous met à risque de choc électrique, d'incendie et/ou de graves blessures corporelles. Appelez les services techniques de Ridge Tool - Ridgid K-380 | Owners Manual - Page 19
diamètre maximum. Respectez les instructions du mode d'emploi. Toute autre utilisation ou modification du dégorgeoir pour d'autres applications peut augmenter les risques de blessure. Description, spécifications et équipements de base Description Le dégorgeoir RIDGID type K-380 est prévu pour le - Ridgid K-380 | Owners Manual - Page 20
Préparation de l'appareil MISE EN GARDE ! Le dégorgeoir doit être assemblé de manière appropriée afin d'éviter de graves blessures corporelles. Respectez les instructions suivantes : Figure 1 - Machine à tambour K-380 avec câble de 3/8 po et mèches Installation du système d'avancement automatique - Ridgid K-380 | Owners Manual - Page 21
380 rifiez le carter de la courroie pour vous assurer qu'il est solidement attaché au châssis. MISE EN GARDE L'espace entre le carter de ème ait été corrigé. 6. Lubrifiez le dégorgeoir selon les instructions de la section Entretien. 7. Utilisez les mèches et accessoires pr Ridge Tool Company 19 - Ridgid K-380 | Owners Manual - Page 22
Dégorgeoir K-380 10. Examinez les câbles et les raccords pour és risquent de rompre et d'entraîner de graves blessures corporelles. Préparation de la machine et du chantier MISE EN GARDE ! La préparation appropriée de l'appareil et du l'eau résiduelle. Nettoyez le siphon. 20 Ridge Tool Company - Ridgid K-380 | Owners Manual - Page 23
Dégorgeoir K-380 2. Positionnez le dégorgeoir aussi près que possible du tuyau d'évacuation, puis procédez selon les instructions suivantes. AVERTISSEMENT Toute tentative de passer directement par la . Répétez ce processus jusqu'à ce que l'obstacle soit éliminé. N'oubliez Ridge Tool Company 21 - Ridgid K-380 | Owners Manual - Page 24
Dégorgeoir K-380 pas que la mèche doit tourner . 7. Pour retirer le câble de la canalisation, faites tourner la machine en marche avant (FOR). Retirez un ou deux pieds de câble de la canalisation, puis canalisation jusqu'à rencontrer un obstacle. Généralement, cela se 22 Ridge Tool Company - Ridgid K-380 | Owners Manual - Page 25
Dégorgeoir K-380 traduira par le vrillage latéral du câ ble semble boucler (généralement apparent par l'augmentation de la taille de la boucle entre la machine et la canalisation), passez immédiatement en marche arrière pour dégager la mèche de de commande. Une fois la mèche Ridge Tool Company 23 - Ridgid K-380 | Owners Manual - Page 26
le câble contre la paroi arrière du tambour. Accessoires Seuls les produits RIDGID suivants sont prévus pour le dégorgeoir K-380. Les accessoires prévus pour d'autres types d'appareil peuvent être dangereux s' 9). Figure 9 - Embobinez le câble dans le tambour comme indiqué 24 Ridge Tool Company - Ridgid K-380 | Owners Manual - Page 27
380 es et mécaniques, y compris le guide-câble selon besoin. NOTA ! Il rement avec du lubrifiant antirouille type RIDGID Cable Rust Inhibitor. MISE EN GARDE parateur RIDGID agréé ou renvoyé à l'usine. Les réparations effectuées par les services Ridge sont Ridge Tool Company Ridge Tool Company 25 - Ridgid K-380 | Owners Manual - Page 28
Dégorgeoir K-380 Tableau 1 - Dépannage PROBLEME RAISONS POSSIBLES SOLUTION Le câble se plisse ou se brise. On force le câble en avant. Le câble est utilis JAUNE BLEU Cond. AUX PRINCIPAL LOGEMENT DANS TIGE ORANGE ORANGE MARRON BLEU BLANC FIL BLANC DU CORDON MARRON 26 Ridge Tool Company - Ridgid K-380 | Owners Manual - Page 29
Máquina limpiadora de desagües K-380 Limpiadora de desagües K-380 A continuación apunte y retenga el número de serie del producto que se encuentra en la placa de características. No. de Serie - Ridgid K-380 | Owners Manual - Page 30
para cables de 3/8 y 1/2 pulgada 39 Instrucciones de mantenimiento Lubricación ...40 Unidad auto-alimentadora ...40 Cables ...40 Almacenaje de la máquina...40 Servicio y reparaciones ...40 Detección de averías...41 Diagrama de cableado ...41 Garantía vitalicia ...carátula posterior 28 Ridge Tool - Ridgid K-380 | Owners Manual - Page 31
Máquina limpiadora de desagües K-380 Información general de seguridad ¡ADVERTENCIA! Lea y comprenda todas las instrucciones. Pueden ocurrir golpes eléctricos, incendios ón. • Mantenga todas las conexiones eléctricas secas y levantadas del suelo. No toque el enchufe con las Ridge Tool Company 29 - Ridgid K-380 | Owners Manual - Page 32
Máquina limpiadora de desagües K-380 manos mojadas. Esto reduce el riesgo de que se produzca un choque use piezas de recambio originales. Siga las instrucciones en la sección de Mantenimiento de este manual. El uso de piezas no autorizadas o el no seguir las instrucciones para el mantenimiento, - Ridgid K-380 | Owners Manual - Page 33
la Limpiadora de Desagües K-380. Si no se siguen o no se comprenden las instrucciones de este manual, es posible que ocurran choques eléctricos, incendios y/o lesiones personales graves. Si tiene cualquier pregunta, llame al Departamento de Servicio Técnico de Ridge Tool Company al (800) 519-3456 - Ridgid K-380 | Owners Manual - Page 34
C-45 IW estándar - Carro de dos ruedas - Auto-alimentador - Cable C-45 IW de eje medular sólido (enrollado integralmente), 1/2 pulgada por 75 pies - Estuche de herramientas T-260 Accesorios 87337 A-380 Unidad auto-alimentadora 59782 - Carro transportador de dos ruedas 32 Ridge Tool Company - Ridgid K-380 | Owners Manual - Page 35
K-380 con cable de 3/8 pulgada y herramientas Instrucciones para montar el auto-alimentador 1. Atornille el mango al auto-alimentador. 2. Coloque el soporte de montaje en la parte trasera del auto-alimentador ües (Figura 4). No use la limpiadora sin un interruptor de pie. Ridge Tool Company 33 - Ridgid K-380 | Owners Manual - Page 36
K-380 de desagües por si alguna de sus partes está quebrada, faltando, desalineada o agarrotada cable. El acoplador con ranura o muesca en T permite que la herramienta se abroche al acoplador del cable (Figura 5). Para desmontar la herramienta, emplee el pasador de acoplamiento o de- 34 Ridge Tool - Ridgid K-380 | Owners Manual - Page 37
380 senganche para oprimir la clavija y separar los acoplamientos. Para acoplar cable y Para desacoplar cable agarrar un cable que se enrollarse alrededor del cable y lesionarlo gravemente maneje el cable y evite quina y el cable en una situaci debe estar sobre el cable para controlar su acción - Ridgid K-380 | Owners Manual - Page 38
para limpiar el cable y la herramienta a medida que se extraen del desagüe. 8. Gire el interruptor de FOR/OFF/REV a la posición de OFF y desenchufe la máquina. 9. Retraiga el resto del cable y la herramienta del interior del desagüe y devuélvalo a la máquina en forma manual. 36 Ridge Tool Company - Ridgid K-380 | Owners Manual - Page 39
380 Empleo de limpiadoras con auto-alimentación 1. A mano saque la suficiente longitud de cable fuera del tambor para introducir la herramienta y el cable en el acceso del desagüe. Empuje el cable la modalidad de alimentación manual hasta que se haya limpiado la obstrucción. Ridge Tool Company 37 - Ridgid K-380 | Owners Manual - Page 40
el cable, el interruptor de FOR/OFF/REV debe estar en OFF (apagado) y la máquina, desenchufada. Extracción de un cable dañado o desgastado 1. Extraiga el exceso de cable del tambor para permitir el acceso al soporte del cable. 2. Afloje el tornillo en la parte trasera del tambor, el 38 Ridge Tool - Ridgid K-380 | Owners Manual - Page 41
quede debajo del soporte para el cable. 3. Vuelva a apretar el tornillo para sujetar el cable contra la pared trasera del tambor. Accesorios ADVERTENCIA Sólo los siguientes productos RIDGID han sido fabricados para funcionar con la Limpiadora de Desagües K-380. Otros accesorios aptos para usarse - Ridgid K-380 | Owners Manual - Page 42
380 auto-alimentadora con una manguera con agua y lubríquela con aceite de máquina liviano. Cables Después de cada uso, los cables cubren la mayor parte de los Ridge Tool Company Technical Service Department 400 Clark Street Elyria, Ohio 44036-2023 Teléfono: (800) 519-3456 E-mail: TechServices@ridgid - Ridgid K-380 | Owners Manual - Page 43
TERMINAL DE COBRE CABLE CON PUNTA NEGRA NEGRO Cable Negro INTERRUPTOR NEUMATICO AL ALOJAMIENTO DEL MOTOR PROT ROJO ROJO AMARILLO AMARILLO AZUL AUX PRINCIPAL ENTRADA PARA LA LLAVE EN EL VASTAGO ANARANJADO ANARANJADO MARRÓN AZUL BLANCO CABLE CON PUNTA BLANCA MARRÓN Ridge Tool Company 41 - Ridgid K-380 | Owners Manual - Page 44
Máquina limpiadora de desagües K-380 42 Ridge Tool Company - Ridgid K-380 | Owners Manual - Page 45
complete product to RIDGE TOOL COMPANY, Elyria, Ohio, or any authorized RIDGID® INDEPENDENT SERVICE CENTER. Pipe wrenches and other hand tools should be returned to the place of purchase. What we will do to correct problems Warranted products will be repaired or replaced, at RIDGE TOOL'S option, and
-
 1
1 -
 2
2 -
 3
3 -
 4
4 -
 5
5 -
 6
6 -
 7
7 -
8
-
9
-
10
-
11
-
12
-
13
-
14
-
15
-
16
-
17
-
18
-
19
-
20
-
21
-
22
-
23
-
24
-
25
-
26
-
27
-
28
-
29
-
30
-
31
-
32
-
33
-
34
-
35
-
36
-
37
-
38
-
39
-
40
-
41
-
42
-
43
-
44
-
45
 |
 |

Drain Cleaning
Machine
OPERATOR’S
MANUAL
• Français – 13
• Castellano – pág. 27
K-380
WARNING!
Read this Operator’s Manual
carefully before using this
tool. Failure to understand
and follow the contents of
this manual may result in
electrical shock, fire and/or
serious personal injury.