Ridgid RD8000 Owners Manual - Page 14
Checking/adding Fuel, Using Fuel Stabilizer, Oxygenated Fuels, Caution, Removable Control Panel, - service manual
 |
View all Ridgid RD8000 manuals
Add to My Manuals
Save this manual to your list of manuals |
Page 14 highlights
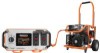
operation checking/adding fuel See Figure 13. Remove the fuel cap. Fill the fuel tank to 1 in. below the top of the fuel neck. Replace and secure the fuel cap. NOTE: Always use unleaded gasoline with a pump octane rating of 86 or higher. Never use old, stale, or contaminated gasoline, and do not use an oil/gas mixture. Do not allow dirt or water into the fuel tank. Do not use E85 fuel. using fuel stabilizer Fuel gets old, oxidizes, and breaks down over time. Adding a fuel stabilizer (not included) extends the usable life of fuel and helps prevent deposits from forming that can clog the fuel system. Follow fuel stabilizer manufacturer's directions for correct ratio of stabilizer to fuel. Add stabilizer to fuel tank, then fill with gasoline following previous instructions. NOTE: Fuel stabilizer and gasoline can be mixed prior to filling the tank by using a gas can or other approved fuel container and shaking gently to combine. Replace and secure the fuel tank cap. Start and run the engine for at least 5 minutes to allow stabilizer to treat the entire fuel system. OXYGENATED FUELS Some conventional gasolines are blended with alcohol or an ether compound. These gasolines are collectively referred to as oxygenated fuels. To meet clean air standards, some areas of the United States and Canada use oxygenated fuels to help reduce emissions. If using an oxygenated fuel, make sure it is unleaded and meets the minimum octane rating requirements. Before using an oxygenated fuel, try to confirm the fuel's contents. Some states/provinces require this information to be posted on the pump. The following are the EPA approved percentages of oxygenates: Ethanol (ethyl or grain alcohol) 10% by volume. You may use gasoline containing up to 10% ethanol by volume. Gasoline containing ethanol may be marketed under the name "Gasohol." Do not use E85 fuel. MTBE (methyl tertiary butyl ether) 15% by volume. You may use gasoline containing up to 15% MTBE by volume. Methanol (methyl or wood alcohol) 5% by volume. You may use gasoline containing up to 5% methanol by volume as long as it also contains cosolvents and corrosion inhibitors to protect the fuel system. Gasoline containing more than 5% methanol by volume may cause starting and/or performance problems. It may also damage metal, rubber, and plastic parts of the generator or your fuel system. If you notice any undesirable operating symptoms, try another service station or switch to another brand of gasoline. NOTE: Fuel system damage or performance problems resulting from the use of an oxygenated fuel containing more than the percentages of oxygenates stated previously are not covered under warranty. CAUTION: On a level surface with the engine off, check the lubricant level before each use of the generator. Removable control panel See Figure 14. The removable control panel can be wall-mounted and connected to the generator with the 25-ft. power cord (Model # RDEC25) provided with the product. The generator can be turned on or off from the removable control panel or using the off switch key on the unit. NOTE: The off switch is an on/momentary off switch. You must push the switch and hold it in until the engine has fully stopped. The removable control panel has two 120V duplex GFCI power outlets with outlet covers. Each duplex outlet has a Test and a Reset push button. NOTE: The GFCI outlets may be shown without their covers for clearer instruction of this feature's operation. Use only with RDEC25 accessory cord. Do not exceed separation length of 75 ft. or a combination of three RDEC25 accessory cords. GenSmart™ DIGITAL DISPLAY See Figure 15. The GenSmart™ monitoring system has the following features: Load Indicator Measures the wattage output of the 2 x 120 Volt duplex GFCI outlets located on the removable control panel. GenSmart™ monitors the load only for the 120 Volt GFCI outlets on the removable control panel. It does not measure load on the 240 Volt, 30 Amp outlet. The GenSmart™ indicator measures up to 4,800 watts of the generator's rated wattage. Note: If the 240 Volt receptacle is in use, the load indicated on the display will not accurately reflect the exact percentage of load being drawn from the generator. Hour Meter The digital hour meter operates whenever the engine is running and keeps track of how many hours the unit has been used. Use this meter along with the accompanying engine manual to determine when and what type of service on the unit is needed. Maintenance Warning System At every 100 hours of use, the GenSmart™ monitoring system will display a message informing the operator to service the engine's air filter, spark plug, and engine oil. To reset this message, push and hold the reset button located underneath the GenSmart™ display for 5 seconds. 14 - English
-
 1
1 -
2
-
3
-
4
-
5
-
6
-
7
-
8
-
 9
9 -
 10
10 -
 11
11 -
 12
12 -
 13
13 -
 14
14 -
 15
15 -
 16
16 -
 17
17 -
 18
18 -
 19
19 -
20
-
21
-
22
-
23
-
24
-
25
-
26
-
27
-
28
-
29
-
30
-
31
-
32
-
33
-
34
-
35
-
36
-
37
-
38
-
39
-
40
-
41
-
42
-
43
-
44
-
45
-
46
-
47
-
48
-
49
-
50
-
51
-
52
-
53
-
54
-
55
-
56
-
57
-
58
-
59
-
60
-
61
-
62
-
63
-
64
-
65
-
66
-
67
-
68
-
69
-
70
-
71
-
72
-
73
-
74
 |
 |
