Ridgid WD1270 Owners Manual - Page 9
Moving the Wet/Dry Vac, Blowing Feature, Emptying the Drum - canada
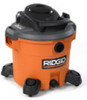 |
View all Ridgid WD1270 manuals
Add to My Manuals
Save this manual to your list of manuals |
Page 9 highlights
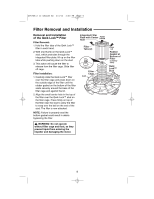
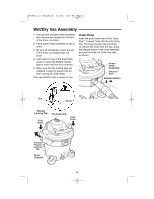
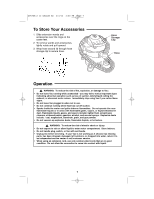
SP6765-2 12 GALLON ES 2/3/12 2:00 PM Page 9 Operation (continued) Emptying the Drum ! WARNING: To reduce the risk of injury from accidental starting, unplug power cord before emptying the drum. 1. The Vac comes equipped with a drain for easy emptying of liquids. Simply unscrew the drain cap and lift the opposite side slightly to empty the drum. 2. Another option is to remove the lid. Pull the flexible latches outward on each side of the lid to release from the drum. 3. While holding the latches out, lift the top assembly up and away from the drum. 4. Lay top assembly upside down on a clean area while emptying drum or changing filter. 5. Dump the drum contents into the proper waste disposal container. ! WARNING: To reduce the risk of back injury or falls, do not lift a Vac heavy with liquid or debris. Scoop or drain enough contents out to make the Vac light enough to lift comfortably. Moving the Wet/Dry Vac Should it become necessary to pick the Vac up to move it, the handles on the sides of the dust drum are used to lift. To maneuver the Vac, the pull handle above the inlet should be used. Blowing Feature Your Wet/Dry Vac features "Full Blowing". It can blow sawdust and other debris. Follow the steps below to use your Vac as a blower. ! WARNING: Always wear safety eyewear complying with ANSI Z87.1 (or in Canada, CSA Z94.3) before using as a blower. ! WARNING: To reduce the risk of injury to bystanders, keep them clear of blowing debris. ! CAUTION: Wear a dust mask if blowing creates dust which might be inhaled. ! CAUTION: To reduce the risk of hearing damage, wear ear protectors when using the Vac/Blower for extended time or in a noisy area. 1. Locate blowing port of your Wet/Dry Vac. 2. Insert locking end of hose into the blowing port of the Vac. 3. (Optional) Attach extension wand to swivel end of hose, then place a car nozzle on the wand. 4. Turn Vac on and you are ready to use your Vac as a blower. Dual-Flex Locking Hose Blowing Port Swivel End of Hose Extension Wand (optional) 9 Car Nozzle (optional)
-
 1
1 -
2
-
3
-
 4
4 -
 5
5 -
 6
6 -
 7
7 -
 8
8 -
 9
9 -
 10
10 -
 11
11 -
 12
12 -
 13
13 -
 14
14 -
15
-
16
-
17
-
18
-
19
-
20
-
21
-
22
-
23
-
24
-
25
-
26
-
27
-
28
-
29
-
30
-
31
-
32
-
33
-
34
-
35
-
36
-
37
-
38
-
39
-
40
-
41
-
42
 |
 |
