Rocketfish RF-AHD35 User Manual (English) - Page 10
Connecting the enclosure to your computer - manual
 |
UPC - 600603116131
View all Rocketfish RF-AHD35 manuals
Add to My Manuals
Save this manual to your list of manuals |
Page 10 highlights
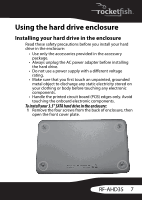
Connecting the enclosure to your computer Before connecting your external storage enclosure: • Confirm that your system supports SATA. If your system does not support SATA, please install an eSATA host card. • Confirm that the eSATA port on your system is working properly. If not, please refer to your computer manufacturer for assistance in getting the eSATA port to work properly. • To enable auto mount for SATA, your system must support Plug and Play. To connect the enclosure to your computer: 1 Plug one end of the dual-voltage power adapter into the enclosure, then plug the other end to an AC power outlet. 2 Plug one end of a USB 2.0 cable or eSATA cable to the enclosure, then plug the other end of the cable to your computer. 3 Press the power button to turn on the enclosure. The operating system automatically detects and sets up the new drive. Notes: The enclosure provides USB and eSATA dual interface for host connectivity. The high-speed eSATA port has priority over the USB port when both are connected at the same time. The USB hub and memory card reader only operate through the USB connection. Important: For new hard drives, you need to initialize and partition your hard drive before it will appear in Windows Explorer or on your Mac desktop. Please refer to your hard drive manufacturer's documentation or read " Creating A New Partition" section of this manual on page 25. 10
-
 1
1 -
2
-
3
-
4
-
 5
5 -
 6
6 -
 7
7 -
 8
8 -
 9
9 -
 10
10 -
 11
11 -
 12
12 -
 13
13 -
 14
14 -
 15
15 -
16
-
17
-
18
-
19
-
20
-
21
-
22
-
23
-
24
-
25
-
26
-
27
-
28
-
29
-
30
-
31
-
32
-
33
-
34
-
35
-
36
 |
 |
