Ryobi BD4600 English Manual - Page 15
Horizontal And Vertical Sanding, Surface Sanding On The Sanding Belt, Sanding Curved Pieces, Warning - 4 in x 36 in belt disc sander
 |
View all Ryobi BD4600 manuals
Add to My Manuals
Save this manual to your list of manuals |
Page 15 highlights
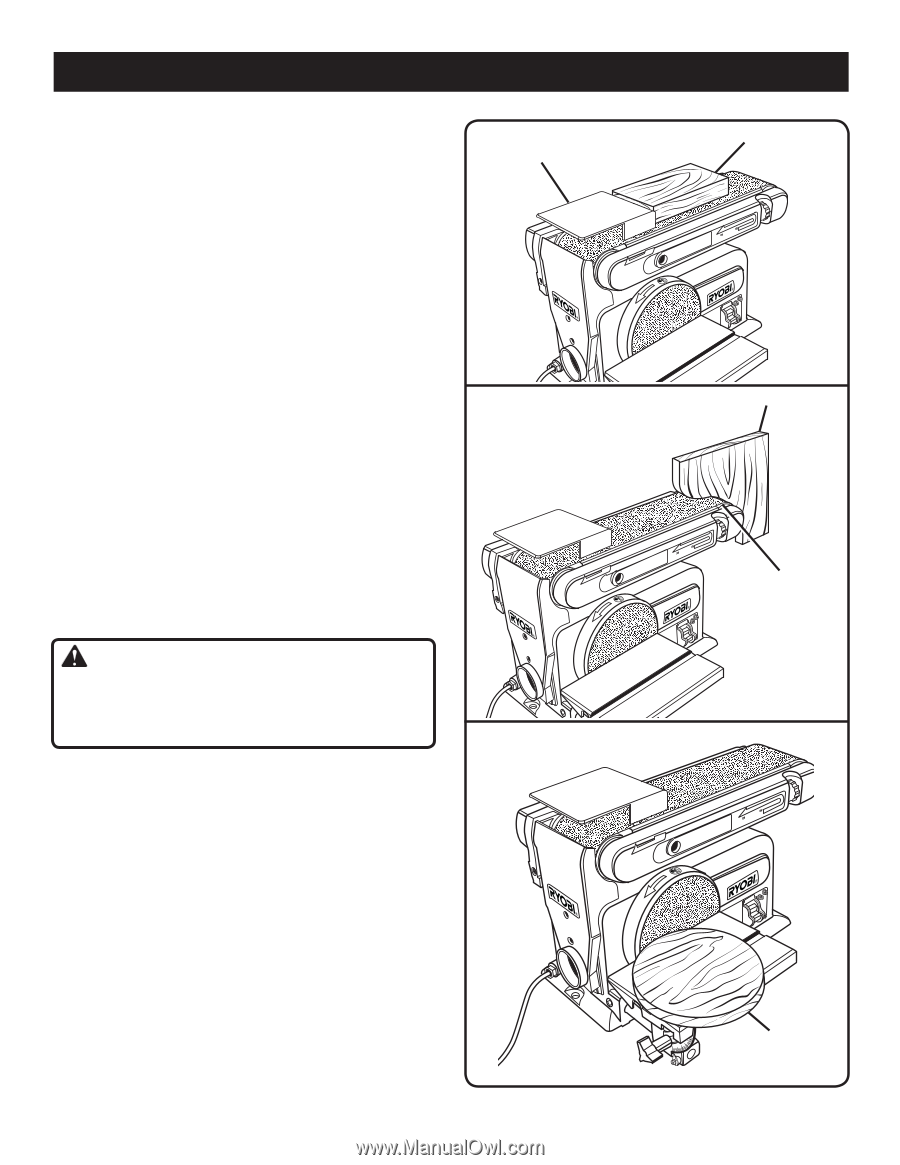
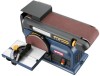
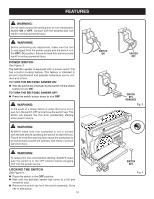
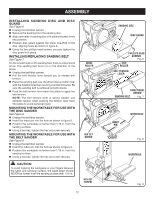
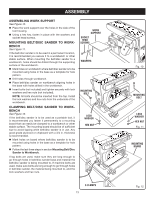
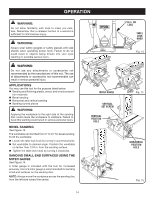
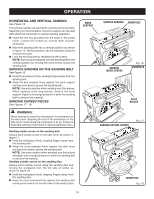
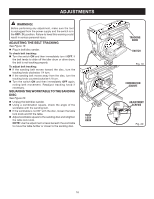
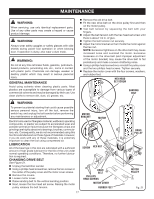
OPERATION HORIZONTAL AND VERTICAL SANDING See Figure 15. The belt/disc sander can sand both vertically and horizontally. Depending on the workpiece, the work support can be used with either the horizontal or vertical sanding operation. n Insert the hex key provided into the holes in the pulley cover. Loosen the screws by turning them counterclockwise. n Move the sanding belt into a vertical position as shown in figure 15. Vertical position can be adjusted using the vertical set screw. n Lock the sanding belt by retightening the screws. NOTE: Sand long workpieces with the sanding belt in the vertical position by moving the work evenly across the sanding belt. SURFACE SANDING ON THE SANDING BELT See Figure 16. n Hold the workpiece firmly, keeping fingers away from the sanding belt. n Keep the end pressed firmly against the work support moving work evenly across the sanding belt. NOTE: Use extra caution when sanding very thin pieces. When sanding extra long pieces, remove the work support. Apply only enough pressure to allow the sanding belt to remove the material. SANDING CURVED PIECES See Figures 17 - 18. WARNING: Never attempt to sand the end pieces of a workpiece on the idler drum. Applying the end of the workpiece on the idler drum could cause the workpiece to fly up. Failure to heed this warning could result in serious personal injury. Sanding inside curves on the sanding belt: Always sand inside curves on the idler drum as shown in figure 17. n Hold the workpiece firmly, keeping fingers away from the sanding belt. n Keep the curve pressed firmly against the idler drum moving work evenly across the sanding belt. NOTE: Use extra caution when sanding very thin pieces and apply only enough pressure to allow the sanding belt to remove the material. Sanding outside curves on the sanding disc: Always sand outside curves using the sanding disc and moving the workpiece from the left side of center as shown in figure 18. n Hold the workpiece firmly, keeping fingers away from the sanding disc. n Keep the curve pressed firmly against the sanding disc moving work evenly on the left side of the sanding disc. work SUPPORT SURFACE SANDING worKPIECE 4 x36 SANDING INSIDE CURVES Fig. 16 workPIECE 4 x36 IDLER Roller SANDING OUTSIDE CURVES Fig. 17 4 x36 workPIECE Fig. 18 15
-
 1
1 -
2
-
3
-
4
-
5
-
6
-
7
-
8
-
9
-
 10
10 -
 11
11 -
 12
12 -
 13
13 -
 14
14 -
 15
15 -
 16
16 -
 17
17 -
 18
18
 |
 |