Ryobi JM82K English Manual - Page 12
Depth Of Cut, Setting Depth Of Cut, Making Fine Adjustments
 |
View all Ryobi JM82K manuals
Add to My Manuals
Save this manual to your list of manuals |
Page 12 highlights
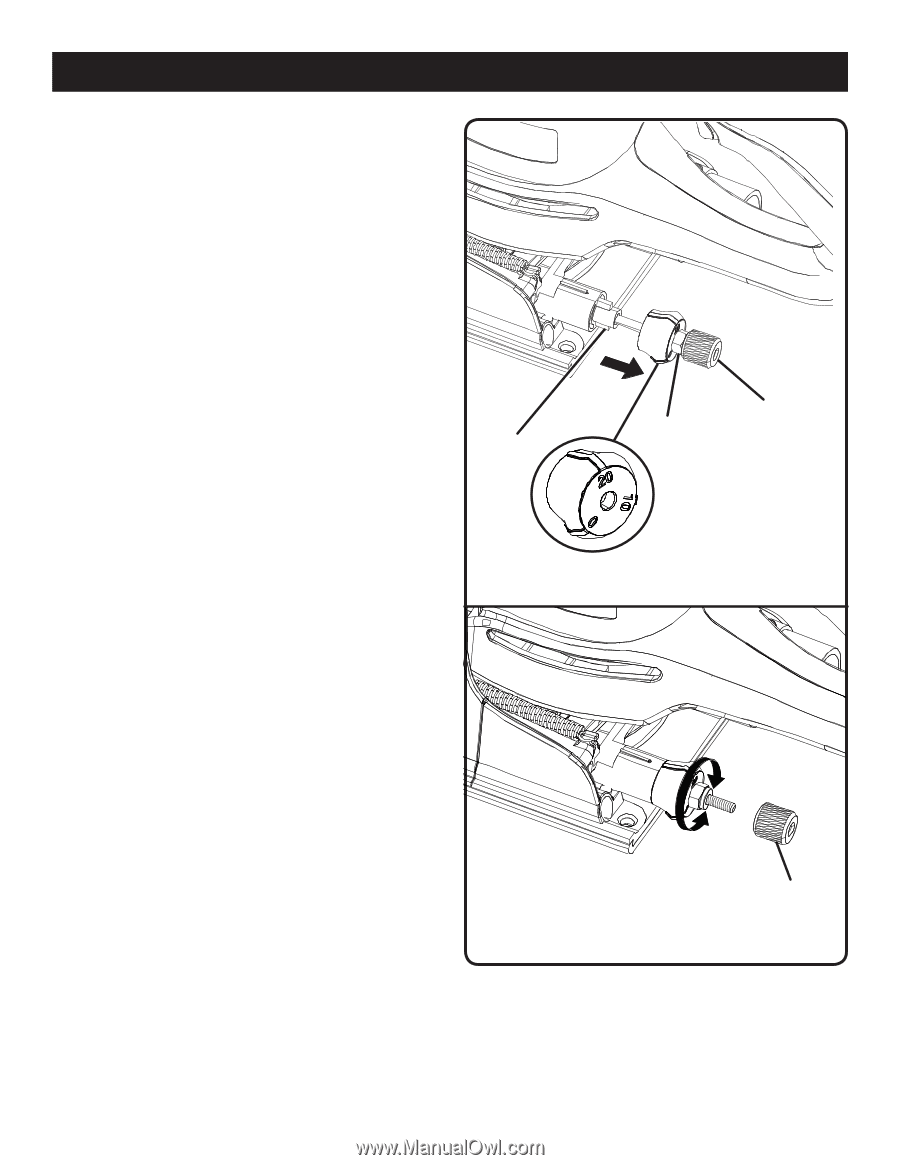
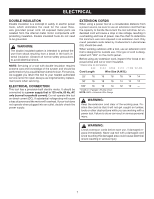
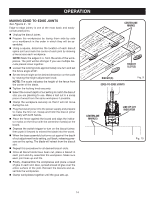
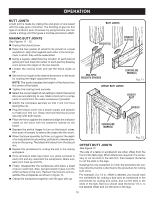
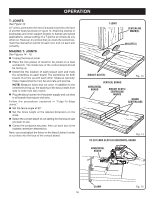
OPERATION DEPTH OF CUT The biscuit joiner can be adjusted to three standard cutting depths to accommodate three standard size biscuits - #0, #10, and #20. Adjustments are made by engaging slots on the depth adjustment knob with tabs on the rear base assembly. For example, when using a #0 size biscuit, rotate the depth adjustment knob to the slot marked 0. When using a #10 size biscuit, rotate the depth adjustment knob to the slot marked 10, and when using a #20 size biscuit rotate the depth adjustment knob to the slot marked 20. SETTING DEPTH OF CUT See Figure 5. n Unplug the biscuit joiner. n Select the correct depth of cut setting for the biscuit size you plan to use. To select depth of cut, pull the knurled adjustment knob and jam nut in the direction of the arrow in figure 5. NOTE: The knob and jam nut are spring loaded. Pulling them in the direction of the arrow puts pressure on the spring and releases pressure from the depth adjustment knob. n Rotate the depth adjustment knob until the desired slot setting aligns with the tabs on the rear base assembly. MAKING FINE ADJUSTMENTS See Figure 6. Make a test cut in a scrap piece of wood. Fit the correct size biscuit into the biscuit slot. The biscuit slot should be deep enough to allow slightly more than one-half of the biscuit into the slot. This extra room allows for proper alignment of the wood being joined. If the biscuit slot is too deep or too shallow, fine adjustments to the depth setting can be made by loosening the knurled adjustment knob and making fine adjustments with the jam nut. n Unplug the biscuit joiner. n Loosen the knurled adjustment knob. This knob is used as a lock nut only. Loosen by twisting it in the opposite direction away from the jam nut. n Rotate the jam nut to the right for a more shallow cut, or to the left for a deeper cut. n Once desired depth of cut is reached, hold the jam nut so that it will not move out of adjustment. Next, tighten the knurled adjustment knob against jam nut. n Recheck the depth setting by making a test cut in a scrap piece of wood. Also periodically check the depth setting for accuracy. Rotating the jam nut to the right will cut shallow biscuit slots. Rotating the jam nut to the left will cut deeper biscuit slots. TABS JAM NUT KNURLED ADJUSTMENT KNOB DEPTH ADJUSTMENT KNOB Fig. 5 KNURLED ADJUSTMENT KNOB Fig. 6 12
-
 1
1 -
2
-
3
-
4
-
5
-
6
-
 7
7 -
 8
8 -
 9
9 -
 10
10 -
 11
11 -
 12
12 -
 13
13 -
 14
14 -
 15
15 -
 16
16 -
 17
17 -
18
-
19
-
20
-
21
-
22
-
23
-
24
-
25
-
26
 |
 |