Ryobi JM82K English Manual - Page 17
Cutting Vertical Boards
 |
View all Ryobi JM82K manuals
Add to My Manuals
Save this manual to your list of manuals |
Page 17 highlights
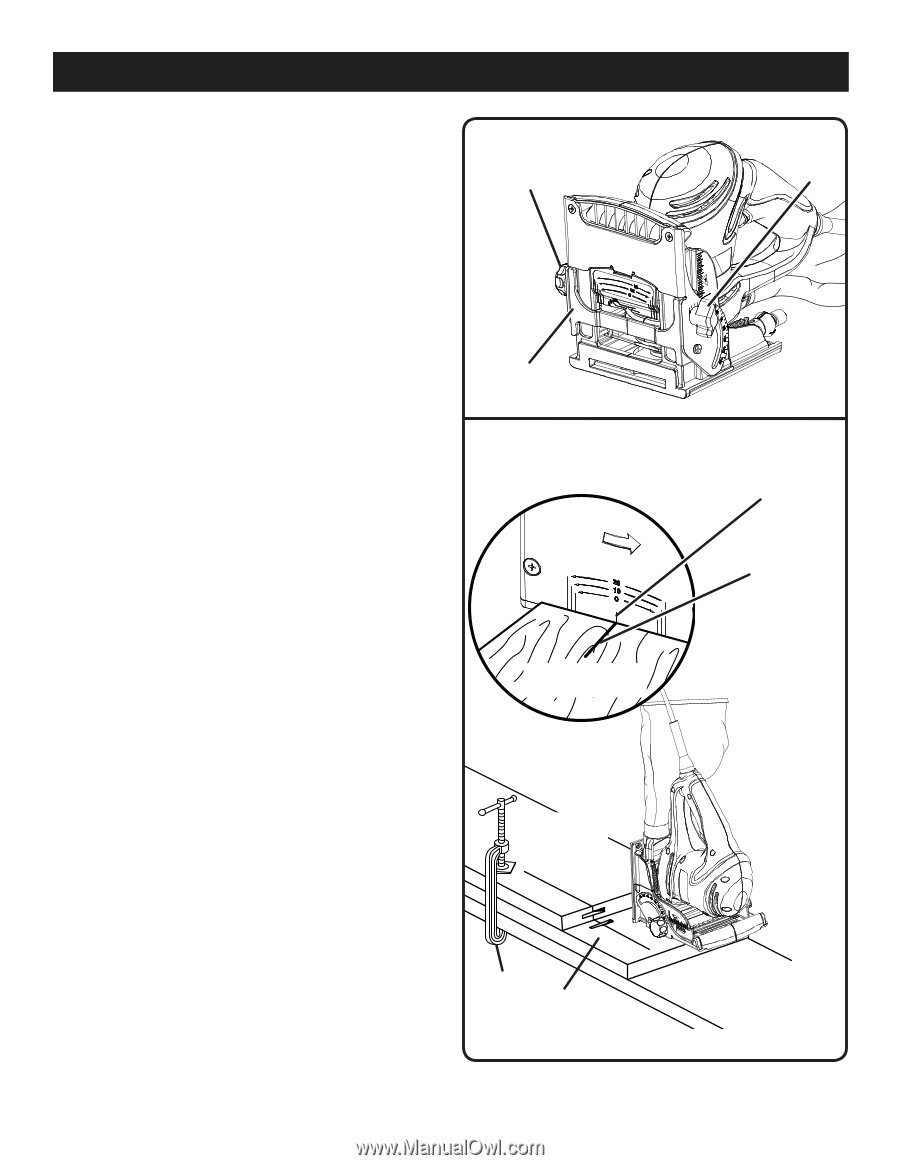
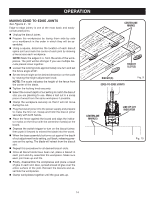
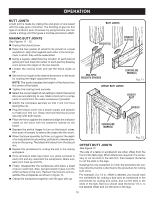
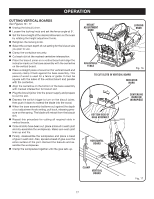
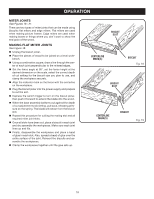
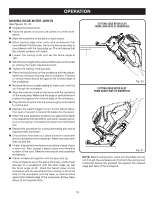
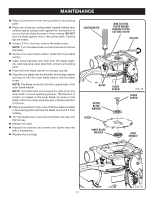
OPERATION CUTTING VERTICAL BOARDS See Figures 16 - 17. n Unplug the biscuit joiner. n Loosen the locking knob and set the fence angle at 0°. n Set the fence height at the desired dimension on the scale by rotating the height adjustment knob. n Retighten the locking knob. n Select the correct depth of cut setting for the biscuit size you plan to use. n Clamp the workpiece securely. n Cut each slot at the marked centerline intersection. n Place the biscuit joiner on a vertical board and align the indicator marks on the base assembly with the centerline on the vertical board. n Place a straight piece of wood on the vertical board and securely clamp it flush against the base assembly. This piece of wood is used for a fence or guide. It must be square with the sides of the vertical board and parallel with the centerline. n Align the centerline on the bottom of the base assembly with marked intersection for biscuit slot. n Plug the biscuit joiner into the power supply and prepare to cut the slot. n Depress the switch trigger to turn on the biscuit joiner, then push it down to extend the blade into the wood. n When the base assembly bottoms out against the depth of cut adjustment knob setting, pull back, releasing pressure on the spring. The blade will retract from the biscuit slot. n Repeat this procedure for cutting all required slots in vertical boards. n Once all slots have been cut, place a biscuit in each joint and dry-assemble the workpieces. Make sure each joint lines up and fits. n Finally, disassemble the workpieces and place a bead of glue in each slot. Also, spread a bead of glue over the entire surface of the joint. Reinsert the biscuits and assemble the workpieces. n Clamp the workpieces together until the glue sets up. HEIGHT ADJUSTMENT KNOB LOCKING KNOB ADJUSTABLE FENCE Fig. 16 TO CUT SLOTS IN VERTICAL BOARD INDICATOR MARK CENTERLINE MARK ON WORKPIECE BOTTOM SIDE OF BASE ASSEMBLY HORIZONTAL BOARD CLAMP VERTICAL BOARD 17 Fig. 17
-
 1
1 -
2
-
3
-
4
-
5
-
6
-
7
-
8
-
9
-
10
-
11
-
 12
12 -
 13
13 -
 14
14 -
 15
15 -
 16
16 -
 17
17 -
 18
18 -
 19
19 -
 20
20 -
 21
21 -
 22
22 -
23
-
24
-
25
-
26
 |
 |