Ryobi JS550LK English Manual - Page 13
Warning, Straight Cut, Using The Laser Guide
 |
View all Ryobi JS550LK manuals
Add to My Manuals
Save this manual to your list of manuals |
Page 13 highlights
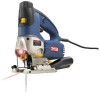
OPERATION STRAIGHT CUT See Figures 7 - 9. Your saw is equipped with a lock for locking the scrolling knob in the forward facing position. This should be locked for all straight cuts as shown in figure 8. A straight cut can be made by clamping a piece of wood or straightedge to the workpiece and guiding the edge of the saw against it. Make the cut from one direction only. Don't cut halfway and complete the cut from the opposite end. You can also use the supplied edge guide as shown in figure 8. Loosen the thumb screw and insert the end of the edge guide through the two slots in the base. Measure the distance to cut and tighten the thumb screw. Place the edge guide on the outside edge of the workpiece and cut in a straight path. WARNING: To avoid possible serious injury, keep hands and fingers from between the gear housing and saw blade clamp, and keep the guard in place. WARNING: Excessive side pressure to the blade could result in broken blades or damage to the material being cut. SCROLLING KNOB LOCK USING THE LASER GUIDE See Figure 9. WARNING: Do not stare into the laser beam or turn the laser on when the tool is not in use. Failure to do so could result in possible serious personal injury.The laser unit comes from the factory already installed and aligned. If the laser becomes misaligned after time refer to the "Adjustments" section. The jig saw is equipped with a laser guide to project a red line to show the cut path. Pull the switch trigger slightly to engage the laser guide. The laser guide will turn on before the jig saw and con- tinue to stay on for the cutting operation. The laser guide will turn off when the switch trigger is released. EDGE GUIDE LASER GUIDE Fig. 7 Fig. 8 Fig. 9 13
-
 1
1 -
2
-
3
-
4
-
5
-
6
-
7
-
 8
8 -
 9
9 -
 10
10 -
 11
11 -
 12
12 -
 13
13 -
 14
14 -
 15
15 -
 16
16 -
 17
17 -
 18
18 -
19
-
20
 |
 |
