Ryobi P3260 Operation Manual - Page 7
Operation
 |
View all Ryobi P3260 manuals
Add to My Manuals
Save this manual to your list of manuals |
Page 7 highlights
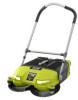
OPERATION WARNING: Do not allow familiarity with this product to make you careless. Remember that a careless fraction of a second is sufficient to inflict serious injury. WARNING: Always remove battery pack from the tool when you are assembling parts, making adjustments, cleaning, or when not in use. Removing battery pack will prevent accidental starting that could cause serious personal injury. WARNING: Do not use any attachments or accessories not recommended by the manufacturer of this product. The use of attachments or accessories not recommended can result in serious personal injury. APPLICATIONS You may use this product for the purpose listed below: Removing saw dust, construction debris, nails, screws and other items from hard surfaces such as workshop and garage floors. INSTALLING/REMOVING BATTERY PACK See Figure 5, page 12. To install: Insert the battery pack. Make sure the latches on each side of the battery pack snap in place and that battery pack is secured in the product before beginning operation. To remove: Depress the latches on each side of the battery pack. ON/OFF BUTTON See Figure 6, page 12. To turn the motor ON: Adjust the handle assembly to a comfortable operating position and height. Install the battery pack. Stand behind the sweeper with your hands on the handle grips. Depress the on/off button with your foot to start the motor. NOTE: When the motor is ON, the rotating brushes will spin continuously and the LED headlights will automatically turn on. The left and right brushes rotate in opposite directions. To turn the motor OFF: Depress the on/off button with your foot to stop the motor. NOTE: When the motor is OFF, the rotating brushes will stop spinning and the LED headlights will turn off. ADJUSTING THE BRISTLES See Figure 7, page 12. The bristle deflectors, on the left and right side of the unit, allow you to raise or lower the bristles for optimal cleaning. The bristles should be raised for general cleaning and lowered to clean corners and edges. To lower the bristles, push the deflectors down. To raise the bristles, pull the deflectors up. RAISING/LOWERING THE BRUSH HEIGHT See Figure 8, page 12. When shipped, the brush height is set to a low setting. Before using the sweeper for the first time, raise the brush height to the position best suited for your application. It is recommended that you lower the brush height (extend the rear caster) when picking up small debris or cleaning smooth surfaces and raise the brush height (retract the rear caster) when picking up large debris or cleaning rough surfaces. To change the brush height: Turn the motor OFF and remove the battery pack. Rotate the height adjustment knob clockwise to raise the brush height (retract the rear caster) and counterclockwise to lower the brush height (extend the rear caster). NOTE: The cordless sweeper should move smoothly across the cleaning surface. If the sweeper is difficult to move, raise the brush height (retract the rear caster). LED HEADLIGHTS LED headlights are located on the front of the unit to illuminate your path in low light conditions. The lights will operate continuously whenever the motor is running. USING THE CORDLESS SWEEPER See Figure 9, page 12. WARNING: Do not sweep over burning materials or electrical cords. Following this rule will reduce the risk of fire, electric shock and personal injury. 7 - English
-
 1
1 -
 2
2 -
 3
3 -
 4
4 -
 5
5 -
 6
6 -
 7
7 -
 8
8 -
 9
9 -
 10
10 -
 11
11 -
 12
12 -
13
-
14
-
15
-
16
-
17
-
18
-
19
-
20
-
21
-
22
-
23
-
24
-
25
-
26
-
27
-
28
-
29
-
30
-
31
-
32
 |
 |
