Ryobi P737 User Manual - Page 7
Operation
 |
View all Ryobi P737 manuals
Add to My Manuals
Save this manual to your list of manuals |
Page 7 highlights
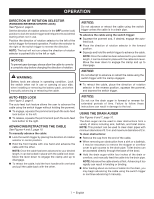
OPERATION DIRECTION OF ROTATION SELECTOR (FORWARD/REVERSE/CENTER LOCK) See Figure 2, page 9. Set the direction of rotation selector in the OFF (center lock) position to lock the switch trigger and help prevent accidental starting when not in use. Position the direction of rotation selector to the left of the switch trigger for forward operation. Position the selector to the right of the switch trigger to reverse the direction. NOTE: The tool will not run unless the direction of rotation selector is pushed fully to the left or right. NOTICE: To prevent gear damage, always allow the cable to come to a complete stop before changing the direction of rotation. WARNING: Battery tools are always in operating condition. Lock the switch when not in use or carrying at your side, when installing or removing the battery pack, and when manually advancing or retracting the cable. AUTO-FEED LOCK See Figure 3, page 9. The auto-feed lock feature allows the user to advance the cable using the switch trigger without holding the pommel. To engage, squeeze the pommel and push the auto-feed lock button to the left. To release, squeeze the pommel and push the auto-feed lock button to the right. ADVANCING/RETRACTING THE CABLE See Figures 4 and 5, page 10. To manually advance the cable: Lock the switch trigger by placing the direction of rotation selector in center position. Hold the front handle with one hand and advance the cable with the other. NOTE: Once the cable has been advanced to your desired length, it can be locked in place with the cable lock lever. Move the lever down to engage the clamp and up to disengage. To retract the cable, hold the front handle with one hand and pull the cable back with the other. NOTICE: Do not advance or retract the cable using the switch trigger unless the cable is in a drain pipe. To advance the cable using the switch trigger: Squeeze the pommel and, if desired, engage the auto- feed lock. Place the direction of rotation selector in the forward position. Squeeze and hold the switch trigger to advance the cable. NOTE: Once the cable has been advanced to your desired length, it can be locked in place with the cable lock lever. Move the lever down to engage the clamp and up to disengage. NOTICE: Do not attempt to advance or retract the cable using the switch trigger with the clamp engaged. To retract the cable, place the direction of rotation selector in the reverse position, squeeze the pommel, and depress the switch trigger. NOTICE: Do not run the drain auger in forward or reverse for extended periods of time. Failure to follow these instructions can result in damage to the tool. USING THE DRAIN AUGER See Figures 6 and 7, page 10. The drain auger can be used to clear obstructions from a variety of drains including sink, bathtub, and toilet drains. NOTE: This product can be used to clear drain pipes with minimum diameters of 0.75 in. and maximum diameters of 2 in. To clear obstructions: Remove the cap from the end of the cable. When removing an obstruction from a sink or a bathtub, it may be neccesary to remove the stopper or overflow cover to gain access to the drain pipe. Toilet drains can be accessed directly through the base of the bowl. Hold the drain auger within four inches of the drain or overflow, and manually feed the cable into the drain pipe. NOTE: Advance the cable slowly at first. Advancing it too rapidly can result in twisting or binding. After feeding about six inches of cable into the drain, you may begin advancing the cable using the switch trigger or continue advancing it manually. 7 - English
-
 1
1 -
 2
2 -
 3
3 -
 4
4 -
 5
5 -
 6
6 -
 7
7 -
 8
8 -
 9
9 -
 10
10 -
 11
11 -
 12
12 -
13
-
14
-
15
-
16
-
17
-
18
-
19
-
20
-
21
-
22
-
23
-
24
-
25
-
26
-
27
-
28
 |
 |