Ryobi PCL801B Operation Manual - Page 10
Operation
 |
View all Ryobi PCL801B manuals
Add to My Manuals
Save this manual to your list of manuals |
Page 10 highlights
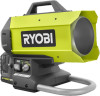
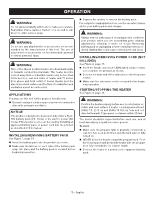
OPERATION WARNING: Do not allow familiarity with tools to make you careless. Remember that a careless fraction of a second is sufficient to inflict serious injury. WARNING: Do not use any attachments or accessories not recommended by the manufacturer of this tool. The use of attachments or accessories not recommended can result in serious personal injury. WARNING: Risk of fire. Never position heater at a downward angle or towards combustible materials. This heater must be located away from combustible surfaces by no less than 24 inches from rear and sides of heater and 72 inches from above and front outlet of heater. Heater must be placed on a level surface and the flow of combustion and ventilation air not be obstructed. APPLICATIONS You may use this tool for the purpose listed below: „ General heating of outdoor spaces and most construction sites with adequate ventilation NOTICE: This product is designed to be powered by either a Ryobi 18V battery pack (DC mode) or by electric power (AC mode). Either power source can be used by installing an approved battery pack or power cord into the product as described in this manual. INSTALLING/REMOVING BATTERY PACK See Figure 7, page 14. „ Insert the battery pack into the product as shown. „ Make sure the latches on each side of the battery pack snap into place and the battery pack is secured before beginning operation. „ Depress the latches to remove the battery pack. For complete charging instructions, see the operator's manuals for your battery pack and charger. WARNING: Always remove battery pack or unplug power cord from your product when you are assembling parts, making adjustments, cleaning, or when not in use. Removing battery pack or unplugging power cord will prevent accidental starting that could cause serious personal injury. INSTALLING/REMOVING POWER CORD (NOT INCLUDED) See Figure 8, page 15. „ Insert the female end of a 16 AWG rated outdoor exten- sion cord into the product as shown. „ Connect the male end of the extension cord to the power source. „ Make sure the extension cord is secured before begin- ning operation. STARTING/STOPPING THE HEATER See Figure 9, page 15. WARNING: Position the heater properly before use. Locate heater on stable and level surface if heater is running and at least (USA) 7 ft. (2.13 m) and (CAN) 10 ft (3 m) from and not directed toward LP (propane) containers within 20 feet. The heater should be inspected before each use, and at least annually by a qualified service person. To start: „ Make sure the propane tank is properly connected, a leak test has been performed, and the tank valve is fully turned on. „ NEVER direct the heater toward the propane tank. Position the propane tank behind the heater with the propane hose fully extended to its longest length. „ Connect the heater to a power cord or approved battery pack. 10 - English
-
 1
1 -
2
-
3
-
4
-
 5
5 -
 6
6 -
 7
7 -
 8
8 -
 9
9 -
 10
10 -
 11
11 -
 12
12 -
 13
13 -
 14
14 -
 15
15 -
16
-
17
-
18
-
19
-
20
-
21
-
22
-
23
-
24
-
25
-
26
-
27
-
28
-
29
-
30
-
31
-
32
-
33
-
34
-
35
-
36
 |
 |
