Ryobi RY40860 Operation Manual - Page 13
Operation
 |
View all Ryobi RY40860 manuals
Add to My Manuals
Save this manual to your list of manuals |
Page 13 highlights
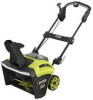
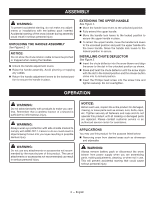
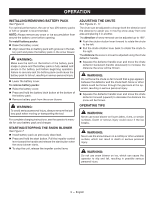
OPERATION INSTALLING/REMOVING BATTERY PACK See Figure 6. For optimal performance, the use of two 40V battery packs of 4Ah or greater is recommended. NOTE: Always remove any snow or ice accumulation from around the battery cover before opening. To install battery packs: Raise the battery cover. Align raised ribs on battery pack with grooves in the bat- tery port and place the battery pack in the snow blower. WARNING: Make sure the latch on the bottom of the battery pack snaps in place and the battery pack is fully seated and secure in the battery port before beginning operation. Failure to securely seat the battery pack could cause the battery pack to fall out, resulting in serious personal injury. Lower the battery cover. To remove battery packs: Raise the battery cover. Press and hold the battery latch button at the bottom of the battery pack. Remove battery pack from the snow blower. WARNING: To avoid serious personal injury, always remove the battery pack when moving or transporting the tool. For complete charging instructions, see the operator's manuals for your battery pack and charger. STARTING/STOPPING THE SNOW BLOWER See Figure 7. Install battery pack as previously described. Press and hold the start button. Pull the impeller control lever toward the handle and release the start button when the snow blower starts. To stop the unit, release the impeller control lever. ADJUSTING THE CHUTE See Figures 8 - 11. The chute can be adjusted to change both the direction and the distance to assist you in moving snow away from one area and placing it in another. The direction of snow removal can be adjusted up to 180º. Push the chute rotation lever forward to rotate the chute to the left. Pull the chute rotation lever back to rotate the chute to the right. The distance the snow is moved is adjusted using the chute deflector handle. Squeeze the deflector handle lever and move the chute deflector backward (handle downward) to increase the distance the snow will be thrown. WARNING: Do not force the chute so far forward that a gap appears between the deflector and the chute itself. Snow or other debris could be thrown through the gap back at the operator, resulting in serious personal injury. Squeeze the deflector handle lever and move the chute deflector forward (upward) to decrease the distance the snow will be thrown. OPERATING TIPS WARNING: Never use snow blower on frozen lakes, rivers, or similar surfaces. Death or serious injury could occur if the ice breaks. WARNING: Never use the snow blower on a rooftop or other unstable surface, which can result in death or serious personal injury. WARNING: Do not use snow blower on ice, which can cause the operator to slip and fall, resulting in possible serious personal injury. 9 - English
-
 1
1 -
2
-
3
-
4
-
5
-
6
-
7
-
 8
8 -
 9
9 -
 10
10 -
 11
11 -
 12
12 -
 13
13 -
 14
14 -
 15
15 -
 16
16 -
 17
17 -
 18
18 -
19
-
20
-
21
-
22
-
23
-
24
-
25
-
26
-
27
-
28
-
29
-
30
-
31
-
32
-
33
-
34
-
35
-
36
-
37
-
38
-
39
-
40
 |
 |