Ryobi RY40860 Operation Manual - Page 15
Maintenance
 |
View all Ryobi RY40860 manuals
Add to My Manuals
Save this manual to your list of manuals |
Page 15 highlights
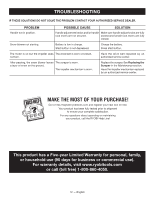
MAINTENANCE GENERAL MAINTENANCE Avoid using solvents when cleaning plastic parts. Most plastics are susceptible to damage from various types of commercial solvents and may be damaged by their use. Use clean cloths to remove dirt, dust, oil, grease, etc. WARNING: Do not at any time let brake fluids, gasoline, petroleumbased products, penetrating oils, etc., come in contact with plastic parts. Chemicals can damage, weaken, or destroy plastic which can result in serious personal injury. LUBRICATION All of the bearings in this product are lubricated with a sufficient amount of high grade lubricant for the life of the unit under normal operating conditions. Therefore, no further bearing lubrication is required. STORING THE SNOW BLOWER See Figure 12. CAUTION: Ensure all melted snow that may drip from the snow blower is properly wiped up to prevent a slip and fall hazard. Remove the batteries and store in a secure location out of the reach of children. Before storage, wipe any moisture, dirt, or debris from the battery area. Wipe the snow blower with a clean dry cloth. Check all nuts, bolts, knobs, screws, fasteners, etc., for tightness. Inspect moving parts for damage, breakage, and wear. Have repairs made on any damaged or missing parts. Unlock the handle lock levers, lower the upper handle, then return the levers to the locked position. Pull the handle adjustment levers out and fold the intermediate handle to the storage position. NOTICE: Do not allow the chute rotation cable to become pinched or trapped when lowering the handle. Store snow blower indoors in a clean, dry place out of the reach of children. Do not store near corrosive materials such as fertilizer or rock salt. REPLACING THE SCRAPER See Figures 13 - 15 The scraper may need to be replaced when a layer of snow remains on the ground after making a pass. To order, call customer service and ask for part number 537724001. n Remove the 4 screws from one side panel with a T20 Torx screwdriver (not included) and set aside. n Repeat for the other side. n Tilt the unit forward as shown to allow access to the screws for the scraper. n Remove the 7 T20 screws from the scraper. Discard the old scraper. n Install the new scraper and reinstall the screws. NOTE: Make sure all screws are tightened securely. Do not overtighten. n Reinstall the side panels and screws on both sides. 11 - English
-
 1
1 -
2
-
3
-
4
-
5
-
6
-
7
-
8
-
9
-
 10
10 -
 11
11 -
 12
12 -
 13
13 -
 14
14 -
 15
15 -
 16
16 -
 17
17 -
 18
18 -
 19
19 -
 20
20 -
21
-
22
-
23
-
24
-
25
-
26
-
27
-
28
-
29
-
30
-
31
-
32
-
33
-
34
-
35
-
36
-
37
-
38
-
39
-
40
 |
 |
