Ryobi TC401 Operation Manual - Page 9
Assembly
 |
View all Ryobi TC401 manuals
Add to My Manuals
Save this manual to your list of manuals |
Page 9 highlights
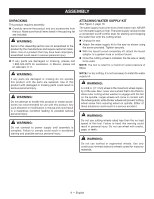
ASSEMBLY UNPACKING This product requires assembly. n Carefully remove the product and any accessories from the box. Make sure that all items listed in the packing list are included. WARNING: Items in this Assembly section are not assembled to the product by the manufacturer and require customer installation. Use of a product that may have been improperly assembled could result in serious personal injury. n If any parts are damaged or missing, please call 1-800-525-2579 for assistance. In Mexico, please call 01-800-843-1111. WARNING: If any parts are damaged or missing do not operate this product until the parts are replaced. Use of this product with damaged or missing parts could result in serious personal injury. WARNING: Do not attempt to modify this product or create accessories not recommended for use with this product. Any such alteration or modification is misuse and could result in a hazardous condition leading to possible serious personal injury. WARNING: Do not connect to power supply until assembly is complete. Failure to comply could result in accidental starting and possible serious personal injury. ATTACHING WATER SUPPLY KIT See Figure 4, page 15. The water supply must come from a fresh water main. NEVER turn the water supply on high. The water supply valve provides a convenient on/off control lever for starting and stopping the water flow onto the cutting wheel. n Unplug the saw. n Attach the water supply kit to the saw as shown using the screw provided. Tighten securely. n With the faucet turned completely off, attach the faucet adaptor to a garden hose or outdoor faucet. n Once the cutting wheel is installed, the tile saw is ready to be used. NOTE: The tool is rated for a maximum water pressure of 60psi. NOTE: For dry cutting, it is not necessary to install the water supply kit. WARNING: A 4-3/8 in. (111 mm) wheel is the maximum wheel capacity of the saw. Also, never use a wheel that is too thick to allow outer cutting wheel washer to engage with the flat on the spindle. Larger wheels will come in contact with the wheel guards, while thicker wheels will prevent cutting wheel screw from securing wheel on spindle. Either of these situations could result in a serious accident. WARNING: Do not use cutting wheels rated less than the no load speed of this tool. Failure to heed this warning could result in personal injury. Do not use wheel with cracks, gaps, or teeth. WARNING: Do not use toothed or segmented wheels. Use only continuous rimmed diamond wheels suited for masonry materials. 9 - English
-
 1
1 -
2
-
3
-
 4
4 -
 5
5 -
 6
6 -
 7
7 -
 8
8 -
 9
9 -
 10
10 -
 11
11 -
 12
12 -
 13
13 -
 14
14 -
15
-
16
-
17
-
18
-
19
-
20
-
21
-
22
-
23
-
24
-
25
-
26
-
27
-
28
-
29
-
30
-
31
-
32
-
33
-
34
-
35
-
36
-
37
-
38
-
39
-
40
-
41
-
42
-
43
-
44
 |
 |