Samsung 204TS Quick Guide Ver.1.0 (English) - Page 11
In Analog or Digital Mode, turns on Video screens in PIP Mode.
 |
View all Samsung 204TS manuals
Add to My Manuals
Save this manual to your list of manuals |
Page 11 highlights
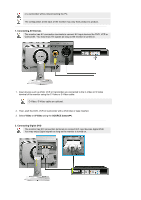
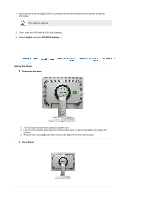
Although the values are carefully chosen by our engineers, the pre-configured values may not be comfortable to your eyes depending on your taste. If this is the case, adjust the brightness and contrast by using the OSD menu. 2) Entertain : High brightness For watching motion pictures such as a DVD or Video CD. 3) Internet : Medium brightness For working with a mixture of images such as text and graphics. 4) Text : Normal brightness For documentations or works involving heavy text. >>Click here to see an animation clip Digital(DVD)/Video /S-Video : Mode button The Monitor has four automatic picture settings ("Dynamic", "Standard", "Movie" and "Custom") that are preset at the factory. You can activate either Dynamic, Standard, Movie, or Custom. You can select "Custom" which automatically recalls your personalized picture settings. 1) Dynamic 2) Standard 3) Movie 4) Custom >>Click here to see an animation clip Brightness button [ ] When OSD is not on the screen, push the button to adjust brightness. >>Click here to see an animation clip Enter button [ ] / SOURCE button Activates a highlighted menu item. / Push the 'SOURCE', then selects the video signal while the OSD is off. (When the source button is pressed to change the input mode, a message appears in the upper left of the screen displaying the current mode -- Analog, Digital, Video and SVideo input signal.) Note : If you select the Digital mode, you must connect your monitor to the graphic card's or Digital DVD's DVI port using the DVI cable. AUTO button (Available in analog mode only) When the 'AUTO' button is pressed, the Auto Adjustment screen appears as shown in the animated screen on the center. Auto adjustment allows the monitor to self-adjust to the incoming video signal. The values of fine, coarse and position are adjusted automatically. >>Click here to see an animation clip PIP button ( Available in Analog/Digital(DVI) Mode Only ) In Analog or Digital Mode, turns on Video screens in PIP Mode. Power button Use this button for turn the monitor on and off. See PowerSaver described in the manual for further information regarding power saving functions. For energy conservation, turn your monitor OFF when it is not needed, or when leaving it unattended for long periods.
-
 1
1 -
2
-
3
-
4
-
5
-
 6
6 -
 7
7 -
 8
8 -
 9
9 -
 10
10 -
 11
11 -
 12
12 -
 13
13 -
 14
14 -
 15
15 -
 16
16 -
17
-
18
-
19
-
20
-
21
-
22
-
23
-
24
-
25
-
26
-
27
-
28
-
29
-
30
-
31
-
32
-
33
-
34
-
35
-
36
-
37
-
38
-
39
-
40
-
41
-
42
-
43
-
44
-
45
-
46
-
47
-
48
-
49
-
50
-
51
-
52
-
53
-
54
-
55
-
56
-
57
-
58
-
59
-
60
-
61
-
62
-
63
-
64
-
65
-
66
-
67
-
68
-
69
-
70
-
71
-
72
-
73
-
74
-
75
-
76
 |
 |
