Samsung DMT400RHS Installation Guide Ver.1.0 (English, French, Spanish) - Page 14
Placing The Dishwasher And Connecting The Hot, Water Supply Line - no power
 |
UPC - 036725593985
View all Samsung DMT400RHS manuals
Add to My Manuals
Save this manual to your list of manuals |
Page 14 highlights
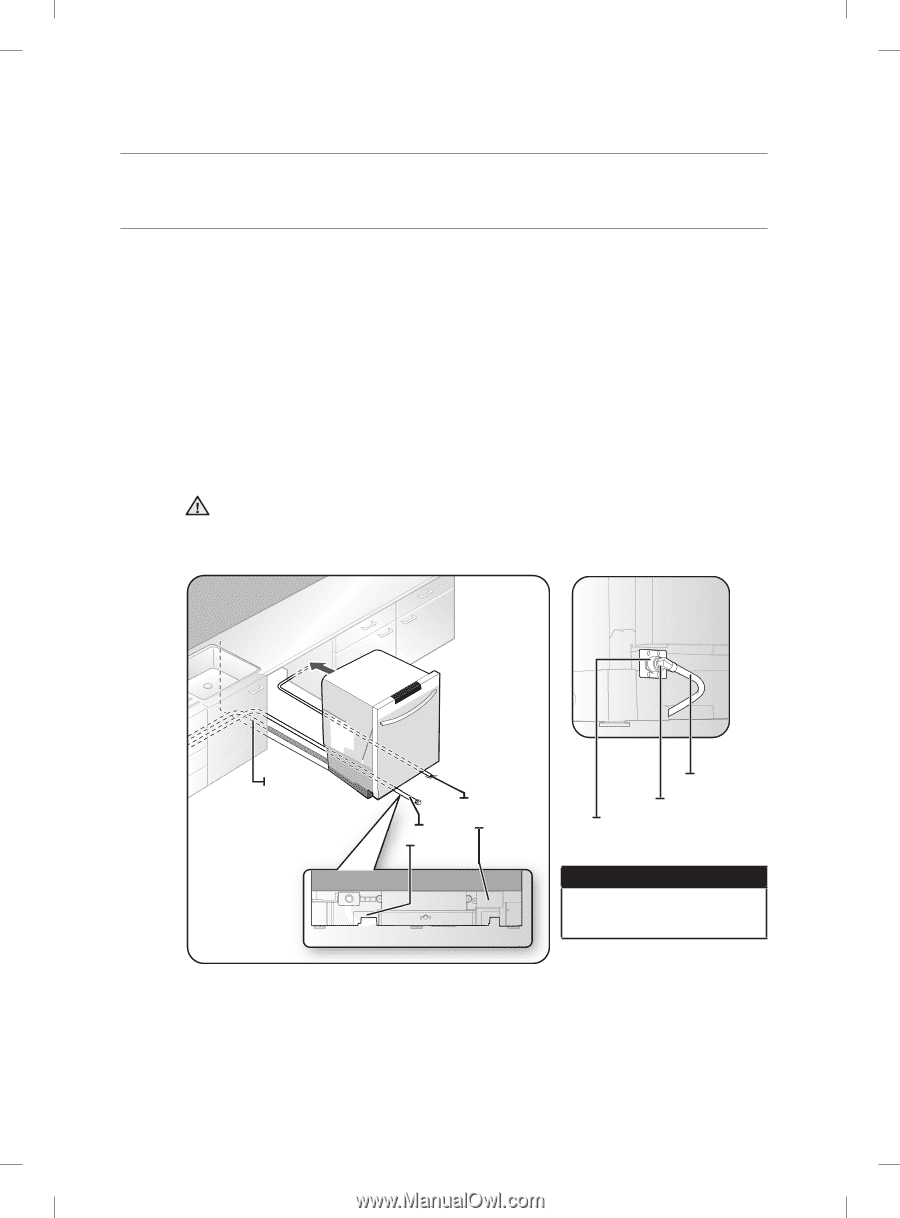
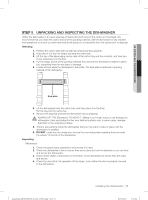
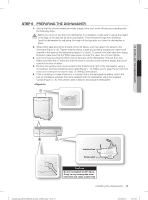
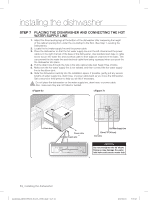
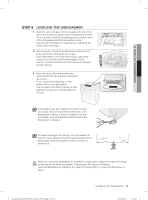
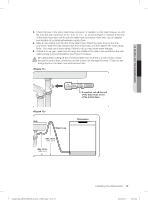
installing the dishwasher STEP 7 PLACING THE DISHWASHER AND CONNECTING THE HOT WATER SUPPLY LINE 1. Adjust the three leveling legs at the bottom of the dishwasher after measuring the height of the cabinet opening from under the countertop to the floor. (See Step 7, Leveling the Dishwasher.) 2. Locate the hot water supply line and the power cable. 3. Place the dishwasher so that the hot water supply line is in the left channel and the power cable is in the right channel of the base of the dishwasher. Use standard duct tape or cable ties to secure the water line and electrical cable to their adjacent channels in the base. This can prevent the the water line and electrical cable from being squeezed when you push the the dishwasher into place. 4. Pull the drain hose through the hole in the sink cabinet side wall. Keep it free of kinks. 5. Make sure the hot water supply line is not twisted, and then connect the hot water supply line to the elbow joint. 6. Slide the dishwasher carefully into the installation space. If possible, gently pull any excess lengths of water supply line, drain hose, or power cable back as you move the dishwasher. Get a second or third person to help you do this if necessary. Do not place the dishwasher on the water supply line, drain hose, or power cable. CAUTION Also, make sure they are not folded or twisted. Drain hose Power cable Hot Water Supply Line Hot Water Supply Line Elbow( ³/8" (9.5mm)) Inlet valve CAUTION Do not overtighten the 90˚ elbow. Doing so may damage the water inlet valve and cause a water leak 14_ installing the dishwasher installation_DD68-00046A-06_EN_130401.indd Sec3:14 2013-04-01 5:05:23
-
 1
1 -
2
-
3
-
4
-
5
-
6
-
7
-
8
-
 9
9 -
 10
10 -
 11
11 -
 12
12 -
 13
13 -
 14
14 -
 15
15 -
 16
16 -
 17
17 -
 18
18 -
 19
19 -
20
-
21
-
22
-
23
-
24
-
25
-
26
-
27
-
28
-
29
-
30
-
31
-
32
-
33
-
34
-
35
-
36
-
37
-
38
-
39
-
40
-
41
-
42
-
43
-
44
-
45
-
46
-
47
-
48
-
49
-
50
-
51
-
52
-
53
-
54
-
55
-
56
-
57
-
58
-
59
-
60
-
61
-
62
-
63
-
64
-
65
-
66
-
67
-
68
-
69
-
70
-
71
-
72
 |
 |