Samsung DVD V6700 User Manual (ENGLISH) - Page 14
Connection to a TV, Connecting to a TV (Progressive) - remote control
 |
UPC - 036725607712
View all Samsung DVD V6700 manuals
Add to My Manuals
Save this manual to your list of manuals |
Page 14 highlights
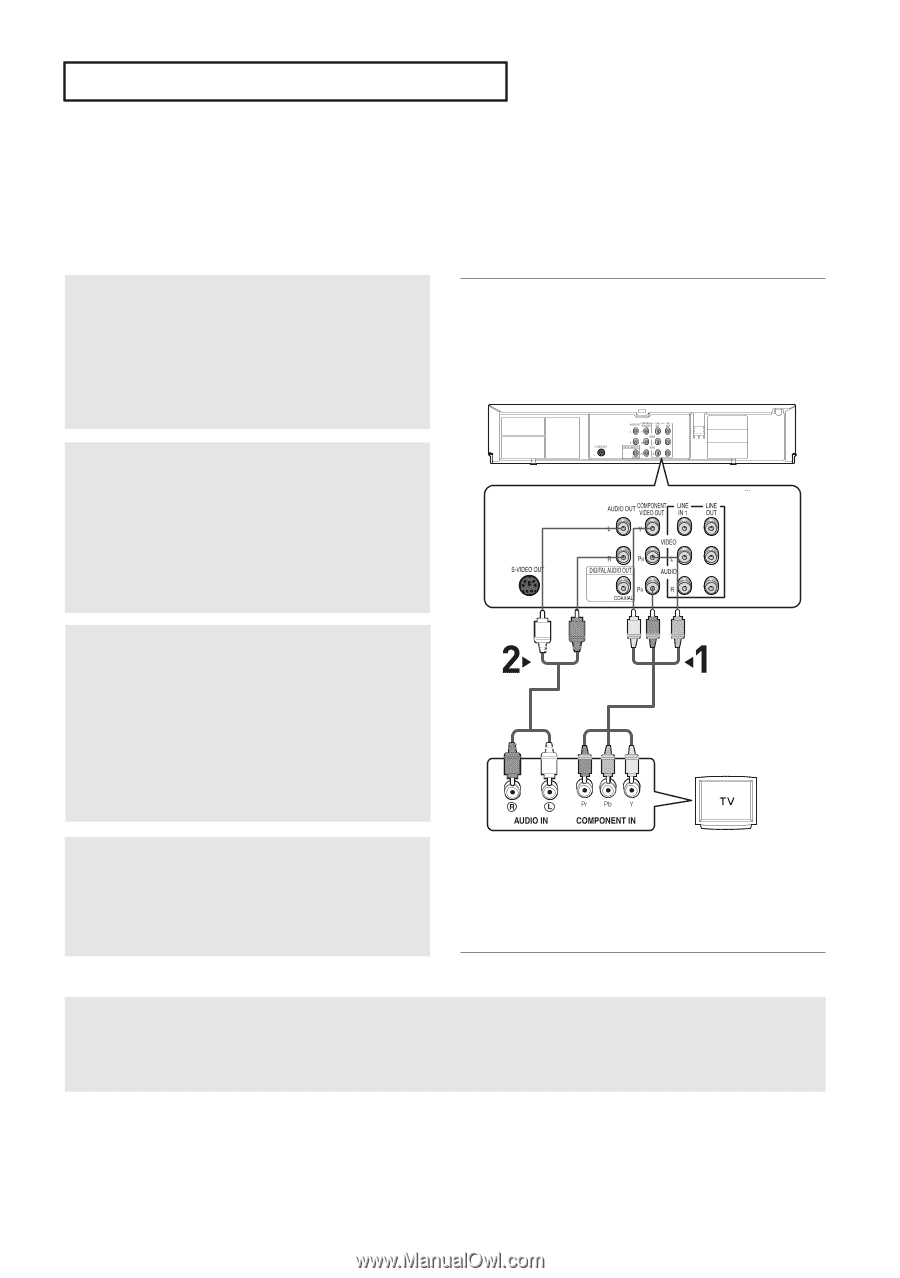
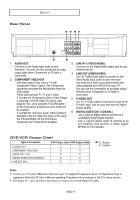
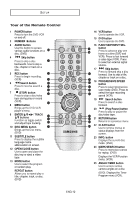
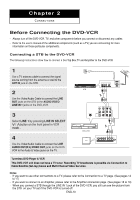
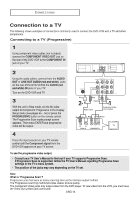
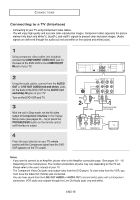
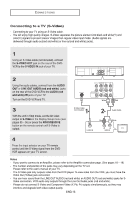
CONNECTIONS Connection to a TV The following shows examples of connections commonly used to connect the DVD-VCR with a TV and other components. Connecting to a TV (Progressive) 1 Using component video cables (not included), connect the COMPONENT VIDEO OUT jack on the rear of the DVD-VCR to the COMPONENT IN jack of your TV. 2 Using the audio cables, connect from the AUDIO OUT or LINE OUT AUDIO (red and white) jacks on the rear of the DVD-VCR to the AUDIO (red and white) IN jacks of your TV. Turn on the DVD-VCR and TV. 3 With the unit in Stop mode, set the Alt video output to Component: Progressive in the Display Setup menu (see pages 55 ~ 56) or press the PROGRESSIVE button on the remote control. The Progressive Scan mode prompt screen appears. Then press ENTER and progressive video will be output. White Red Green Blue Red Audio Cable Component Cable (not included) Red White Red Blue Green 4 Press the input selector on your TV remote control until the Component signal from the DVD-VCR appears on your TV screen. To see the progressive video output, - Consult your TV User's Manual to find out if your TV supports Progressive Scan. If Progressive Scan is supported, follow the TV User's Manual regarding Progressive Scan settings in the TV's menu system. - The position of the jacks may vary depending on the TV set. Note What is "Progressive Scan"? Progressive scan has twice as many scanning lines as the interlace output method. The Progressive scanning method provides clearer picture quality. The Component Video jacks only output video from the DVD player. To view video from the VCR, you must have the Video Out (yellow) jack connected. ENG-14
-
 1
1 -
2
-
3
-
4
-
5
-
6
-
7
-
8
-
 9
9 -
 10
10 -
 11
11 -
 12
12 -
 13
13 -
 14
14 -
 15
15 -
 16
16 -
 17
17 -
 18
18 -
 19
19 -
20
-
21
-
22
-
23
-
24
-
25
-
26
-
27
-
28
-
29
-
30
-
31
-
32
-
33
-
34
-
35
-
36
-
37
-
38
-
39
-
40
-
41
-
42
-
43
-
44
-
45
-
46
-
47
-
48
-
49
-
50
-
51
-
52
-
53
-
54
-
55
-
56
-
57
-
58
-
59
-
60
-
61
-
62
-
63
-
64
-
65
-
66
-
67
-
68
-
69
-
70
-
71
-
72
-
73
-
74
-
75
-
76
-
77
-
78
-
79
-
80
-
81
-
82
-
83
-
84
 |
 |