Samsung F2080 Quick Guide (ENGLISH) - Page 6
Connecting with a PC - problem
 |
UPC - 729507808994
View all Samsung F2080 manuals
Add to My Manuals
Save this manual to your list of manuals |
Page 6 highlights
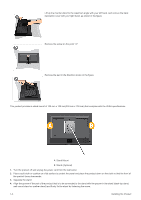
• If you use a screw that is longer than the standard specifications, the inside of the product may be damaged. • For wall mounts that are not compatible with the standard VESA specifications, the length of the screw may differ depending on the corresponding specifications. • Do not use screws that are incompatible with the standard VESA specifications and do not assemble them using excessive force. This may result in damage to the product or injury due to the product falling. The company shall not be held liable for any damage or injury. • The company shall not be held liable for any damage to the product or injury caused by using a stand that is not compatible with the specified specifications or due to an installation not performed by an authorized installation engineer. • When installing the product using a wall mount, purchase a wall mount that provides at least 10 cm of space from the wall. • The company shall not be held liable for any problems caused by using a stand that is not compatible with the specified specifications. • Use the wall mount according to the international specifications. 1-4 Connecting with a PC The connecting part may differ depending on the product model. 1. Connect the product to a PC depending on the video output supported by the PC. • When the graphics card provides D-Sub (analog) output • Connect the [RGB IN] port of the product to the [D-Sub] port of the PC with the D-Sub cable. • When the graphics card provides DVI (digital) output • Connect the [DVI IN 1/DVI IN 2] port of the product to the DVI port of the PC with the DVI cable.. 2. Connect one end of the power cord to the POWER port of the product and connect the other end of the power cord to the 220V or 110V wall outlet. Installing the Product 1-4
-
 1
1 -
 2
2 -
 3
3 -
 4
4 -
 5
5 -
 6
6 -
 7
7 -
 8
8 -
 9
9 -
 10
10 -
 11
11 -
 12
12
 |
 |
