Samsung F2080 Quick Guide (ENGLISH) - Page 8
Product Operating Buttons
 |
UPC - 729507808994
View all Samsung F2080 manuals
Add to My Manuals
Save this manual to your list of manuals |
Page 8 highlights
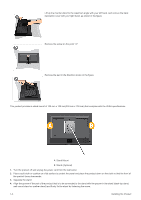
Locking the product 1. Insert the locking part of the locking device into the hole of the Kensington lock of the product and turn it in the locking direction. 2. Connect the Kensington lock cable. 3. Tie the Kensington lock cable to a desk or heavy object. You can purchase the locking device from an electronics store, an online shop, or our service center. 1-6 Product Operating Buttons Product Operating Buttons Icon MENU ▲/▼ /SOURCE Description Press this button to view the On Screen Display (OSD). This button is also used to exit the OSD or to return to a higher-level OSD menu * OSD Adjustment Lock This function locks the OSD in order to maintain the current settings or to prevent the settings from being changed by another person On: If you press and hold the MENU button down for 5 seconds, the OSD Adjustment Lock function is activated. Off: If you press and hold the MENU button down for 5 seconds again, the OSD Adjustment Lock function is disabled. Even if the OSD Adjustment Lock function is activated, users can adjust the brightness and contrast and can set up the adjustment function assigned to the [ ]. Use these buttons to navigate the menu or to adjust a value in the OSD. Users can set the Customized Key to one of the following functions. If the user presses the Customized Key[ ] after setting it, the configured function will be performed - - - You can set the function of the Customized Key by selecting "SETUP&RESET -> Customized Key" in the OSD. When OSD is not on the screen, push the button to adjust brightness. Use this button to select a function If you press the [ /SOURCE] button when there is no OSD, the input signal (Analog/Digital 1/Digital 2) is switched. When the input signal is switched by pressing [ /SOURCE] button or the product is turned on, a message displaying the selected input signal appears at the top left of the screen.) To select digital mode, you have to connect the product and the PC with the DVI cable. Installing the Product 1-6
-
 1
1 -
2
-
 3
3 -
 4
4 -
 5
5 -
 6
6 -
 7
7 -
 8
8 -
 9
9 -
 10
10 -
 11
11 -
 12
12
 |
 |
