Samsung HPS5073 User Manual (ENGLISH) - Page 65
Current OSD, Function, ENTER, WISELINK, Zoom function information icon, Printing the Photo Image - tv model
 |
UPC - 036725250772
View all Samsung HPS5073 manuals
Add to My Manuals
Save this manual to your list of manuals |
Page 65 highlights
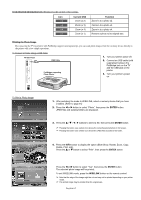
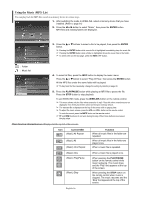
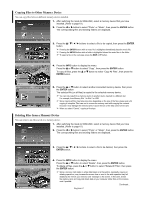
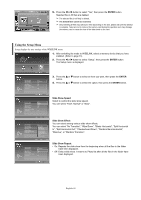
Zoom function information icon (Displayed at the top left of the screen). Icon Current OSD Zoom (x 2) Zoom (x 3) Zoom (x 4) Zoom (x 1) Function Zoom-in to a photo x2. Zoom-in to a photo x3. Zoom-in to a photo x4. Restore a photo to its original size. Printing the Photo Image By connecting the TV to printers with PictBridge support (sold separately), you can send photo images from the memory device directly to the printer with a few simple operations. To Connect a Printer Using a USB Cable TV Side Panel USB Cable PictBridge-supporting Photo Printer 1. Turn your printer power off. 2. Connect an USB cable (sold separately) between the PictBridge jack on the TV and the USB jack on the printer. 3. Turn your printer's power on. To Print a Photo Image 1. After switching the mode to WISELINK, select a memory device that you have installed. (Refer to page 61) 2. Press the œ or √ button to select "Photo", then press the ENTER button. JPEG files and existing folders are displayed. 219x171 6 KBytes May 05,2006 3/130 Move Enter Return œœ 1/10 Page √√ 3. Press the buttons to select a file, then press the ENTER button. ➢ Pressing the button over a photo icon shows the currently selected photo in full screen. ➢ Pressing the button over a folder icon shows the JPEG files included in the folder. Move Enter Photo Menu Return Slide Show Rotate Zoom Copy Delete Print List Exit Print Do you want to print the file? Photo0001 Yes No Move Enter Return 4. Press the INFO button to display the option (Slide Show, Rotate, Zoom, Copy, Delete, Print, List). Press the ... or † button to select "Print", then press the ENTER button. Press the œ or √ button to select "Yes", then press the ENTER button. The selected photo image will be printed. To exit WISELINK mode, press the WISELINK button on the remote control. ➢ Note that the edge of the image might be cut and may not be printed depending on your printer model. ➢ The printed image may be smaller than the original size. English-65
-
 1
1 -
2
-
3
-
4
-
5
-
6
-
7
-
8
-
9
-
10
-
11
-
12
-
13
-
14
-
15
-
16
-
17
-
18
-
19
-
20
-
21
-
22
-
23
-
24
-
25
-
26
-
27
-
28
-
29
-
30
-
31
-
32
-
33
-
34
-
35
-
36
-
37
-
38
-
39
-
40
-
41
-
42
-
43
-
44
-
45
-
46
-
47
-
48
-
49
-
50
-
51
-
52
-
53
-
54
-
55
-
56
-
57
-
58
-
59
-
 60
60 -
 61
61 -
 62
62 -
 63
63 -
 64
64 -
 65
65 -
 66
66 -
 67
67 -
 68
68 -
 69
69 -
 70
70 -
71
-
72
-
73
-
74
-
75
-
76
 |
 |
