Samsung HT-X20 User Manual (user Manual) (ver.1.0) (English) - Page 10
Connecting the Video Out to your TV, Resetting the Wireless Receiving Module - remote
 |
View all Samsung HT-X20 manuals
Add to My Manuals
Save this manual to your list of manuals |
Page 10 highlights
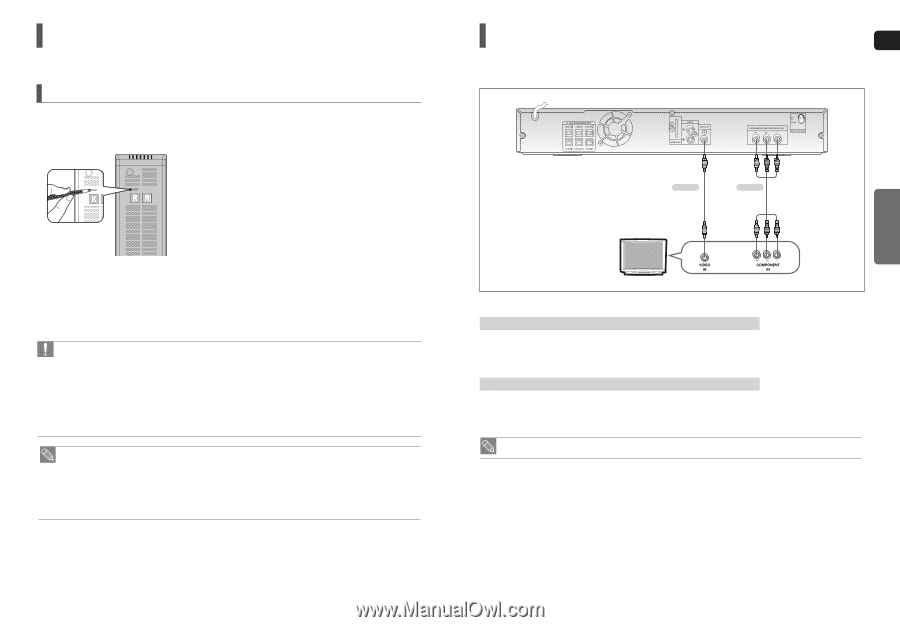
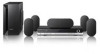
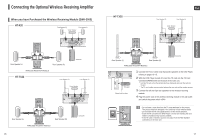
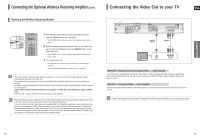
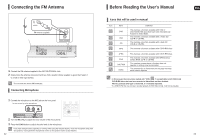
Connecting the Optional Wireless Receiving Amplifier (Con't) Resetting the Wireless Receiving Module Reset the system if a communication failure occurs, or if the Link indicator (blue LED) on the wireless receiver does not light up and the "REAR CHECK" message blinks on the main unit's display. Reset the system while the main unit and the wireless receiver module (SWA-3000) are in Power Standby mode. 1 With the main unit turned off, press and hold the remote control's REMAIN button for 5 seconds. ■ The STANDBY LED on the front panel of the wireless receiver module blinks. 2 With the wireless receiver module turned on, use a ball point pen or a pair of toothpick to press the RESET button on the back of the unit. ■ The STANDBY LED on the front panel of the wireless receiver module blinks 2 Times. 3 Turn on the main unit. ■ The LINK LED of the wireless receiver module is lit and the Reset is complete. ■ If Power Standby mode continues, repeat Steps 1 to 3 above. • When the wireless receiving module setting is complete, no sound is output from the Rear Speaker Output Connectors on the back of the main unit. • The wireless receiving antenna is built into the wireless receiver module. Keep the unit away from water and moisture. • For optimal listening performance, make sure that the area around the wireless receiver module location is clear of any obstructions. • Sound will be heard from the wireless rear speakers in DVD 5.1-CH or Dolby Pro Logic II mode only. • In 2-CH mode, no sound will be heard from the wireless rear speakers. • Place the wireless receiver module at the rear of the listening position. If the wireless receiver module is too close to the main unit, some sound interruption may be heard due to interference. • If you use a device such as a microwave oven, wireless LAN Card, Bluetooth equipment, or any other device that uses the same frequency (2.4GHz) near the system, some sound interruption may be heard due to interference. • The transmission distance of a radio wave is about 10m, but may vary depending on your operating environment. If a steel-concrete wall or metallic wall is between the main unit and the wireless receiver module, the system may not operate at all, because the radio wave cannot penetrate metal. Connecting the Video Out to your TV ENG Choose one of the two methods for connecting to a TV. METHOD 2 (supplied) METHOD 1 CONNECTIONS METHOD 1 : Progressive Scan Component Video ....... (Best Quality) If your television is equipped with Component Video inputs, connect a Component video cable(not supplied) from the Component Video Output (Pr, Pb and Y) jacks on the back of the DVD Player to the Component Video Input jacks on your TV. METHOD 2 : Composite Video ....... (Good Quality) Connect the supplied Video cable from the VIDEO OUT jack on the back of the DVD Player to the VIDEO IN jack on your TV. • When the Progressive scan mode is selected, the VIDEO output (Yellow) does not output any signal. 18 19
-
 1
1 -
2
-
3
-
4
-
 5
5 -
 6
6 -
 7
7 -
 8
8 -
 9
9 -
 10
10 -
 11
11 -
 12
12 -
 13
13 -
 14
14 -
 15
15 -
16
-
17
-
18
-
19
-
20
-
21
-
22
-
23
-
24
-
25
-
26
-
27
-
28
-
29
-
30
-
31
-
32
-
33
-
34
 |
 |