Samsung LN32B360C5DXZA User Manual (ENGLISH) - Page 24
Plug & Play Feature, English - 22 - tv manual
 |
View all Samsung LN32B360C5DXZA manuals
Add to My Manuals
Save this manual to your list of manuals |
Page 24 highlights
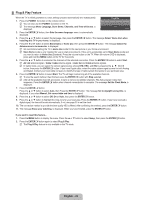
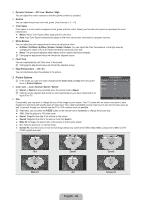
¦ Plug & Play Feature When the TV is initially powered on, basic settings proceed automatically and subsequently. Plug & Play 1. Press the POWER P button on the remote control. N You can also use the POWER P button on the TV. N The message Menu Language, Store Demo, Channels, and Time will be set. is displayed. Menu Language, Store Demo, Channels, and Time will be set. Start E Enter 2. Press the ENTERE button, then Sets the menu language. menu is automatically displayed. 3. Press the ▲ or ▼ button to select the language, then press the ENTERE button. The message Select 'Home Use' when installing this TV in your home. is displayed. 4. Press the ◄ or ► button to select Store Demo or Home Use, then press the ENTERE button. The message Select the Antenna source to memorize. is displayed. N We recommend setting the TV to Home Use mode for the best picture in your home environment. N Store Demo mode is only intended for use in retail environments. If the unit is accidentally set to Store Demo mode and you want to return to Home Use (Standard): Press the volume button on the TV. When the volume OSD is displayed, press and hold the MENU button on the TV for 5 seconds. 5. Press the ▲ or ▼ button to memorize the channels of the selected connection. Press the ENTERE button to select Start. N Air: Air antenna signal. / Cable: Cable antenna signal. / Auto: Air and Cable antenna signals. N In Cable mode, you can select the correct signal source among STD, HRC, and IRC by pressing the or ► button, then press the ENTERE button. If you have Digital cable, select the cable system signal source for both Analog and Digital. Contact your local cable company to identify the type of cable system that exists in your particular area. 6. Press the ENTERE button to select Start. The TV will begin memorizing all of the available channels. N To stop the search before it has finished, press the ENTERE button with Stop selected. N After all the available channels are stored, it starts to remove scrambled channels. The Auto program menu then reappears. Press the ENTERE button when channel memorization is complete. The message Set the Clock Mode. is displayed. 7. Press the ENTERE button. Press the ▲ or ▼ button to select Auto, then Press the ENTERE button. The message Set to daylight saving time. is displayed. If you select Manual, Set current date and time is displayed. 8. Press the ▲ or ▼ button to select Off, On or Auto, then press the ENTERE button. 9. Press the ▲ or ▼ button to highlight the time zone for your local area. Press the ENTERE button. If you have received a digital signal, the time will be set automatically. If not, see page 30 to set the clock. 10. The connection method to provide the best quality HD is offered. After confirming the method, press the ENTERE button. 11. The message Enjoy your watching. is displayed. When you have finished, press the ENTERE button. If you want to reset this feature... 1. Press the MENU button to display the menu. Press the ▲ or ▼ button to select Setup, then press the ENTERE button. 2. Press the ENTERE button again to select Plug & Play. N The Plug & Play feature is only available in the TV mode. English - 22
-
 1
1 -
2
-
3
-
4
-
5
-
6
-
7
-
8
-
9
-
10
-
11
-
12
-
13
-
14
-
15
-
16
-
17
-
18
-
 19
19 -
 20
20 -
 21
21 -
 22
22 -
 23
23 -
 24
24 -
 25
25 -
 26
26 -
 27
27 -
 28
28 -
 29
29 -
30
-
31
-
32
-
33
-
34
-
35
-
36
-
37
-
38
-
39
-
40
-
41
-
42
-
43
-
44
-
45
-
46
-
47
-
48
-
49
-
50
-
51
-
52
-
53
-
54
-
55
-
56
-
57
-
58
-
59
-
60
-
61
-
62
-
63
-
64
-
65
-
66
-
67
-
68
-
69
-
70
-
71
-
72
-
73
-
74
-
75
-
76
-
77
-
78
-
79
-
80
-
81
-
82
-
83
-
84
-
85
-
86
-
87
-
88
-
89
-
90
-
91
-
92
-
93
 |
 |