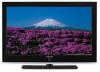
Samsung LNS4695DX User Manual (ENGLISH)
Samsung LNS4695DX Manual
 |
View all Samsung LNS4695DX manuals
Add to My Manuals
Save this manual to your list of manuals |
Samsung LNS4695DX manual content summary:
- Samsung LNS4695DX | User Manual (ENGLISH) - Page 1
Canada Inc., Service á la Clientéle 55 Standish Court Mississauga, Ontario L5R 4B2 Canada Samsung Electronics America, Inc. 105 Challenger Road Ridgefield Park, NJ 07660-0511 LN-S4095D LN-S4695D TFT-LCD TELEVISION BN68-01047J-01 Owner's Instructions Register your product at www.samsung.com/global - Samsung LNS4695DX | User Manual (ENGLISH) - Page 2
TV screen. • Do not display a still image on the LCD panel for more than 2 hours as it can cause screen image retention. This image retention is also known as "screen El uso del televisor LCD en formato 4:3 durante un tiempo prolongado puede dejar rastros de bordes en las partes izquierda, derecha y - Samsung LNS4695DX | User Manual (ENGLISH) - Page 3
Natural Image engine 46 Setting the Film Mode 47 Viewing Picture-In-Picture 48 Changing the Size of the Sub (PIP) Picture 49 Changing the Location of the Sub (PIP) Picture 49 Changing the Channel of the Sub (PIP) Picture 50 Freezing the Picture 51 Setting the Blue Screen Mode 51 SOUND - Samsung LNS4695DX | User Manual (ENGLISH) - Page 4
the Current Resolution 81 Initializing the Picture Settings 82 APPENDIX Identifying Problems 83 Installing the Stand 84 Disconnecting the Stand 84 Stand Swivel Function 84 Installing the Wall Mount Kit (LN-S4095D 85 Installing the Wall Mount Kit (LN-S4695D 86 Using the Anti-Theft Kensington - Samsung LNS4695DX | User Manual (ENGLISH) - Page 5
TV. If any items are missing, contact your dealer. Remote Control & Batteries (AAA x 2) (BN59-00568A) Power Cord (3903-000144) Cleaning Cloth (BN63-01798A) Cover-Bottom LN-S4095D (BN63-02491A) LN-S4695D (BN63-02624A) Owner's Instructions Warranty Card / Registration Card / Safety Guide Manual - Samsung LNS4695DX | User Manual (ENGLISH) - Page 6
Buttons on the Lower-Right Part of the Panel The buttons on the lower-right panel control your TV's basic features, including the on-screen menu. To use the ) Press to turn the TV on and off. POWER INDICATOR Blinks and turns off when the power is on and lights up in stand-by mode. REMOTE CONTROL - Samsung LNS4695DX | User Manual (ENGLISH) - Page 7
DVI-IN 'R-AUDIO-L' terminal for audio. - HDMI/DVI IN terminal does not support PC. - No sound connection is needed for an HDMI to HDMI connection. 1 IN/ANT 2 IN Connect to an antenna or cable TV system. SERVICE 1/SERVICE 2 Connectors for service only. AV OUT Connect to the audio input jacks on your - Samsung LNS4695DX | User Manual (ENGLISH) - Page 8
game. (See page 11) AV IN 2 Video and audio inputs for external devices. S-VIDEO 2 Video inputs for external devices with an S-Video output. HEADPHONE Connect a set of external headphones for private listening. English-6 - Samsung LNS4695DX | User Manual (ENGLISH) - Page 9
the TV screen. SLEEP Press to select a preset time interval for automatic shut off. STILL Press to stop the action during a particular scene. Press again to resume normal video. P.SIZE Picture size selection. DNIe (Digital Natural Image engine) Activates DNIe mode. (Refer to page 46) CH Displays the - Samsung LNS4695DX | User Manual (ENGLISH) - Page 10
batteries with the diagram inside the compartment. 3. Replace the cover. Remove the batteries and store them in VHF and UHF Antennas If your antenna has a set of leads that look like this, see "Antennas IN (CABLE) terminal on the back of the TV. Antennas with 75 Ω Round Leads ANT 1 IN (AIR) 1. - Samsung LNS4695DX | User Manual (ENGLISH) - Page 11
of this cable to the ANT 2 IN (CABLE) terminal on the back of the TV. Connecting to a Cable Box that Descrambles Some Channels If your cable box descrambles only some channels (such as premium channels), follow the instructions below. You will need a two-way splitter, an RF (A/B) switch, and four - Samsung LNS4695DX | User Manual (ENGLISH) - Page 12
(CABLE) terminal on the TV. 5 Audio Cable (Not supplied) 2 4 Video Cable (Not supplied) 3 RF Cable (Not supplied) Follow the instructions in "Viewing a VCR input jacks of the TV. If your VCR is stereo, you must connect two cables. Connecting an S-VHS VCR Your Samsung TV can be connected to an - Samsung LNS4695DX | User Manual (ENGLISH) - Page 13
and the AUDIO OUT jacks on the camcorder. Connecting a DVD Player/Set-Top Box The rear panel jacks on your TV make it easy to connect a DVD player to your TV. DVD Player/Set-Top Box TV Rear Panel 2 Audio Cable (Not supplied) 1 Component Cable (Not supplied) 1. Connect a Component Cable between - Samsung LNS4695DX | User Manual (ENGLISH) - Page 14
if there is a DVI Output connector on the external device. DVD Player/Set-Top Box TV Rear Panel 2 Audio Cable (Not supplied) 1 DVI to HDMI Cable HDCP (High Bandwidth Digital Copy Protection) coding feature installed, and supports multi-channel digital audio. Each DVD player/STB has a different - Samsung LNS4695DX | User Manual (ENGLISH) - Page 15
Digital Audio System The rear panel jacks on your TV make it easy to connect a Digital Audio System to your TV. Digital Audio System TV Rear Panel Optical Cable (Not supplied) 5.1CH audio is possible when the TV is connected to an external device supporting 5.1CH. We recommend the use of cables with - Samsung LNS4695DX | User Manual (ENGLISH) - Page 16
/DVI jacks do not support PC connection. We recommend the use of cables with a Ferrite Core. 1. Connect a D-Sub Cable between PC IN [PC] connector on the TV and the PC output Mute Mute When "Internal mute" is set to "On", Sound menus except "Multi-Track Options" cannot be adjusted. English-14 - Samsung LNS4695DX | User Manual (ENGLISH) - Page 17
the ENTER button, then "Select the language of the OSD" menu is automatically displayed. 2 Press the or buttons to select "Shop" or "Home", then the ENTER button. We recommend setting the TV to Home mode for the best picture in your home environment. Shop mode is only intended for use in retail - Samsung LNS4695DX | User Manual (ENGLISH) - Page 18
message "Enjoy your watching." is displayed. When you have finished, press the ENTER button. The basic Plug & Play setting is available only once when the TV is initially powered on. If the Plug and Play is stopped while it is in progress, you must set the functions manually by using the OSD menu - Samsung LNS4695DX | User Manual (ENGLISH) - Page 19
. You can also view the on-screen menu system and make some adjustments using the TV's front (or side) panel buttons. Display Press the INFO button on the remote control. The TV displays the current channel, the status of certain picture, sound settings and the current time. The information displayed - Samsung LNS4695DX | User Manual (ENGLISH) - Page 20
1 Press the MENU button. The main menu will appear at the bottom of the screen. 2 Press the or button to select "Menu Map", then press the ENTER button. the / / / /ENTER buttons to display, change, or use the selected items. Red button: Displays menus in alphabetical order. Yellow button: Moves - Samsung LNS4695DX | User Manual (ENGLISH) - Page 21
Selecting a Menu Language When you start using your television for the first time, you must select the language which will be used for displaying menus and indications. 1 Press the MENU button. Press the or button to select "Setup", then press the ENTER button. 2 Press the or to select "Language - Samsung LNS4695DX | User Manual (ENGLISH) - Page 22
Signal Source Before your television can begin memorizing the available channels, you must specify the type of signal source that is connected to the TV (i.e., an antenna or cable system). 1 Press the MENU button. Press the or button to select "Channel", then press the ENTER button. 2 Press the or - Samsung LNS4695DX | User Manual (ENGLISH) - Page 23
" antenna signal Cable : "Cable" antenna signal Air+Cable : "Air" and "Cable" antenna signals When selecting Cable TV system: Press the ENTER button to start the auto program. By default, the cable TV system is set to "STD". If you want to select another type of cable system, press the or button to - Samsung LNS4695DX | User Manual (ENGLISH) - Page 24
quickly switch to any channel. Press the number buttons to go directly to a channel. For example, to select channel 27, press "2," then "7." The TV will change channels when you press the second number. Using the "-" Button The "-" button is used to select stations that broadcast both a digital and - Samsung LNS4695DX | User Manual (ENGLISH) - Page 25
1. Turn off your VCR. 2. Press the VCR button on your TV's remote control. 3. Press the SET button on your TV's remote control. 4. Using the number buttons on your remote control, enter three digits of the VCR code listed on page 25 of this manual for your brand of VCR. Make sure you enter three - Samsung LNS4695DX | User Manual (ENGLISH) - Page 26
1. Turn off your STB. 2. Press the STB button on your TV's remote control. 3. Press the SET button on your TV's remote control. 4. Using the number buttons on your remote control, enter three digits of the STB code listed on page 27 of this manual for your brand of STB. Make sure you enter three - Samsung LNS4695DX | User Manual (ENGLISH) - Page 27
Remote Control Codes VCR Brand Code SAMSUNG 000 001 002 003 004 005 077 078 079 ADMIRAL 020 AIWA 025 AKAI 004 027 032 AUDIO DYNAMICS 007 026 BELL&HOWELL 018 BROKSONIC - Samsung LNS4695DX | User Manual (ENGLISH) - Page 28
CABLE BOX Brand SAMSUNG GI HAMLIN HITACHI JERROLD MACOM MAGNAVOX OAK PANASONIC PHILIPS PIONEER RCA 032 UNIVERSAL 033 034 VIEWSTAR 019 021 023 028 WARNER AMEX 046 ZENITH 017 029 035 037 045 SAMSUNG DVD Product DVD DVDR BD Record VCR COMBO VCR Record DHR COMBO Code 000 001 002 003 004 - Samsung LNS4695DX | User Manual (ENGLISH) - Page 29
102 YAMAHA 032 063 YAMAKAWA 040 073 XWAVE 103 ZENITH 076 121 SAMSUNG SET-TOP BOX Product Ground wave STB Satellite STB CABLE STB STB DVD COMBO REALISTIC STAR TRAK STS SKY SKY LIFE SHACK STAR CHOICE SONY TOSHIBA ULTIMATE TV UNIDEN ZENITH English-27 Code 016 021 036 038 039 040 041 042 - Samsung LNS4695DX | User Manual (ENGLISH) - Page 30
the clock is necessary in order to use the various timer features of the TV. Also, you can check the time while watching the TV. (Just press the INFO button.) Option 1: Setting the Clock Manually 1 Press the MENU button. Press the or press the ENTER button. button to select "Setup", then 2 Press - Samsung LNS4695DX | User Manual (ENGLISH) - Page 31
time may not be correct depending on the broadcasting station and signal. If there is a difference between the real time and set time, please set the time manually. 5 Press the or button to select "DST"(Daylight Saving Time), then press the ENTER button. Press the or button to select "On" or "Off - Samsung LNS4695DX | User Manual (ENGLISH) - Page 32
channel directly by pressing the number buttons on the remote control. Auto Power Off When you set the timer "On", the television will eventually turn off, if no controls are operated for 3 hours after the TV was turned on by the timer. This function is only available in timer "On" mode and - Samsung LNS4695DX | User Manual (ENGLISH) - Page 33
Setting the Sleep Timer The sleep timer automatically shuts off the TV after a preset time (from 30 to 180 minutes). or button to select "Sleep Timer", then press the ENTER button. 3 Press the or button to set sleep timer to "30min, 60min, 90min, 120min, 150min, 180min or Off", then press the ENTER - Samsung LNS4695DX | User Manual (ENGLISH) - Page 34
the ENTER button. • When you connect equipment to the TV, you can choose between the following sets of jacks: "AV1", "S-Video1", "Component1", "Component2", "PC", "HDMI1", or "HDMI2" on the TV's rear panel, and "AV2", or "S-Video2" on the TV's side panel. Alternate method Press the SOURCE button on - Samsung LNS4695DX | User Manual (ENGLISH) - Page 35
STB, PVR STB, AV Receiver, DVD Receiver, Game, Camcorder, DVD Combo, DVD HDD Recorder, PC, Internet TV Recv., Interactive TV Recv., VOD (Video On Demand) STB, TV. Press the ENTER button. Set other signal sources (AV1, AV2, S-Video1, S-Video2, Component1, Component2, PC, HDMI1, HDMI2) using the same - Samsung LNS4695DX | User Manual (ENGLISH) - Page 36
store your favorite channels for each available input source (such as TV and CATV). Preset : To use the Channel Manager function, first menu. Press the EXIT button to exit. Only memorized channels can be set as Favorite channels. Alternate method Select Channel menu ➔ Channel Manager ➔ Favorite - Samsung LNS4695DX | User Manual (ENGLISH) - Page 37
Viewing the Channel Lists You can display a list of all channels, added channels, or your favorite channels. Preset : To use the Channel Manager function, first broadcasting window will appear. Alternate method Press the CH MGR button on the remote control to display a list of channels. English-35 - Samsung LNS4695DX | User Manual (ENGLISH) - Page 38
Adding and Erasing Channels Preset : To use the Channel Manager function, first run Auto Program (See page 20). 1 Press the MENU button. Press the then press the ENTER button. or button to select "Channel", 2 Press the or button to select "Channel Manager", then press the ENTER button. Press the - Samsung LNS4695DX | User Manual (ENGLISH) - Page 39
the or button, then press the ENTER button to return to the previous menu. Press the EXIT button to exit. If you add or delete a TV channel, the labeled channels will also be added or deleted. English-37 - Samsung LNS4695DX | User Manual (ENGLISH) - Page 40
Tuning Analog Channels Analog Use fine tuning to manually adjust a particular channel for optimal reception. 1 the fine tuning setting in the TV's memory, press the ENTER button. 4 To reset the fine tuning setting, press the then press the ENTER button. button to select "Reset", Select "Return" - Samsung LNS4695DX | User Manual (ENGLISH) - Page 41
from "snowy" to clear, digital (HDTV) channels have either perfect reception quality or to exit. LNA (Low Noise Amplifier) If the TV is operating in a weak-signal area, sometimes the setting must be made separately for each channel. If the picture is noisy with the LNA set to On, select Off. - Samsung LNS4695DX | User Manual (ENGLISH) - Page 42
MODE button on the remote control repeatedly to select the desired picture mode. • Choose "Dynamic" for viewing the TV during the day or when there is a bright light in the room. • Choose "Standard" for the standard factory settings. • Choose "Movie" when viewing the movie. • Choose "Custom" if you - Samsung LNS4695DX | User Manual (ENGLISH) - Page 43
Customizing the Picture Settings You can use the on-screen menus to change the "Contrast", "Brightness", "Sharpness", "Color", "Tint", and "Color Tone" according to personal preference. You can select "Standard" which automatically recalls your personalized picture settings. 1 Press the MENU button - Samsung LNS4695DX | User Manual (ENGLISH) - Page 44
button to select a particular option (Cool2, Cool1, Normal, Warm1, or Warm2), then press the ENTER button. Resetting the Picture Settings to the Factory Defaults 7 To return the factory defaults, select "Reset" by pressing the Press the ENTER button. or button. Press the or button to select "OK - Samsung LNS4695DX | User Manual (ENGLISH) - Page 45
DTV's HD signal, you can use Wide Fit. Horizontal zoom(Wide Fit) sets the optical picture format by expanding it both horizontally and vertically. For example, you can reset the picture in 4:3 format to 16:9. Wide Fit does not support all external devices. To maintain scale in the Wide Fit mode - Samsung LNS4695DX | User Manual (ENGLISH) - Page 46
Using the Color Weakness Enhancement Feature This feature adjusts the Red, Green or Blue color to compensate for the user's particular color weakness. 1 Press the MENU button. Press the then press the ENTER button. or button to select "Setup", 2 Press the or button to select " - Samsung LNS4695DX | User Manual (ENGLISH) - Page 47
If the broadcast signal received by your TV is weak, you can activate the Digital Noise Reduction feature to help reduce any static and ghosting that may appear on the screen. 1 Press the MENU button. Press the then press the ENTER button. or button to select "Picture", 2 Press the or button to - Samsung LNS4695DX | User Manual (ENGLISH) - Page 48
TV includes the DNIe function so as to provide a high visual quality. If you set DNIe to on, you can view the screen with the DNIe feature activated. If you set the DNIe to Demo, you can view the applied DNIe and normal pictures on the screen supported in the Movie mode. (It is inactivated.) English - Samsung LNS4695DX | User Manual (ENGLISH) - Page 49
or button, then press the ENTER button to return to the previous menu. Press the EXIT button to exit. The Film Mode can only be set when viewing an analog signal in AV modes (AV or S-Video) that support SD (Standard Definition) signals (480i). English-47 - Samsung LNS4695DX | User Manual (ENGLISH) - Page 50
or button to select "On", then press the ENTER The sub (PIP) picture appears in the corner of the screen. button. Select "Return" by pressing the or button, then press the ENTER "V-Chip" is active. If you turn the TV off while watching and turn it on again, then the mode will return to normal - Samsung LNS4695DX | User Manual (ENGLISH) - Page 51
EXIT button to exit. Double ( , ) mode is not available in PC mode. PIP Settings O : PIP operates X : PIP doesn't operate PIP Settings Main Sub Picture Analog Digital (ATSC) AV1 Picture Analog X X O Digital (ATSC) X X O AV/Component/ X X X HDMI/PC O: PIP operates / X: PIP doesn - Samsung LNS4695DX | User Manual (ENGLISH) - Page 52
Changing the Channel of the Sub (PIP) Picture After you set the signal source (antenna or cable) of the sub picture, it is easy to change channels. 1 Press the MENU button. Press the then press the ENTER button. or button to select "PIP", 2 Press the or - Samsung LNS4695DX | User Manual (ENGLISH) - Page 53
Mode If no signal is being received or the signal is very weak, a blue screen automatically replaces the noisy picture background. If you wish to continue viewing the poor picture, you must set the "Blue Screen" mode to "Off". 1 Press the MENU button. Press the then press the ENTER button. or - Samsung LNS4695DX | User Manual (ENGLISH) - Page 54
message "Mute" is displayed and the sound cuts off. To turn mute off, press the MUTE button again or press either the VOL+ or VOL- button. Using Automatic Sound Settings Your TV has automatic sound settings ("Standard", "Music", "Movie", and "Speech") that are preset at the factory. You can select - Samsung LNS4695DX | User Manual (ENGLISH) - Page 55
to increase or decrease the selected frequency. Press the ENTER button. • The equalizer function is set for each mode (Standard, Music, Movie, Speech, or Custom). 4 To return the factory defaults, select "Reset" by pressing the Press the ENTER button. or button. Press the or button to select - Samsung LNS4695DX | User Manual (ENGLISH) - Page 56
the SRS TruSurround XT TruSurround XT is a patented SRS technology that solves the problem of playing 5.1 multichannel content over two speakers. Trusurround delivers a compelling, virtual surround sound experience through any two-speaker playback system, including internal television speakers - Samsung LNS4695DX | User Manual (ENGLISH) - Page 57
Auto Volume Each broadcasting station has its own signal conditions, and it is inconvenient to adjust the volume every time the channel is changed. "Auto Volume" automatically adjusts the volume of the desired channel by lowering the sound output when the modulation signal is high or by raising the - Samsung LNS4695DX | User Manual (ENGLISH) - Page 58
Choosing a Multi-Channel Sound (MTS) track Digital The digital-TV transmission system is capable of simultaneous transmission of many audio tracks (for example, simultaneous translations of the program into foreign languages). The availability of these - Samsung LNS4695DX | User Manual (ENGLISH) - Page 59
", then press the ENTER button. 3 Press the or button to select "Multi-Track Sound", then press the ENTER button. Press the or button to select a setting you want, then press the ENTER button. Select "Return" by pressing the or button, then press the ENTER button to return to the previous menu - Samsung LNS4695DX | User Manual (ENGLISH) - Page 60
Selecting the Internal Mute When using a device such as a Home Theater or Amplifier with external speakers, you can set Internal Mute to On to cut off sound from the TV's internal speakers. 1 Press the MENU button. Press the then press the ENTER button. or button to select "Sound", 2 Press the - Samsung LNS4695DX | User Manual (ENGLISH) - Page 61
the Sound Select Sound Select enables you to hear sound from either the Main or Sub(PIP) picture in PIP mode. 1 Press the MENU button. Press the then press the ENTER button. or button EXIT button to exit. You can select this option when the "PIP" is set to "On". (See page 48) English-59 - Samsung LNS4695DX | User Manual (ENGLISH) - Page 62
/Off Melody A melody sound can be set to come on when the TV is powered On or Off. 1 Press the MENU button. Press the then press the ENTER button. or button to select "Sound", 2 Press the button. or - Samsung LNS4695DX | User Manual (ENGLISH) - Page 63
Special Features Setting the Function Help Displays Help on the menu functions. The Help appears at the top of the screen. 1 Press the MENU button. Press the then press the ENTER button. or button to menu. Press the EXIT button to exit. The Function Help default setting is On. English-61 - Samsung LNS4695DX | User Manual (ENGLISH) - Page 64
This feature adjusts the brightness of the TV in order to reduce power consumption. When watching TV at night, set the "Energy Saving " mode option Saving setting you have made, press the E.SAVING button on the remote control. Menu Transparency Level Adjusts the transparency of the menu screen. 1 - Samsung LNS4695DX | User Manual (ENGLISH) - Page 65
• To disconnect the game console and connect another external device, set Game to Off in the setup menu. • If you display the TV menu in Game mode, the screen shakes slightly. Game Mode is not available in TV mode. If Game Mode is On • Picture and Sound Modes are automatically changed to Custom. You - Samsung LNS4695DX | User Manual (ENGLISH) - Page 66
secret code that is defined by the user). The on-screen menu will instruct you to assign a password (you can . (The default PIN for a new TV set is "0000".) The "V-Chip" menu is displayed. 3 Press the or button to select sequence, which resets the pin to 0-0-0-0: POWER (Off), MUTE, 8, 2, 4, - Samsung LNS4695DX | User Manual (ENGLISH) - Page 67
. 2 Press the button. Press the number buttons to enter your current 4-digit PIN. (The default PIN for a new TV set is "0000".) The "V-Chip" menu is displayed. 3 The "V-Chip" screen will appear. Press the "V-Chip Lock". or button to select To enable the V-Chip feature, press the ENTER button so - Samsung LNS4695DX | User Manual (ENGLISH) - Page 68
current 4-digit PIN. (The default PIN for a new TV set is "0000".) The "V-Chip" menu is displayed. 3 Press the or button to select "TV Parental Guidelines", then press the ENTER button. 4 You can independently lock the TV ratings. The locked TV (FCC) ratings are indicated by the symbol " ". Press - Samsung LNS4695DX | User Manual (ENGLISH) - Page 69
Picture Association of America) system, and its main application is for movies. When the rating control is on, the TV will automatically block any programs that are coded with objectionable ratings (either "MPAA Rating" or "TV for a new TV set is "0000".) The "V-Chip" menu is displayed. 3 Press the - Samsung LNS4695DX | User Manual (ENGLISH) - Page 70
an adult. R Restricted. Viewers should be 17 or older. NC-17 Not classified. Viewers should be 17 or older. X Adults only. NR Not rated. • TV (FCC) ratings : The particular rating that you have selected will be locked (and indicated as a red "L" on a blue background). Also, all of the age - Samsung LNS4695DX | User Manual (ENGLISH) - Page 71
press the ENTER button. 2 Press the button. Press the number buttons to enter your current 4-digit PIN. (The default PIN for a new TV set is "0000".) The "V-Chip" menu is displayed. 3 Press the or button to select "Canadian English", then press the ENTER button. Allow All : Press to unlock all - Samsung LNS4695DX | User Manual (ENGLISH) - Page 72
button. 2 Press the button. Press the number buttons to enter your current 4-digit PIN. (The default PIN for a new TV set is "0000".) The "V-Chip" menu is displayed. 3 Press the or button to select "Canadian French", then press the ENTER button. 4 Press the or button to select a appropriate - Samsung LNS4695DX | User Manual (ENGLISH) - Page 73
. / Block all: Press to lock all TV ratings. Parental restriction levels differ depending on the broadcasting station. The default menu name and Downloadable U.S. Rating changes depending on the downloaded information. Even if you set the On-screen display to your desired language, the "Downloadable - Samsung LNS4695DX | User Manual (ENGLISH) - Page 74
. Additional data, usually not program related. Text3/Text4 : Third and Fourth Text Services. These data channels are used only if Text1 and Text2 data bandwidth is not sufficient. The Caption feature only works in TV, AV and S-Video mode. The availability of captions depends on the program being - Samsung LNS4695DX | User Manual (ENGLISH) - Page 75
Viewing Closed Captions (On-Screen Text Messages) Digital The Digital Captions function operates on digital channels. 1 Press the MENU button. Press the then press the ENTER button. or button to - Samsung LNS4695DX | User Manual (ENGLISH) - Page 76
to select the desired item in the Size menu, then press the ENTER button. Set other listed options below using the same method as above. Select "Return" by pressing ", "Solid", and "Flashing". You can change the background opacity of the caption. Return to Default This option sets each of "Size", - Samsung LNS4695DX | User Manual (ENGLISH) - Page 77
Blue Power LED on or off. When the Blue Eye is set to off, the Blue LED will go off 5 seconds after the TV is turned off. This will save power and reduce eye fatigue. 1 Press the MENU button. Press the then press the ENTER button. or button to - Samsung LNS4695DX | User Manual (ENGLISH) - Page 78
screens look different, the same basic set-up information will apply in almost all cases. (If not, contact your computer manufacturer or Samsung user guide; otherwise there may be no video. For the display modes listed below, the screen 31.5 37.9 37.5 35.2 37.9 48.1 46.9 48.4 56.5 60.0 64.0 80.0 66.5 - Samsung LNS4695DX | User Manual (ENGLISH) - Page 79
the noise has been reduced, re-adjust the picture so that it is aligned on the center of the screen. 1 Press the SOURCE button to select "PC Fine", then press the ENTER button. 6 Press the or button to remove the picture noise. Select "Return" by pressing the or button, then press the ENTER button - Samsung LNS4695DX | User Manual (ENGLISH) - Page 80
Position After connecting the TV to your PC, adjust the position of the picture if it is not well-aligned. 1 the button. or button to select "Position", then press the ENTER 5 Adjust the position of picture by pressing the / / / buttons. Press the ENTER button. Select "Return" by pressing the - Samsung LNS4695DX | User Manual (ENGLISH) - Page 81
Adjusting the Picture Quality and Position Automatically This feature allows the TV to self-adjust to the incoming video signal. The values of fine, coarse and position are adjusted automatically. 1 Press the SOURCE button to select "PC". 2 - Samsung LNS4695DX | User Manual (ENGLISH) - Page 82
press the ENTER button. 3 Press the or button to select the screen format you want, then press the ENTER button. • 16:9 : Scales the picture to 92% of the TV screen, regardless of the aspect ratio of the input source. • 4 : 3 : Displays the picture as it is without changing the aspect ratio of input - Samsung LNS4695DX | User Manual (ENGLISH) - Page 83
ENTER button. or button to select "Setup", 3 Press the or button to select "PC", then press the ENTER button. The resolution information is displayed on the screen. Select "Return" by pressing the or button, then press the ENTER button to return to the previous menu. Press the EXIT button to - Samsung LNS4695DX | User Manual (ENGLISH) - Page 84
Press the or button to select "PC", then press the ENTER button. 4 Press the or button to select "Image Reset", then press the ENTER button. The picture settings are replaced with the factory default values. Select "Return" by pressing the or button, then press the ENTER button to return to the - Samsung LNS4695DX | User Manual (ENGLISH) - Page 85
Appendix Identifying Problems If the TV seems to have a problem, first try this list of possible problems and solutions. If none of these troubleshooting tips apply, call your nearest Samsung service center. Problem Poor picture quality. Poor sound quality. No picture or sound. No sound or sound - Samsung LNS4695DX | User Manual (ENGLISH) - Page 86
down on a soft cloth or cushion on a table. 2. Remove four screws from the back of the TV. 3. Separate the stand from the TV. 4. Cover the bottom hole with a cap. < 4 > Stand Swivel Function The TV can be swiveled to the left or right. You can adjust the angle up to 20° to the left or right - Samsung LNS4695DX | User Manual (ENGLISH) - Page 87
Mount Kit (LN-S4095D) This installation is to be used when attaching the wall mount to a wall. When attaching to other building materials, please contact your nearest dealer. This LCD TV accepts a 200 mm x 200 mm VESA-compliant mounting interface pad. Components (Sold separately) Wall-Bracket Set - Samsung LNS4695DX | User Manual (ENGLISH) - Page 88
Installing the Wall Mount Kit (LN-S4695D) Refer to the correct installation guide according to your wall bracket. This LCD TV accepts a 600 mm x 400 mm VESA-compliant mounting interface pad. Installation Notes 1. Contact a technician for installing the wall bracket. 2. Samsung Electronics is not - Samsung LNS4695DX | User Manual (ENGLISH) - Page 89
Installing the Wall Mount Kit (LN-S4695D) Fixing the TV panel to the wall attachment panel reinsert and tighten the safety pin ( ) to securely hold the product to the bracket. LCD TV How to Adjust Mounting Angle Adjust the bracket angle to -2° before installing it on the wall. Wall Bracket Wall - Samsung LNS4695DX | User Manual (ENGLISH) - Page 90
manual on the LCD TV (Figure Screen Size (Diagonal) Power Supply Power Consumption PC Resolution Sound Output Dimensions (WxDxH) Body With stand Weight With stand Without stand °F to 113 °F (-20 °C to 45 °C) 5% to 95%, non-condensing LN-S4695D 46 inches AC 110-120 V 60 Hz 310 W 1920 x 1080@ 60 Hz 10 - Samsung LNS4695DX | User Manual (ENGLISH) - Page 91
: All drawings are not necessarily to scale. Some dimensions are subject to change without prior notice. Refer to dimensions prior to performing installation of your TV. Not responsible for typographical or printed errors. © 2006 Samsung Electronics America, Inc. English-89 - Samsung LNS4695DX | User Manual (ENGLISH) - Page 92
Dimensions (LN-S4695D) TOP VIEW JACK PANEL DETAIL 3.25" H x 9.92" W @ 12.98 " UP FROM BOTTOM FRONT VIEW/SIDE VIEW REAR VIEW NOTE: All drawings are not necessarily to scale. Some dimensions are subject to change without prior notice. Refer to dimensions prior to performing installation of your TV. - Samsung LNS4695DX | User Manual (ENGLISH) - Page 93
This page is intentionally left blank. - Samsung LNS4695DX | User Manual (ENGLISH) - Page 94
commande 8 CONNEXIONS Connexion d'antennes VHF et UHF 8 Connexion du câble TV 9 Branchement d'un magnétoscope 10 Branchement d'un magnétoscope S-VHS 10 duction numérique des bruits 45 DNIe (Image naturelle numérique 46 Réglage du mode film 47 Visionnement Image sur Image 48 Redimensionnement - Samsung LNS4695DX | User Manual (ENGLISH) - Page 95
82 ANNEXE Identification des problèmes 83 Installation du support 84 Démonter la base 84 Fonction d'orientation du socle 84 Installer un kit de fixation mural (LN-S4095D 85 Installer un kit de fixation mural (LN-S4695D 86 Utilisation du verrouillage Kensington antivol 88 Spécifications - Samsung LNS4695DX | User Manual (ENGLISH) - Page 96
contactez votre revendeur. Télécommande et piles (AAA x 2) (BN59-00568A) Cordon D'alimentation (3903-000144) Tissu de nettoyage (BN63-01798A) Panneau arrière LN-S4095D (BN63-02491A) LN-S4695D (BN63-02624A) Instructions Carte de garantie / Cartes d'enregistrement / Guide de sécurité Français-3 - Samsung LNS4695DX | User Manual (ENGLISH) - Page 97
la télécom-mande. La couleur et la forme du produit peuvent varier en fonction du modèle. SOURCE Bascule entre toutes les sources d'entrée disponibles (TV, AV1, AV2, S-Vidéo1, S-Vidéo2, Composante1, Composante2, PC, HDMI1, HDMI2). Dans le menu à l'écran, utilisez ce bouton de la même manière que - Samsung LNS4695DX | User Manual (ENGLISH) - Page 98
provenant d'un caméscope ou d'un magnétoscope. ANT 1 IN/ANT 2 IN Pour connecter une antenne ou un système de télévision par câble. SERVICE 1/SERVICE 2 Connecteur réservé aux opérations de maintenance uniquement. AV OUT Branchez la prise d'entrée audio sur votre amplificateur ou votre système de cin - Samsung LNS4695DX | User Manual (ENGLISH) - Page 99
Side Panel Jacks Use the left side panel jacks to connect a component that is used only occasionally, such as a camcorder or video game. (See page 11) AV IN 2 Entrées vidéo et audio pour périphériques externes. S-VIDEO 2 Entrées vidéo pour périphériques externes avec sortie S-Vidéo. PRISE CASQUE - Samsung LNS4695DX | User Manual (ENGLISH) - Page 100
binage - Arrêt - Lecture/Pause - Avance/Rapide TV, DVD, STB, CABLE, VCR Permet de contrô Pour activer le mode DNIe. (voir page 46) CH Fait défiler les chaînes disponibles SET Règle la télécommande pour qu'elle contrôle votre téléviseur, votre magnétoscope, votre lecteur DVD ou votre décodeur RESET - Samsung LNS4695DX | User Manual (ENGLISH) - Page 101
Insertion des piles dans la télécommande 1. Soulevez le panneau à l'arrière de la télécommande, comme illustré. 2. Placez deux piles AAA. Assurez-vous de faire correspon dre les pôles "+" et "-" des iles avec le schéma situé à l'intérieur du compartiment. 3. Replacez le couvercle. Retirez les piles - Samsung LNS4695DX | User Manual (ENGLISH) - Page 102
Connexion du câble TV Pour brancher un système de télévision par câble, suivez les instructions ci-dessous. Câble sans boîte de jonction décrypte que certaines canal (comme les canal dites 'premium'), suivez les instructions ci-dessous. Pour ce faire, vous avez besoin d'un séparateur bidirectionnel - Samsung LNS4695DX | User Manual (ENGLISH) - Page 103
) 2 4 Câble Vidéo (non fourni) 3 Câble RF (non fourni) Suivez les instructions de "Visualisation d'une cassette à l'aide d'un magnétoscope ou d'un caméscope" pour distincts. Branchement d'un magnétoscope S-VHS Votre télévision Samsung peut recevoir un signal S-Vidéo provenant d'un magnétoscope - Samsung LNS4695DX | User Manual (ENGLISH) - Page 104
de votre caméscope sans passer par un magnétoscope. Caméscope 1 Câble S-Vidéo (non fourni) ou 1 Câble Vidéo (non fourni) 2 Câble Audio (non fourni) TV Side Panel 1. Connectez un Câble Vidéo (ou Câble S-Vidé) entre les prises AV IN 2 [VIDEO] (ou S-VIDEO) du téléviseur et les prises AUDIO OUT (ou - Samsung LNS4695DX | User Manual (ENGLISH) - Page 105
Connecter un boîtier décodeur/lecteur de DVD via DVI Cette connexion ne peut être effectuée que si le périphérique externe dispose d'un connecteur de sortie DVI. Lecteur DVD/ boîtier décodeur Pannear arrière de la télévision 1. Connectez un câble DVI vers HDMI ou un adaptateur DVI-HDMI entre le - Samsung LNS4695DX | User Manual (ENGLISH) - Page 106
Branchement d'un système audio numérique Les prises du panneau arrière de votre téléviseur permettent de brancher facilement un système audio numérique. Système Audio Numérique Pannear arrière de la télévision 1. Branchez un câble optique entre les prises "DIGITAL AUDIO OUT (OPTICAL)" (Sortie - Samsung LNS4695DX | User Manual (ENGLISH) - Page 107
1. Connect a D-Sub Cable between PC IN [PC] connector on the TV and the PC output connector on your computer. 2. Connect a PC Audio Cable between PC IN [AUDIO] jack on the TV and the Audio Out jack of the sound card on your computer. Mode Internal - Samsung LNS4695DX | User Manual (ENGLISH) - Page 108
sont proposés automatiquement à la configuration : 1 Appuyez sur le bouton POWER de la télécommande. Le message "Menu language, Channels and Time will be set." s'affiche. Appuyez sur le bouton ENTER ; le menu "Select the language of the OSD" s'affiche automatiquement. 2 Appuyez sur le bouton ou - Samsung LNS4695DX | User Manual (ENGLISH) - Page 109
la fin, appuyez sur le bouton ENTER lorsque Stop est sélectionné. 6 Appuyez sur le bouton ENTER . Appuyez sur les boutons ou pour sélectionners "Manual" ou "Auto", puis appuyez sur le bouton ENTER . Active et désactive la fonction Heure d'été. 7 Appuyez sur le bouton ENTER . Appuyez sur les boutons - Samsung LNS4695DX | User Manual (ENGLISH) - Page 110
Menus dynamiques et affichages à l'écran Les menus permettent de configurer votre téléviseur. Pour accéder aux menus, appuyez sur la touche MENU de la télécommande. Une fois le menu à l'écran, utilisez les touches / / / /ENTER de la télécommande pour passer d'une option à l'autre dans le menu, sé - Samsung LNS4695DX | User Manual (ENGLISH) - Page 111
Navigation dans les menus à l'aide de la carte des menus La carte de menus du menu principal permet de voir tous les menus et de choisir une fonction rapidement. 1 Appuyez sur la touche MENU. Le menu principal s'affiche au bas de l'écran. 2 Appuyez sur la touche Le sous-menu s'affiche. ou pour - Samsung LNS4695DX | User Manual (ENGLISH) - Page 112
Sélection de la langue des menus Lorsque vous utilisez le téléviseur pour la première fois, vous devez sélectionner la langue d'affichage des menus et des messages. 1 Appuyez sur la touche MENU. Appuyez sur la touche ou sélectionner "Configuration", puis appuyez sur ENTER . pour 2 Appuyez sur la - Samsung LNS4695DX | User Manual (ENGLISH) - Page 113
Mémorisation canal Le téléviseur peut mémoriser tous les canaux captés par l'antenne ou câblodiffusés. Une fois les canaux mémorisés, la touche CH ou CH permet de les parcourir successivement, ce qui vous évite de syntoniser chaque canal manuellement avec les touches numériques. La mémorisation des - Samsung LNS4695DX | User Manual (ENGLISH) - Page 114
4 Appuyez sur la touche ou pour sélectionner la connexion avec l'antenne, puis appuyez sur ENTER . • Air : signal d'antenne de type "Air". Câble : signal d'antenne de type "Câble". Air + Câble : signaux d'antenne de type "Air" et "Câble". Au moment de la sélection du système de télévision par câble: - Samsung LNS4695DX | User Manual (ENGLISH) - Page 115
Changement de la chaîne Utilisation des boutons des canaux Appuyez sur le bouton CH ou CH pour changer la chaîne. Quand vous appuyez sur le bouton CH ou CH , le téléviseur change les chaînes en séquence. Vous voyez défiler toutes les chaînes mémorisées par le téléviseur. (Le téléviseur doit avoir mé - Samsung LNS4695DX | User Manual (ENGLISH) - Page 116
bouton CABLE de la télécommande du téléviseur. 3. Appuyez sur le bouton SET de la télécommande du téléviseur. 4. Appuyez sur les touches numériques de lecteur dont les marques sont répertoriées à la 'page 26' du présent guide. Veillez à entrer tous les chiffres du code, même si le premier chiffre - Samsung LNS4695DX | User Manual (ENGLISH) - Page 117
le bouton DVD de la télécommande du téléviseur. 3. Appuyez sur le bouton SET de la télécommande du téléviseur. 4. Appuyez sur les touches numériques de dont les marques sont répertoriées à la 'page 26~27' du présent guide. Veillez à entrer tous les chiffres du code, même si le premier chiffre est - Samsung LNS4695DX | User Manual (ENGLISH) - Page 118
Codes de la télécommande Codes de magnétoscope Marque Code SAMSUNG 000 001 002 003 004 005 077 078 079 ADMIRAL 020 AIWA 025 AKAI 004 027 032 AUDIO DYNAMICS 007 026 BELL&HOWELL 018 BROKSONIC - Samsung LNS4695DX | User Manual (ENGLISH) - Page 119
Codes de boîtier décodeur Marque Code SAMSUNG 000 001 002 003 004 005 006 007 GI 041 HAMLIN 032 UNIVERSAL 033 034 VIEWSTAR 019 021 023 028 WARNER AMEX 046 ZENITH 017 029 035 037 045 SAMSUNG Codes de lecteur DVD Produit DVD DVDR BD Record VCR COMBO VCR Record DHR COMBO Code 000 001 - Samsung LNS4695DX | User Manual (ENGLISH) - Page 120
YAMAHA 032 063 YAMAKAWA 040 073 XWAVE 103 ZENITH 076 121 RÉCEPTEUR SAMSUNG Produit Ground wave STB Satellite STB CABLE STB STB DVD COMBO Satellite 023 ANAM 043 CHANNEL MASTER 018 034 CROSSDIGITAL 019 CHAPARRAL 035 DIRECT TV 015 016 017 019 022 045 060 061 062 065 066 067 068 - Samsung LNS4695DX | User Manual (ENGLISH) - Page 121
Réglage de l'heure Pour pouvoir utiliser les différentes fonctions de minuterie du téléviseur, vous devez d'abord régler l'horloge. En outre, vous pouvez afficher l'heure pendant que vous regardez le téléviseur. (Appuyez simplement sur le bouton INFO.) Option 1: Réglage manuel de l'horloge 1 Appuyez - Samsung LNS4695DX | User Manual (ENGLISH) - Page 122
Option 2: Réglage automatique de l'horloge L'horloge peut être réglée automatiquement si vous recevez un signal numérique. 1 Appuyez sur la touche MENU. Appuyez sur la touche ou sélectionner "Configuration", puis appuyez sur ENTER . pour 2 Appuyez sur la touche sur ENTER . ou pour sélectionner " - Samsung LNS4695DX | User Manual (ENGLISH) - Page 123
Réglage de la minuterie de marche/arrêt 1 Appuyez sur la touche MENU. Appuyez sur la touche ou pour sélectionner "Configuration", puis appuyez sur ENTER . 2 Appuyez sur la touche sur ENTER . ou pour choisir "Minuterie", puis appuyez Appuyez sur la touche ou pour sélectionner "Minuteur ON", puis - Samsung LNS4695DX | User Manual (ENGLISH) - Page 124
Minuterie d'arrêt automatique Cette minuterie éteint automatiquement le téléviseur après le délai choisi (de 30 à 180 minutes). 1 Appuyez sur la touche MENU. Appuyez sur la touche ou sélectionner "Configuration", puis appuyez sur ENTER . pour 2 Appuyez sur la touche ou sur ENTER . Appuyez sur la - Samsung LNS4695DX | User Manual (ENGLISH) - Page 125
Utilisation d'une source de diffusion externe Utilisez la télécommande pour permuter entre les signaux des appareils connectés - magnétoscope, lecteur de DVD, décodeur et la source de diffusion (câble ou ordinaire). Réglage de la source de diffusion 1 Appuyez sur la touche MENU. Appuyez sur la - Samsung LNS4695DX | User Manual (ENGLISH) - Page 126
STB, PVR STB, Récepteur AV, Récepteur DVD, Jeu, Caméscope, Combo DVD, Recorder DVD HDD, PC, Téléviseur Internet, Téléviseur interactif, Décodeur VOD, TV. Appuyez sur le bouton ENTER . Choisissez les autres sources de signal (AV1, AV2, S-Vidéo1, S-Vidéo2, Composante1, Composante2, PC, HDMI1, HDMI2 - Samsung LNS4695DX | User Manual (ENGLISH) - Page 127
Contrôle des Chaînes Sélection de vos canaux favoris Vous pouvez mémoriser vos canaux favoris pour chacune des sources d'entrée disponibles (téléviseur, câble). Préalable : Pour utiliser la fonction Gestionnaire de canaux, commencez d'abord par utiliser la fonction Progr. auto. (Voir page 20). - Samsung LNS4695DX | User Manual (ENGLISH) - Page 128
Affichage des listes de canaux Vous pouvez afficher la liste de tous les canaux, des canaux ajoutés ou des canaux favoris. Préalable : Pour utiliser la fonction Gestionnaire de canaux, commencez d'abord par utiliser la fonction Progr. auto. (Voir page 20). 1 Appuyez sur la touche MENU. Appuyez sur - Samsung LNS4695DX | User Manual (ENGLISH) - Page 129
Ajout et suppression de canaux Préalable : Pour utiliser la fonction Gestionnaire de canaux, commencez d'abord par utiliser la fonction Progr. auto. (Voir page 20). 1 Appuyez sur la touche MENU. Appuyez sur la touche "Chaîne", puis sur ENTER . ou pour choisir 2 Appuyez sur la touche ou pour sé - Samsung LNS4695DX | User Manual (ENGLISH) - Page 130
Identification des canaux Cette fonction permet d'assigner un identificateur simple à un canal analogique (par exemple "CBS", "ESPN", "PBS2" ou "CNN02", etc.). Un identificateur consiste en cinq champs comprenant chacun une lettre, un chiffre ou un blanc. Lorsqu'on appuie sur la touche INFO, l' - Samsung LNS4695DX | User Manual (ENGLISH) - Page 131
Syntonisation précise des canaux analogiques Analog La fonction de syntonisation précise permet d'optimiser la réception d'un canal. 1 Appuyez sur la touche MENU. Appuyez sur la touche "Chaîne", puis sur ENTER . ou pour choisir 2 Appuyez sur la touche ou appuyez sur ENTER . pour sélectionner " - Samsung LNS4695DX | User Manual (ENGLISH) - Page 132
numérique Digital Contrairement aux chaînes analogiques, dont la qualité de réception peut varier (d'enneigée à claire), les chaînes numériques (HDTV) offrent soit une réception parfaite, soit aucune réception. Ainsi, contrairement aux chaînes analogiques, vous ne pouvez pas syntoniser de façon pr - Samsung LNS4695DX | User Manual (ENGLISH) - Page 133
Contrôle de L'image Réglage de l'image Vous pouvez choisir le type d'image qui correspond le plus à vos exigences. Changement du format normal de l'image 1 Appuyez sur la touche MENU. Appuyez sur la touche "Image", puis sur ENTER . ou pour choisir 2 Appuyez sur la touche ou pour sélectionner " - Samsung LNS4695DX | User Manual (ENGLISH) - Page 134
Personnalisation des réglages de l'image Vous pouvez utiliser les menus affichés à l'écran pour régler le contraste, la luminosité, la netteté, les couleurs et la teinte en fonction de vos préférences. Vous pouvez choisir "Standard" pour appliquer automatiquement vos réglages d'image personnalisés. - Samsung LNS4695DX | User Manual (ENGLISH) - Page 135
5 Appuyez sur ENTER pour revenir au "Mode". Appuyez sur la touche ou pour sélectionner "Nuance coul.", puis appuyez sur ENTER . 6 Appuyez sur la touche ou pour choisir une option particulière (Froide2, Froide1, Normale, Chaude1 ou Chaude2), puis appuyez sur ENTER . Rétablir les réglages par défaut 7 - Samsung LNS4695DX | User Manual (ENGLISH) - Page 136
et Large en mode DTV ou Component (720p, 1080i) ou HDMI (720p, 1080i). Lorsque le mode Double ( , ) a été défini sur PIP, le paramètre Picture Size (Taille de l'image) ne peut pas être réglé. Lorsque vous regardez une émission numérique, vous pouvez utiliser la fonction Format Large. Horizontal - Samsung LNS4695DX | User Manual (ENGLISH) - Page 137
Utilisation de la fonction de correction de la faiblesse chromatique Cette fonction permet d'ajuster les couleurs rouge, vert et bleu afin de corriger la faiblesse chromatique de l'utilisateur. 1 Appuyez sur la touche MENU. Appuyez sur la touche ou sélectionner "Configuration", puis appuyez sur - Samsung LNS4695DX | User Manual (ENGLISH) - Page 138
Réduction numérique des bruits Si le signal de diffusion capté par votre téléviseur est faible, vous pouvez activer la fonction de réduction numérique des bruits pour aider à éliminer les parasites et les images fantômes qui apparaissent à l'écran. 1 Appuyez sur la touche MENU. Appuyez sur la - Samsung LNS4695DX | User Manual (ENGLISH) - Page 139
est désactivée lorsque la source d'entrée est en mode PC. La fonction DNIe n'est pas disponible en mode Cinéma.(Elle est désactivée.) Français-46 - Samsung LNS4695DX | User Manual (ENGLISH) - Page 140
Réglage du mode film Il est possible de détecter et de traiter automatiquement des signaux de film et de régler l'image afin d'obtenir une qualité optimale. 1 Pr Appuyez sur la touche MENU. Appuyez sur la touche sélectionner "Image", puis appuyez sur ENTER . ou pour 2 Appuyez sur la touche sur - Samsung LNS4695DX | User Manual (ENGLISH) - Page 141
Visionnement Image sur Image La fonction Picture-In-Picture (PIP) est l'une des plus utiles de votre téléviseur. Le système d'avant-garde PIP permet de regarder deux images simultanément. Comment activer la - Samsung LNS4695DX | User Manual (ENGLISH) - Page 142
Redimensionnement de l'image secondaire 1 Appuyez sur la touche MENU. Appuyez sur la touche sélectionner "ISI", puis appuyez sur ENTER . ou pour 2 Appuyez sur la touche ou pour sélectionner "Format", puis appuyez sur ENTER . Appuyez sur la touche ou pour sélectionner le format que vous voulez, - Samsung LNS4695DX | User Manual (ENGLISH) - Page 143
Sélection du canal de l'image secondaire (PIP) Après avoir défini la source du signal (antenne ou câble) de l'image secondaire, la sélection de la chaîne est aisée. 1 Appuyez sur la touche MENU. Appuyez sur la touche sélectionner "ISI", puis appuyez sur ENTER . ou pour 2 Appuyez sur la touche - Samsung LNS4695DX | User Manual (ENGLISH) - Page 144
Arrêt sur image Appuyez sur le bouton STILL pour faire un arrêt sur image en mouvement. (Vous entendrez toujours le son normal.) fonction, appuyez sur la touche STILL ou sur n'importe quelle touche de la télécommande. Pour annuler cette Réglage du mode écran bleu Si le téléviseur ne reçoit aucun - Samsung LNS4695DX | User Manual (ENGLISH) - Page 145
Contrôle du Son Paramètres audio Vous pouvez régler et personnaliser le son du téléviseur au moyen de la télécommande. Réglage du volume Appuyez sur VOL+ pour monter le volume et sur VOL- pour le baisser. Utilisation de la touche MUTE Vous pouvez couper le son en tout temps. Pour cela, appuyez sur - Samsung LNS4695DX | User Manual (ENGLISH) - Page 146
Réglages audio Vous pouvez régler le son selon vos préférences. 1 Appuyez sur la touche MENU. Appuyez sur la touche ou sélectionner "Son", puis appuyez sur la touche ENTER . pour 2 Appuyez sur la touche ou pour sélectionner "Mode", puis appuyez sur ENTER . Appuyez de nouveau sur le bouton ou pour - Samsung LNS4695DX | User Manual (ENGLISH) - Page 147
Configuration de la fonction SRS TruSurround XT TruSurround XT est une technologie SRS brevetée qui permet de passer le contenu multichaîne 5.1 sur un système à deux haut-parleurs. Le mode TruSurround permet d'obtenir un son ambiophonique renversant sur tout système d'écoute à deux haut-parleurs, y - Samsung LNS4695DX | User Manual (ENGLISH) - Page 148
Volume automatique L'amplitude du signal audio étant différente pour chaque station de télévision, il peut être fastidieux de régler le volume chaque fois que vous syntonisez un nouveau canal. La fonction de réglage automatique du volume modifie automatiquement le volume de chaque canal en fonction - Samsung LNS4695DX | User Manual (ENGLISH) - Page 149
Sélection d'une bande son à canaux multiples (MTS) Digital Le système de télévision numérique est capable de réaliser la transmission simultanée de plusieurs pistes audio (par exemple, la traduction simultanée de l'émission en plusieurs langues). La disponibilité de ces multipistes supplémentaires - Samsung LNS4695DX | User Manual (ENGLISH) - Page 150
Sélection d'une bande son à canaux multiples (MTS) Analog Selon l'émission que vous écoutez, vous pouvez sélectionner parmi les modes audio Stéréo ou SAP. 1 Appuyez sur la touche MENU. Appuyez sur la touche ou sélectionner "Son", puis appuyez sur la touche ENTER . pour 2 Appuyez sur le bouton ou - Samsung LNS4695DX | User Manual (ENGLISH) - Page 151
Sélection de l'option Sourdine int. Lorsque vous utilisez un appareil comme un cinéma maison ou un amplificateur avec des haut-parleurs externes, vous pouvez régler la Sourdine int. à On pour couper le son des haut-parleurs internes du téléviseur. 1 Appuyez sur la touche MENU. Appuyez sur la touche - Samsung LNS4695DX | User Manual (ENGLISH) - Page 152
Sélection de Sélect. son 1 Appuyez sur la touche MENU. Appuyez sur la touch ou sélectionner "Son", puis appuyez sur la touche ENTER . pour 2 Appuyez sur le bouton ou pour sélectionner "Sélect. son", puis appuyez sur le bouton ENTER . 3 Appuyez sur le bouton ou pour sélectionner "Principale", puis - Samsung LNS4695DX | User Manual (ENGLISH) - Page 153
Définition de la mélodie de marche/arrêt Il est possible de régler une mélodie qui se met en marche lorsque le téléviseur est mis sous tension ou hors tension. 1 Appuyez sur la touche MENU. Appuyez sur la touche ou sélectionner "Son", puis appuyez sur la touche ENTER . pour 2 Appuyez sur le - Samsung LNS4695DX | User Manual (ENGLISH) - Page 154
Foctions Speciales Réglage des fonctions d'aide Affiche l'aide dans le menu des fonctions. L'Aide s'affiche dans le haut de l'écran. 1 Appuyez sur la touche MENU. Appuyez sur la touche ou sélectionner "Configuration", puis appuyez sur ENTER . pour 2 Appuyez sur la touche ENTER . ou pour choisir - Samsung LNS4695DX | User Manual (ENGLISH) - Page 155
Utilisation de la fonction d'économie d'énergie Cette fonction règle la luminosité du téléviseur afin de réduire la consommation d'énergie. Lorsque vous regardez la télévision la nuit, définissez l'option "Économiseur énergie" sur "Haute" pour réduire la fatigue des yeux et la consommation d'énergie - Samsung LNS4695DX | User Manual (ENGLISH) - Page 156
un autre appareil externe, désactivez le mode Jeu dans le menu de configuration. • Si vous affichez le menu TV en mode Jeu, l'écran tremblera légèrement. Le mode Jeu n'est pas offert en mode TV. Si le mode jeu est activé • Les modes Image et Son sont automatiquement modifiés en Personnalisé. Vous ne - Samsung LNS4695DX | User Manual (ENGLISH) - Page 157
dans l'ordre suivant pour rétablir le code 0-0-0-0 : POWER (Off), MUTE, 8, 2, 4, POWER (On). La fonction V-Chip pour le contrôle parental ne fonctionne qu'en modes TV, AV et S-Vidéo. Français-64 - Samsung LNS4695DX | User Manual (ENGLISH) - Page 158
Activation/désactivation des classifications 1 Appuyez sur la touche MENU. Appuyez sur la touche ou sélectionner "Configuration", puis appuyez sur ENTER . pour Appuyez sur la touche ou pour sélectionner "V-Chip", puis appuyez sur la touche ENTER . 2 Appuyez sur la touche . Appuyez sur les - Samsung LNS4695DX | User Manual (ENGLISH) - Page 159
configurer le contrôle parental selon deux classifications : "Cont. paren. TV" et "Classif. MPAA". 1 Appuyez sur la touche MENU. Appuyez menu. Ces catégories composent deux grands groupes : "TV-Y" et "TV-Y7" (jusqu'à 7 ans), et "TV-G" à "TV-MA" (tous les autres). Les restrictions applicables à ces - Samsung LNS4695DX | User Manual (ENGLISH) - Page 160
utilise le système mis au point par la "MPAA" (Motion Picture Association of America). Cette fonction s'applique surtout aux longs métrages. Quand ées offensantes (selon le système "Classif. MPAA" ou "Cont. paren. TV") sont automatiquement bloquées. 1 Appuyez sur la touche MENU. Appuyez sur la - Samsung LNS4695DX | User Manual (ENGLISH) - Page 161
âgées de 17 ans et plus. NC-17 Non classé. Réservé aux personnes âgées de 17 ans et plus. X Adultes seulement. NR Non classé. • Classification TV (FCC) : La catégorie sélectionnée sera verrouillée (et accompagnée d'un "L" rouge sur fond bleu). En outre, toutes les catégories basées sur l'âge - Samsung LNS4695DX | User Manual (ENGLISH) - Page 162
Configuration des restrictions au moyen des Anglais canadien 1 Appuyez sur la touche MENU. Appuyez sur la touche ou sélectionner "Configuration", puis appuyez sur ENTER . pour Appuyez sur la touche ou pour sélectionner "V-Chip", puis appuyez sur la touche ENTER . 2 Appuyez sur la touche . - Samsung LNS4695DX | User Manual (ENGLISH) - Page 163
Configuration des restrictions au moyen des Français canadien 1 Appuyez sur la touche MENU. Appuyez sur la touche ou sélectionner "Configuration", puis appuyez sur ENTER . pour Appuyez sur la touche ou pour sélectionner "V-Chip", puis appuyez sur la touche ENTER . 2 Appuyez sur la touche . - Samsung LNS4695DX | User Manual (ENGLISH) - Page 164
Utilisation de la fonction V-Chip pour les canaux numériques Il est possible d'utiliser de l'information sur le contrôle parental tout en regardant des canaux numériques. 1 Appuyez sur la touche MENU. Appuyez sur la touche ou sélectionner "Configuration", puis appuyez sur ENTER . pour Appuyez sur - Samsung LNS4695DX | User Manual (ENGLISH) - Page 165
: Deuxième affichage de texte. Données supplémentaires, qui en général ne se rapportent pas au programme. Text3/Text4 : Troisième et quatrième services de texte. Ces canaux de données ne sont utilisés que si la largeur de bande de données Texte1 et Texte2 est insuffisante. La - Samsung LNS4695DX | User Manual (ENGLISH) - Page 166
Affichage des sous-titres codés (messages à l'écran) Digital La fonction de sous-titrage numérique est compatible avec les canaux numériques. 1 Appuyez sur la touche MENU. Appuyez sur la touchec "Configuration", puis appuyez sur ENTER . ou pour sélectionner 2 Appuyez sur la touche sur ENTER . - Samsung LNS4695DX | User Manual (ENGLISH) - Page 167
6 Appuyez sur le bouton ou pour sélectionner "Format", puis appuyez sur le bouton ENTER . Appuyez sur le bouton ou pour sélectionner l'élément voulu dans le menu Format, puis appuyez sur le bouton ENTER . Sélectionnez les autres options indiquées ci-dessous en observant la même méthode. Sélectionnez - Samsung LNS4695DX | User Manual (ENGLISH) - Page 168
Réglage du mode Blue Eye (Yeux bleus) Vous pouvez définir la LED bleue Power sur on (Allumée) or off (Eteinte). Lorsque la fonction Blue Eye (Yeux bleus) est désactivée, la LED bleue s'éteint 5 secondes après l'arrêt du téléviseur. Cela permet d'économiser de l'énergie et de réduire la fatigue - Samsung LNS4695DX | User Manual (ENGLISH) - Page 169
ordinateur ou votre revendeur Samsung). 1. Cliquez sur " Display)" et une boîte de dialogue Propriétés de l'affichage apparaît. 4. Allez sur l'onglet "Paramètres (Settings 800 x 600 35.2 800 x 600 37.9 800 x 600 48.1 800 x 600 46.9 1024 x 768 48.4 1024 x 768 56.5 1024 x 768 60.0 1280 x - Samsung LNS4695DX | User Manual (ENGLISH) - Page 170
Réglage de la qualité de l'image La fonction de réglage de la qualité de l'image supprime ou réduit les parasites. Si la syntonisation précise ne suffit pas à supprimer les parasites, réglez la fréquence le mieux possible puis recommencez la syntonisation précise. Une fois les parasites réduits, - Samsung LNS4695DX | User Manual (ENGLISH) - Page 171
Déplacement de l'image Après avoir branché l'ordinateur sur le téléviseur, si nécessaire vous pouvez réglez la position de l'image. 1 Appuyez sur la touche SOURCE pour sélectionner "PC". 2 Appuyez sur la touche MENU. Appuyez sur la touche ou sélectionner "Configuration", puis appuyez sur ENTER . - Samsung LNS4695DX | User Manual (ENGLISH) - Page 172
Réglage automatique de la qualité et de la position de l'image Cette fonction règle automatiquement l'écran du téléviseur en fonction du signal vidéo reçu. Les réglages fin et rapide ainsi que la position de l'image sont ajustés automatiquement. 1 Appuyez sur la touche SOURCE pour sélectionner "PC - Samsung LNS4695DX | User Manual (ENGLISH) - Page 173
Redimensionnement de l'image (mode PC) You can select the picture size which best corresponds to your viewing requirements. 1 Appuyez sur la touche SOURCE pour sélectionner "PC". 2 Appuyez sur la touche ou pour sélectionner "Image", puis - Samsung LNS4695DX | User Manual (ENGLISH) - Page 174
Affichage de la résolution actuelle Vous pouvez obtenir l'information sur la résolution de votre ordinateur. 1 Appuyez sur la touche SOURCE pour sélectionner "PC". 2 Appuyez sur la touche MENU. Appuyez sur la touche ou sélectionner "Configuration", puis appuyez sur ENTER . pour 3 Appuyez sur le - Samsung LNS4695DX | User Manual (ENGLISH) - Page 175
Initialisation des réglages de l'image Vous pouvez ramener tous les réglages d'image aux valeurs réglées à l'usine. 1 Appuyez sur la touche SOURCE pour sélectionner "PC". 2 Appuyez sur la touche MENU. Appuyez sur la touche ou sélectionner "Configuration", puis appuyez sur ENTER . pour 3 Appuyez - Samsung LNS4695DX | User Manual (ENGLISH) - Page 176
solutions. Si aucune des astuces de dépannage ne s'applique, appelez le centre de service le plus proche de chez vous. Problème Image de qualité médiocre. cran de veille pour afficher une image qui bouge. L'écran TFT LCD utilise un affichage constitué de pixels secondaires 6.220.800 nécessitant - Samsung LNS4695DX | User Manual (ENGLISH) - Page 177
Installation du support < 2 > < 3 > 1. Placez la télévision face posée sur un chiffon doux ou un coussin sur une table. 2. Insérez le socle dans le trou situé sous le télé - Samsung LNS4695DX | User Manual (ENGLISH) - Page 178
au mur en utilisant les vis à bois après avoir fixé les chevilles dans le support mural . Remarque : Si le support n'est pas fermement fixé au mur, la télévision LCD risque de tomber. Vis: 3 EA Guide d'installation 2 Coupez le courant puis débranchez le cordon de la prise. Placez la télévision - Samsung LNS4695DX | User Manual (ENGLISH) - Page 179
(LN-S4695D) Reportez-vous au manuel d'installation correspondant à votre fixation murale. Ce TV accepte une interface de montage de 600 mm x 400 mm conforme à la norme VESA. Remarques concernant l'installation 1. Faites appel à un technicien pour installer la fixation murale. 2. Samsung Electronics - Samsung LNS4695DX | User Manual (ENGLISH) - Page 180
Installer un kit de fixation mural (LN-S4695D) Mise en place de l'écran de télévision sur la à réinsérer et à serrer la goupille de sécurité ( )pour fixer solidement le produit au support. TELEVISEUR LCD Comment régler l'angle de montage ARemarque : Réglez l'angle de la fixation à -2° avant de la - Samsung LNS4695DX | User Manual (ENGLISH) - Page 181
verrouillage dans la fente Kensington de la télévision LCD (Figure 1) et tournez-le dans le H) TV Avec support Poids Avec support Sans support Considérations Le design et les spécifications peuvent changer sans préavis. Français-88 LN-S4695D 46 pouces AC 110-120 V 60 Hz 310 W 1920 x 1080@ 60 Hz - Samsung LNS4695DX | User Manual (ENGLISH) - Page 182
Dimensions (LN-S4095D) VUE DE DESSUS DÉTAILS DU PANNEAU DE PRISES 3,25" H x 9,92" W À 12,98" UNE HAUTEUR DE VUE AVANT/ de procéder à des travaux de menuiserie. Nous n 'assumons aucune responsabilité pour les erreurs typographiques ou d 'impression. © 2006 Samsung Electronics America,Inc. Français-89 - Samsung LNS4695DX | User Manual (ENGLISH) - Page 183
Dimensions (LN-S4695D) VUE DE DESSUS DÉTAILS DU PANNEAU DE PRISES 3,25" H x 9,92" W À 12,98" UNE HAUTEUR DE VUE AVANT/VUE procéder à des travaux de menuiserie. Nous n 'assumons aucune responsabilité pour les erreurs typographiques ou d 'impression. © 2006 Samsung Electronics America,Inc. English-90 - Samsung LNS4695DX | User Manual (ENGLISH) - Page 184
Cette page est laissée intentionnellement en blanc. - Samsung LNS4695DX | User Manual (ENGLISH) - Page 185
un PC 14 FUNCIONAMIENTO Encendido o apagado del TV 15 Función Plug & Play 15 Visualización (motor digital de imágenes naturales 46 Ajuste de la función Film Mode 51 Ajuste del modo Blue Screen (Pantalla Azul 51 CONTROL DE manual para evitar fallas y guarde para futuras referencias. Español-1 - Samsung LNS4695DX | User Manual (ENGLISH) - Page 186
Contenido PANTALLA DE PC Uso del TV como pantalla de ordenador (PC 76 Modos de visualización 76 giratoria 84 Instalación del Kit de montaje en la pared (LN-S4095D 85 Instalación del Kit de montaje en la pared (LN-S4695D 85 Uso del cierre antirrobo kensington 88 Especificaciones 88 Dimensiones - Samsung LNS4695DX | User Manual (ENGLISH) - Page 187
con su TV LCD. Si falta alguna opción, póngase en contacto con el proveedor. Mando A Distancia y Pilas (AAA x 2) (BN59-00568A) Cable de alimentación (3903-000144) Paño de limpieza (BN63-01798A) Cubierta inferior LN-S4095D (BN63-02491A) LN-S4695D (BN63-02624A) Manual de Instrucciones Tarjeta - Samsung LNS4695DX | User Manual (ENGLISH) - Page 188
general del panel de control Botones de la parte inferior derecha del panel Los botones del panel ENTER del mando a distancia. MENU Pulse para ver en pantalla un menú con las características del TV. Pulse para aumentar o reducir el volumen. En el menú de la pantalla, utilice los botones del - Samsung LNS4695DX | User Manual (ENGLISH) - Page 189
de S-Vídeo de una cámara o de un vídeo. ANT 1 IN/ANT 2 IN Efectuar una conexión con una antena o con un sistema de televisión por cable. SERVICE 1/SERVICE 2 Conector solamente para servicio. AV OUT Conéctelo a la toma de la entrada de audio del amplificador/sistema de Cine en casa. PC IN Se - Samsung LNS4695DX | User Manual (ENGLISH) - Page 190
Tomas del panel lateral Use las tomas del panel lateral izquierdo para conectar los componentes que se utilizan ocasionalmente, como una videocámara o un videojuego. (Consulte la página 11) AV IN 2 Entradas de vídeo y audio para dispositivos externos. S-VIDEO 2 Entradas de vídeo para dispositivos - Samsung LNS4695DX | User Manual (ENGLISH) - Page 191
TV/Cable. ADD/DEL Se utiliza para almacenar y borrar canales en la memoria. SET Permite naturales) Activa la DNIe.(Consulte la página 46) CH Presenta secuencialmente los canales disponibles. Estos tulos. RESET Cuando no funcione el mando a distancia, cambie las baterías y pulse el botón RESET ( - Samsung LNS4695DX | User Manual (ENGLISH) - Page 192
1 IN (AIR) 1. Conecte el cable de la antena en el terminal ANT 1 IN (AIR) de la parte inferior del panel posterior. Antenas de VHF y UHF independientes Si dispone de dos antenas independientes para el TV (una de VHF y otra de UHF), debe combinar ambas señales de la antena antes de conectarlas - Samsung LNS4695DX | User Manual (ENGLISH) - Page 193
por cable sin decodificador ANT 2 IN (CABLE) 1. Conecte el cable de entrada en el terminal de la antena ANT 2 IN (CABLE) de la parte posterior del TV. Dado que el TV está preparado para la televisión por cable, no se necesita un decodificador para ver canales de cable no codificados. Conexión al - Samsung LNS4695DX | User Manual (ENGLISH) - Page 194
de la parte posterior del TV. Panel posterior del VCR Panel posterior del TV 2. Conecte el cable o la antena en el terminal ANT IN de la parte posterior del del TV. Si el vídeo es estéreo, tendrá que conectar dos cables. Conexión de un reproductor de vídeo S-VHS Este televisor Samsung - Samsung LNS4695DX | User Manual (ENGLISH) - Page 195
del televisor facilitan la conexión de la videocámara. Permiten ver las cintas de la videocámara sin utilizar un aparato de vídeo. Videocámara TV (Tomas del panel lateral) 1 Cable de S-Video (No incluido) o 1 Cable de Video (No incluido) 2 Cable de Audio (No incluido) 1. Conecte un cable de audio - Samsung LNS4695DX | User Manual (ENGLISH) - Page 196
de DVD/reproductor de televisión digital. Conexión a un DVD/receptor de TV digital a través de un HDMI Solo es aplicable si hay un de HDMI en el dispositivo externo. Reproductor de DVD/ receptor de TV digital Panel posterior del TV 1. Conecte un cable de HDMI entre el conector de HDMI/DVI - Samsung LNS4695DX | User Manual (ENGLISH) - Page 197
con núcleo de ferrita. Cuado un sistema de audio digital se conecta a la terminal "DIGITAL AUDIO OUT (OPTICAL)" terminal: Reduzca la ganancia (volumen) del TV, y ajuste el volumen con el control del amplificador. Conexión de un amplificador/DVD para cine en casa Amplificador/DVD para Cine en casa - Samsung LNS4695DX | User Manual (ENGLISH) - Page 198
Conexión a un PC PC Panel posterior del TV 2 Cable de Audio de PC (No incluido) 1 Cable de D-Sub (No incluido) 1. Conecte un cable de PC vídeo (D-Sub) entre el conector PC IN [PC] - Samsung LNS4695DX | User Manual (ENGLISH) - Page 199
Funcionamiento Encendido o apagado del TV Pulse el botón POWER del mando a distancia. También puede el botón POWER en el mando a distancia. Aparece el mensaje "Menu language, Channels and Time will be set.". Pulse el botón ENTER y aparecerá automáticamente el menú "Select the language of the OSD". 2 - Samsung LNS4695DX | User Manual (ENGLISH) - Page 200
búsqueda antes de que termine, pulse el botón ENTER con la opción Detener seleccionada. 6 Pulse el botón ENTER . Pulse los botones o para seleccionar "Manual" o "Auto" después, pulse el botón ENTER . Activa o desactiva la función Horario de verano. 7 Pulse el botón ENTER . Pulse los botones o para - Samsung LNS4695DX | User Manual (ENGLISH) - Page 201
mediante los botones del panel lateral del televisor. Visualización de los menús 1 Pulse el botón MENU. El menú principal aparece en la parte inferior de la pantalla. Existen seis grupos de menús: "Entrada", "Imagen", "Sonido", "Canal", "Configuración", "PIP" y "Mapa de menús". 2 Pulse los botones - Samsung LNS4695DX | User Manual (ENGLISH) - Page 202
ón Menu Map (Mapa de menús) del menú principal se puede seleccionar una función rápidamente. 1 Pulse el botón MENU. El menú principal aparece en la parte inferior de la pantalla. 2 Pulse los botones o para seleccionar "Mapa de menús" y pulse el botón ENTER . Aparece el mapa de menús. 3 Pulse los - Samsung LNS4695DX | User Manual (ENGLISH) - Page 203
Selección del idioma de los menús Cuando el televisor se utiliza por primera vez, debe seleccionar el idioma en el que desea que aparezcan los menús y las indicaciones. 1 Pulse el botón MENU. Pulse los botones o para seleccionar "Configuración", y después pulse el botón ENTER . 2 Pulse los botones - Samsung LNS4695DX | User Manual (ENGLISH) - Page 204
Memorización de canales El TV puede memorizar y almacenar todos los canales disponibles, tanto "aéreos" (antena) como de cable. Una vez memorizados los canales disponibles, use los botones CH y CH para - Samsung LNS4695DX | User Manual (ENGLISH) - Page 205
tipo de sistema de cable, pulse los botones o para seleccionar las opciones "STD", "HRC" o "IRC". • STD, HRC e IRC identifican los distintos tipos de sistemas de TV por cable. Póngase en contacto con su proveedor de cable para saber el tipo de sistema de cable existente en su zona. En este momento - Samsung LNS4695DX | User Manual (ENGLISH) - Page 206
botones CH o CH . Al pulsar los botones CH o CH , el televisor cambia los canales en secuencia. Verá todos los canales que ha memorizado el TV. (Debe haber un mínimo de tres canales memorizados.) No verá los canales borrados o no memorizados. Utilización de los botones numéricos Utilice los botones - Samsung LNS4695DX | User Manual (ENGLISH) - Page 207
funcionar en cinco modos diferentes: TV, VCR (vídeo), Cable (Decodificador), DVD o Set- Top Box (receptor TV digital). Pulsando el botón marca de su decodificador, que aparece en la lista de la página 26 de este manual. Asegúrese de introducir los tres dígitos del código, incluso aunque el primer dí - Samsung LNS4695DX | User Manual (ENGLISH) - Page 208
el botón DVD del mando a distancia del televisor. 3. Pulse el botón SET del mando a distancia del televisor. 4. Mediante los botones de número del marca de su STB, que aparece en la lista de la página 27 de este manual. Asegúrese de introducir los tres dígitos del código, incluso aunque el primer dí - Samsung LNS4695DX | User Manual (ENGLISH) - Page 209
Códigos del mando a distancia Códigos de vídeo Marca Codigo SAMSUNG 000 001 002 003 004 005 077 078 079 ADMIRAL 020 AIWA 025 AKAI 004 027 032 AUDIO DYNAMICS 007 026 BELL&HOWELL 018 BROKSONIC - Samsung LNS4695DX | User Manual (ENGLISH) - Page 210
Códigos de cable Marca Codigo SAMSUNG 000 001 002 003 004 005 006 007 GI 041 HAMLIN TOCOM 032 UNIVERSAL 033 034 VIEWSTAR 019 021 023 028 WARNER AMEX 046 ZENITH 017 029 035 037 045 SAMSUNG Códigos de DVD Producto DVD DVDR BD Record VCR COMBO VCR Record DHR COMBO Codigo 000 001 002 - Samsung LNS4695DX | User Manual (ENGLISH) - Page 211
102 YAMAHA 032 063 YAMAKAWA 040 073 XWAVE 103 ZENITH 076 121 SAMSUNG Códigos de STB Producto Ground wave STB Satellite STB CABLE STB STB ALPHASTAR 023 ANAM 043 CHANNEL MASTER 018 034 CROSSDIGITAL 019 CHAPARRAL 035 DIRECT TV 015 016 017 019 022 045 060 061 062 065 066 067 068 - Samsung LNS4695DX | User Manual (ENGLISH) - Page 212
distintas funciones de temporización del televisor. Además, podrá ver la hora mientras ve la televisión. (Pulse el botón INFO.) Opción 1: Ajuste manual del reloj 1 Pulse el botón MENU. Pulse los botones o para seleccionar "Configuración", y después pulse el botón ENTER . 2 Pulse los botones o para - Samsung LNS4695DX | User Manual (ENGLISH) - Page 213
Opción 2: Ajuste automático del reloj El reloj puede ajustarse automáticamente cuando se recibe una señal digital. 1 Pulse el botón MENU. Pulse los botones o para seleccionar "Configuración", y después pulse el botón ENTER . 2 Pulse los botones o para seleccionar "Reloj" y, a continuación, pulse el - Samsung LNS4695DX | User Manual (ENGLISH) - Page 214
Activación y desactivación del temporizador 1 Pulse el botón MENU. Pulse los botones o para seleccionar "Configuración", y después pulse el botón ENTER . 2 Pulse los botones o para seleccionar "Temporizador" y, a continuación, pulse el botón ENTER . Pulse los botones o para seleccionar "T. de - Samsung LNS4695DX | User Manual (ENGLISH) - Page 215
Ajuste del temporizador de desconexión El temporizador de desconexión apaga automáticamente el televisor después de un período prefijado (entre 30 y 180 minutos). 1 Pulse el botón MENU. Pulse los botones o para seleccionar "Configuración", y después pulse el botón ENTER . 2 Pulse los botones o para - Samsung LNS4695DX | User Manual (ENGLISH) - Page 216
a distancia se puede usar para cambiar las señales de visualización procedentes de los equipos conectados, como aparatos de vídeo, DVD, receptores de televisión digital Samsung y las fuentes de señales de televisión (aéreas o por cable) Ajuste de la fuente de la señal 1 Pulse el botón MENU. Pulse el - Samsung LNS4695DX | User Manual (ENGLISH) - Page 217
élite STB, PVR STB, Receptor AV, Receptor DVD, Juego, Filmadora, DVD Combo, DVD Recorder DVD HDD, PC, Televisor Internet, Televisor interact., STB VOD, TV. Pulse el botón ENTER . Ajuste otros orígenes de señal (AV1, AV2, S-Vídeo1, S-Vídeo2, Componente1, Componente2, PC, HDMI1 o HDMI2) utilizando el - Samsung LNS4695DX | User Manual (ENGLISH) - Page 218
Control de los Canales Selección de los canales favoritos Puede almacenar sus canales favoritos para cada fuente de entrada disponible (como TV y CATV). Preselección: Para utilizar la función Gestor de canales antes se ha de ejecutar Prog. Auto (consulte la página 20). Para almacenar los canales - Samsung LNS4695DX | User Manual (ENGLISH) - Page 219
Visualización de las listas de canales Se pueden ver las listas de todos los canales, de los añadidos y de los favoritos. Preselección: Para utilizar la función Gestor de canales antes se ha de ejecutar Prog. Auto (consulte la página 20). 1 Pulse el botón MENU. Pulse los botones o para seleccionar " - Samsung LNS4695DX | User Manual (ENGLISH) - Page 220
Adición y supresión de canales Preselección: Para utilizar la función Gestor de canales antes se ha de ejecutar Prog. Auto. (Consulte la página 20.) 1 Pulse el botón MENU. Pulse los botones o para seleccionar "Canal" y, a continuación, pulse el botón ENTER . 2 Pulse los botones o para seleccionar " - Samsung LNS4695DX | User Manual (ENGLISH) - Page 221
" pulsando los botones o y, a continuación, pulse el botón ENTER para volver al menú anterior. Pulse el botón EXIT para salir. Si añade o suprime un canal de TV, los canales etiquetados también se añadirán o se suprimirán. Español-37 - Samsung LNS4695DX | User Manual (ENGLISH) - Page 222
Sintonización fina de los canales analógicos Analógico Utilice la sintonización fina para ajustar manualmente un determinado canal a fin de que la recepción sea óptima. 1 Pulse el botón MENU. Pulse los botones o para seleccionar "Canal" y, a continuación, pulse el botón ENTER . 2 Pulse los botones o - Samsung LNS4695DX | User Manual (ENGLISH) - Page 223
la señal digital Digital A diferencia de los canales analógicos, cuya calidad de recepción puede variar desde "nebuloso" a claro, los canales digitales (HDTV) tienen una calidad de recepción perfecta o no se reciben en absoluto. Por tanto, a diferencia de los canales analógicos, no puede sintonizar - Samsung LNS4695DX | User Manual (ENGLISH) - Page 224
Control de la Imagen Control de la imagen Puede seleccionar el tipo de imagen que mejor cumpla sus requisitos de visualización. Cambio del formato de la imagen 1 Pulse el botón MENU. Pulse los botones o para seleccionar "Imagen" y, a continuación, pulse el botón ENTER . 2 Pulse los botones botón - Samsung LNS4695DX | User Manual (ENGLISH) - Page 225
ón, Color o Tinte (V/R)) pulsando los botones o . "Tinte" no funciona en HDMI, Componente 480p ni en modos superiores. "Tinte" no puede ajustarse cuando se está viendo la TV digital. En el modo PC, sólo se pueden seleccionar las opciones Contraste y Luminosidad. Español-41 Continúa... - Samsung LNS4695DX | User Manual (ENGLISH) - Page 226
5 Pulse el botón ENTER para volver a "Modo". Pulse los botones o para seleccionar "Tono Color" y, a continuación, pulse el botón ENTER . 6 Pulse los botones o para seleccionar una opción determinada (Frío2, Frío1, Normal, Tibio1 o Tibio2) y, a continuación, pulse el botón ENTER . Reajuste de valores - Samsung LNS4695DX | User Manual (ENGLISH) - Page 227
(Ajuste de anchura) no admite todos los 4 : 3 dispositivos externos. Wide Fit Para mantener la escala en el modo Wide Fit (Ajuste Ancho), se recorta la parte superior e inferior de la imagen. Español-43 - Samsung LNS4695DX | User Manual (ENGLISH) - Page 228
Uso de la función de mejora Color Weakness (Defect. de color) Esta función ajusta los colores rojo, verde o azul para compensar las deficiencias particulares que presentan algunos usuarios en la visualización de los colores. 1 Pulse el botón MENU. Pulse los botones o para seleccionar "Configuración" - Samsung LNS4695DX | User Manual (ENGLISH) - Page 229
Reducción digital del ruido Si la señal de emisión que recibe el televisor es débil, puede activarse la función de reducción digital del ruido (Digital Noise Reduction) para reducir la estática y las imágenes superpuestas que pueden aparecer en la pantalla. 1 Pulse el botón MENU. Pulse los botones o - Samsung LNS4695DX | User Manual (ENGLISH) - Page 230
se activa si la fuente de entrada es un PC. La función DNle no se admite en el modo Movie (Cine). (Está desactivada.) Español-46 - Samsung LNS4695DX | User Manual (ENGLISH) - Page 231
función Modo película sólo se puede ajustar en los modos AV (AV o S-Vídeo) que admitan la señales SD (480i) en el modo de TV analógica. Español-47 - Samsung LNS4695DX | User Manual (ENGLISH) - Page 232
Visualización de imagen sobre imagen Una de las mejores características del televisor es la función de imagen sobre imagen (PIP). El avanzado sistema PIP permite ver dos imágenes diferentes al mismo tiempo. Activación de PIP 1 Pulse el botón MENU. Pulse los botones o para seleccionar "PIP" y, a - Samsung LNS4695DX | User Manual (ENGLISH) - Page 233
Cambio del tamaño de la imagen secundaria (PIP) 1 Pulse el botón MENU. Pulse los botones o para seleccionar "PIP" y, a continuación, pulse el botón ENTER . 2 Pulse los botones o para seleccionar "Tamaño" y, a continuación, pulse el botón ENTER . Pulse los botones o para seleccionar el tamaño que - Samsung LNS4695DX | User Manual (ENGLISH) - Page 234
Cambio del canal de la imagen secundaria (PIP) Después de establecer la fuente de señal (antena o cable) de la imagen secundaria, cambiar los canales es fácil. 1 Pulse el botón MENU. Pulse los botones o para seleccionar "PIP" y, a continuación, pulse el botón ENTER . 2 Pulse los botones o para - Samsung LNS4695DX | User Manual (ENGLISH) - Page 235
seguirá oyendo el sonido normal.) función, vuelva a pulsar el botón STILL o pulse cualquier botón del mando a distancia. Para cancelar esta Ajuste del modo Blue Screen (Pantalla Azul) Si no se recibe ninguna señal o ésta es muy débil, una pantalla azul sustituye de forma automática la imagen con - Samsung LNS4695DX | User Manual (ENGLISH) - Page 236
el sonido, vuelva a pulsar el botón MUTE o pulse los botones VOL + o VOL - Utilización de los parámetros de sonido automáticos El TV tiene valores de sonido automáticos ("Normal", "Música", "Cine" y "Diálogo" preajustados de fábrica. Puede seleccionar "Favorito", que recupera automáticamente los - Samsung LNS4695DX | User Manual (ENGLISH) - Page 237
Personalización del sonido Los parámetros de sonido pueden ajustarse para que se adapten a sus preferencias personales. 1 Pulse el botón MENU. Pulse los botones o para seleccionar "Sonido" y, a continuación, pulse el botón ENTER . 2 Pulse los botones o para seleccionar "Modo" y, a continuación, - Samsung LNS4695DX | User Manual (ENGLISH) - Page 238
Configuración de SRS TruSurround XT TruSurround XT es una tecnología SRS patentada que solventa el problema de reproducir contenido multicanal 5.1 en dos altavoces. Trusurround proporciona una sensación de sonido virtual convincente a través de cualquier sistema de reproducción con dos altavoces. Es - Samsung LNS4695DX | User Manual (ENGLISH) - Page 239
Auto Volume (Volumen automático) Cada emisora tiene sus propias condiciones de señal y es muy incómodo ajustar el volumen cada vez que se cambia de canal. Con la función "Vol.Auto" el volumen del canal deseado se ajusta de forma automática reduciendo la salida de sonido cuando la señal de modulación - Samsung LNS4695DX | User Manual (ENGLISH) - Page 240
Elección de una pista sonora multicanal (MTS) Digital El sistema de transmisión de TV digital permite transmitir simultáneamente muchas pistas de audio (por ejemplo, traducciones simultáneas del programa en otros idiomas). La disponibilidad de estas "multipistas" adicionales - Samsung LNS4695DX | User Manual (ENGLISH) - Page 241
Elección de una pista sonora multicanal (MTS) Analógico En función del programa concreto emitido, puede escuchar en modo estéreo o escuchar un programa de audio secundario (SAP). 1 Pulse el botón MENU. Pulse los botones o para seleccionar "Sonido" y, a continuación, pulse el botón ENTER . 2 Pulse - Samsung LNS4695DX | User Manual (ENGLISH) - Page 242
Selección del silencio interno Al utilizar un dispositivo como Cine en casa o Amplificador con altavoces externos, puede definir "Silenc. Int" en "Encendido" para cortar el sonido de los altavoces internos del televisor. 1 Pulse el botón MENU. Pulse los botones o para seleccionar "Sonido" y, a - Samsung LNS4695DX | User Manual (ENGLISH) - Page 243
Selección del sonido Cuando la opción PIP esta activada, usted puede escuchar el sonido de la sub imagen del PIP. 1 Pulse el botón MENU. Pulse los botones o para seleccionar "Sonido" y, a continuación, pulse el botón ENTER . 2 Pulse los botones o para seleccionar "Sel. sonido" y, a continuación, - Samsung LNS4695DX | User Manual (ENGLISH) - Page 244
Ajuste de la melodía de encendido/apagado Puede definirse un sonido de melodía para que suene cuando se encienda o se apague el TV. 1 Pulse el botón MENU. Pulse los botones o para seleccionar "Sonido" y, a continuación, pulse el botón ENTER . 2 Pulse los botones o para seleccionar "Melodía" y, a - Samsung LNS4695DX | User Manual (ENGLISH) - Page 245
FUNCIONES ESPECIALES Ajuste de la Funcion de Ayuda Muestra la ayuda sobre las funciones del menú. La ayuda aparece en la parte superior de la pantalla. 1 Pulse el botón MENU. Pulse los botones o para seleccionar "Configuración", y después pulse el botón ENTER . 2 Pulse los botones o para seleccionar - Samsung LNS4695DX | User Manual (ENGLISH) - Page 246
Configuración del ahorro de energía Se necesitan más detalles sobre el funcionamiento. Explicar las especificaciones Ahorro de energía Bajo, Medio y Alto. 1 Pulse el botón MENU. Pulse los botones o para seleccionar "Configuración", y después pulse el botón ENTER . 2 Pulse los botones o para - Samsung LNS4695DX | User Manual (ENGLISH) - Page 247
ón en Modo del juego, la pantalla tiembla ligeramente. Modo del juego no está disponible en el modo de TV. Si Modo del juego está configurado como Encendido • Los modos Picture (Imagen) y Sound (Sonido) se cambian automáticamente a Custom (Favorito). No se pueden seleccionar otros modos. Español-63 - Samsung LNS4695DX | User Manual (ENGLISH) - Page 248
el botón . Pulse los botones numéricos para introducir el número PIN actual de 4 dígitos. (El número PIN predeterminado del nuevo equipo de TV es "0000".) Aparecerá el menú "V-Chip". 3 Pulse los botones o para seleccionar "Cambiar código" y, a continuación, pulse el botón ENTER . 4 Pulse el bot - Samsung LNS4695DX | User Manual (ENGLISH) - Page 249
el botón . Pulse los botones numéricos para introducir el número PIN actual de 4 dígitos. (El número PIN predeterminado del nuevo equipo de TV es "0000".) Aparecerá el menú "V-Chip". 3 Aparecerá la pantalla "V-Chip". Pulse los botones seleccionar "Bloqueo V-Chip". o para Para activar la funci - Samsung LNS4695DX | User Manual (ENGLISH) - Page 250
para volver al menú anterior. Pulse el botón EXIT para salir. Estas categorías se dividen en dos grupos: "TV-Y" y "TV-Y7" (niños pequeños y niños a partir de 7 años), y "TV-G" a "TV-MA" (todos los demás). Las limitaciones para estos grupos funcionan de forma independiente. Si en la familia hay ni - Samsung LNS4695DX | User Manual (ENGLISH) - Page 251
de clasificación de películas utiliza el sistema de la Motion Picture Association of America (MPAA) y su aplicación principal es para número PIN actual de 4 dígitos. (El número PIN predeterminado del nuevo equipo de TV es "0000".) Aparecerá el menú "V-Chip". 3 Pulse los botones o para seleccionar " - Samsung LNS4695DX | User Manual (ENGLISH) - Page 252
mayores. Los temas y elementos de este programa pueden incluir violencia física o cómica suave, o puede asustar a niños con una edad inferior a los 7 años. TV-Y Todos los niños. Los temas y elementos de este programa están diseñados específicamente para audiencia muy joven, incluidos niños de edad - Samsung LNS4695DX | User Manual (ENGLISH) - Page 253
ón . Pulse los botones numéricos para introducir el número PIN actual de 4 dígitos. (El número PIN predeterminado del nuevo equipo de TV es "0000".) Aparecerá el menú "V-Chip". 3 Pulse los botones o para seleccionar "Inglés Canadiense" y, a continuación, pulse el botón ENTER . 4 Pulse los botones - Samsung LNS4695DX | User Manual (ENGLISH) - Page 254
ón . Pulse los botones numéricos para introducir el número PIN actual de 4 dígitos. (El número PIN predeterminado del nuevo equipo de TV es "0000".) Aparecerá el menú "V-Chip". 3 Pulse los botones o para seleccionar "Francés Canadiense" y, a continuación, pulse el botón ENTER . 4 Pulse los botones - Samsung LNS4695DX | User Manual (ENGLISH) - Page 255
El número del título de clasificación actual El número de todos los títulos de clasificación 4 Puede bloquear independientemente los programas de TV. Las clasificaciones bloqueadas de televisión se indican mediante el símbolo " ". Para desbloquear un canal bloqueado, pulse de nuevo el botón ENTER - Samsung LNS4695DX | User Manual (ENGLISH) - Page 256
Visualización de subtítulos (mensajes de texto en pantalla) Analógico La función analógica Subtítulo funciona en un modo de canal de TV analógico o en modo de fuente externa. (Dependiendo de la señal de transmisión, la función analógica Subtítulo puede funcionar en canales digitales.) 1 - Samsung LNS4695DX | User Manual (ENGLISH) - Page 257
Visualización de subtítulos (mensajes de texto en pantalla) Digital La función Opciones - Subtítulos Dig. funciona en canales digitales. 1 Pulse el botón MENU. Pulse los botones o para seleccionar "Configuración", y después pulse el botón ENTER . 2 Pulse los botones o para seleccionar "Subtítulo" - Samsung LNS4695DX | User Manual (ENGLISH) - Page 258
6 Pulse los botones o para seleccionar "Tamaño" y, a continuación, pulse el botón ENTER . Pulse los botones o para seleccionar el elemento deseado en el menú Tamaño y, a continuación, pulse el botón ENTER . Ajuste otras opciones de la lista siguiente utilizando el mismo método indicado anteriormente - Samsung LNS4695DX | User Manual (ENGLISH) - Page 259
Ajuste del modo Blue Eye Puede configurar que el LED de alimentación azul esté activado o desactivado. Cuando Blue Eye está desactivado, el LED azul se apaga 5 segundos después de apagar el televisor. En este modo se ahorra energía y se reduce la fatiga ocular. 1 Pulse el botón MENU. Pulse los - Samsung LNS4695DX | User Manual (ENGLISH) - Page 260
TV contacto con el fabricante del ordenador o con un concesionario Samsung). 1. Primero, haga clic en "Panel de control" el modo efectuando una consulta en el manual del usuario de la tarjeta de ví kHz) 31.5 31.5 31.5 37.9 37.5 35.2 37.9 48.1 46.9 48.4 56.5 60.0 64.0 80.0 66.5 Frecuencia vertical (Hz) - Samsung LNS4695DX | User Manual (ENGLISH) - Page 261
Ajuste de la calidad de la imagen El objetivo del ajuste de la calidad de imagen es eliminar o reducir las interferencias. Si no se eliminan mediante la sintonización fina, ajuste la frecuencia todo cuanto pueda y vuelva a realizar la sintonización fina. Cuando se hayan reducido las interferencias, - Samsung LNS4695DX | User Manual (ENGLISH) - Page 262
Cambio de la posición de la imagen Una vez conectado el televisor al PC, ajuste la posición de la imagen si no está bien alineada. 1 Pulse el botón SOURCE para seleccionar "PC". 2 Pulse el botón MENU. Pulse los botones o para seleccionar "Configuración", y después pulse el botón ENTER . 3 Pulse los - Samsung LNS4695DX | User Manual (ENGLISH) - Page 263
Ajuste automático de la calidad y la posición de la imagen Esta función permite al televisor ajustarse automáticamente a la señal de vídeo entrante. Los valores fino, grueso y posición se ajustan automáticamente. 1 Pulse el botón SOURCE para seleccionar "PC". 2 Pulse el botón MENU. Pulse los botones - Samsung LNS4695DX | User Manual (ENGLISH) - Page 264
Cambio del tamaño de imagen (modo PC) Puede seleccionar el tamaño de imagen que mejor se adapte a sus requisitos de visualización. 1 Pulse el botón SOURCE para seleccionar "PC". 2 Pulse los botones o para seleccionar "Imagen" y, a continuación, pulse el botón ENTER . Pulse los botones o para - Samsung LNS4695DX | User Manual (ENGLISH) - Page 265
Visualización de la resolución actual Puede conseguir información sobre la resolución del PC. 1 Pulse el botón SOURCE para seleccionar "PC". 2 Pulse el botón MENU. Pulse los botones o para seleccionar "Configuración", y después pulse el botón ENTER . 3 Pulse los botones o para seleccionar "PC" y, a - Samsung LNS4695DX | User Manual (ENGLISH) - Page 266
Inicialización de los ajustes de imagen Puede recuperar todos los ajustes de imagen predeterminados de fábrica. 1 Pulse el botón SOURCE para seleccionar "PC". 2 Pulse el botón MENU. Pulse los botones o para seleccionar "Configuración", y después pulse el botón ENTER . 3 Pulse los botones o para - Samsung LNS4695DX | User Manual (ENGLISH) - Page 267
ón Fino. Compruebe lo siguiente en el equipo: Alimentación, Cable de señal. El TV utiliza su sistema de gestión de energía. Mueva el ratón del equipo o pulse active el protector de pantalla para visualizar imágenes móviles. El panel LCD TFT utiliza un panel que consta de muchos píxeles de ínfimo - Samsung LNS4695DX | User Manual (ENGLISH) - Page 268
sobre un paño suave o un almohadón sobre una mesa. 2. Desmonte los 4 tornillos de la parte posterior del TV. 3. Separe el soporte del TV. 4. Cubra con una tapa el orificio inferior. < 4 > Función de base giratoria El TV puede ser girado a la izquierda o derecha. Puede ajustar hasta un ángulo de 20 - Samsung LNS4695DX | User Manual (ENGLISH) - Page 269
LCD puede caerse. Tornillo: 3EA Manual 2 Desconecte la alimentación y el cordón eléctrico de la toma de corriente. Coloque hacia abajo el TV sobre un paño suave o un almohadón sobre una mesa. Acople el soporte del aparato sobre la parte posterior del televisor y apriete los tornillos . 3 Inserte - Samsung LNS4695DX | User Manual (ENGLISH) - Page 270
LN-S4695D) Consulte la guía de instalación adecuada a su soporte mural. Este TV admite la base de montaje de 600 mm x 400 mm compatible con VESA. Notas sobre la instalación 1. Para la instalación del soporte mural, póngase en contacto con un técnico. 2. Samsung bloqueo de la parte posterior del - Samsung LNS4695DX | User Manual (ENGLISH) - Page 271
LN-S4695D) Fijación del panel del televisor al soporte del accesorio de montaje mural El aspecto del aparato puede variar según el modelo. Los juegos de colgadores de plástico y de tornillos son iguales. 2 Retire los 4 tornillos de la parte aparato al soporte. Televisor LCD Cómo ajustar el ángulo - Samsung LNS4695DX | User Manual (ENGLISH) - Page 272
los fabricantes. Consulte el manual proporcionado con el bloqueo bloqueo en la ranura Kensington del TV LCD (Figura 1) y gírelo en LN-S4095D Sí -20˚ ~ 20˚ El diseño y las especificaciones están sujetos a cambios sin previo aviso. Español-88 LN-S4692D 46 5 % al 95 %, sin condensación LN-S4695D Sí - Samsung LNS4695DX | User Manual (ENGLISH) - Page 273
Dimensiones (LN-S4095D) VISTA SUPERIOR DETALLE DEL PANEL DE CONEXIONES 3.25" H x 9.92" W @ 12.98 " PROFUNDIDAD VISTA FRONTAL/VISTA LATERAL VISTA mueble para el televisor. La empresa no se responsabiliza de cualquier error tipográfico o de impresión. © 2006 Samsung Electronics America, Inc. Español-89 - Samsung LNS4695DX | User Manual (ENGLISH) - Page 274
Dimensiones (LN-S4695D) VISTA SUPERIOR DETALLE DEL PANEL DE CONEXIONES 3.25" H x 9.92" W @ 12.98 " PROFUNDIDAD VISTA FRONTAL/VISTA LATERAL VISTA POSTERIOR el televisor. La empresa no se responsabiliza de cualquier error tipográfico o de impresión. © 2006 Samsung Electronics America, Inc. English-90 - Samsung LNS4695DX | User Manual (ENGLISH) - Page 275
Esta pagina se ha dejado en blanco expresamente.
-
 1
1 -
 2
2 -
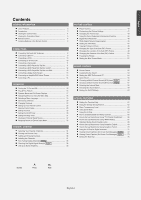 3
3 -
 4
4 -
 5
5 -
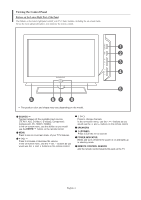 6
6 -
 7
7 -
8
-
9
-
10
-
11
-
12
-
13
-
14
-
15
-
16
-
17
-
18
-
19
-
20
-
21
-
22
-
23
-
24
-
25
-
26
-
27
-
28
-
29
-
30
-
31
-
32
-
33
-
34
-
35
-
36
-
37
-
38
-
39
-
40
-
41
-
42
-
43
-
44
-
45
-
46
-
47
-
48
-
49
-
50
-
51
-
52
-
53
-
54
-
55
-
56
-
57
-
58
-
59
-
60
-
61
-
62
-
63
-
64
-
65
-
66
-
67
-
68
-
69
-
70
-
71
-
72
-
73
-
74
-
75
-
76
-
77
-
78
-
79
-
80
-
81
-
82
-
83
-
84
-
85
-
86
-
87
-
88
-
89
-
90
-
91
-
92
-
93
-
94
-
95
-
96
-
97
-
98
-
99
-
100
-
101
-
102
-
103
-
104
-
105
-
106
-
107
-
108
-
109
-
110
-
111
-
112
-
113
-
114
-
115
-
116
-
117
-
118
-
119
-
120
-
121
-
122
-
123
-
124
-
125
-
126
-
127
-
128
-
129
-
130
-
131
-
132
-
133
-
134
-
135
-
136
-
137
-
138
-
139
-
140
-
141
-
142
-
143
-
144
-
145
-
146
-
147
-
148
-
149
-
150
-
151
-
152
-
153
-
154
-
155
-
156
-
157
-
158
-
159
-
160
-
161
-
162
-
163
-
164
-
165
-
166
-
167
-
168
-
169
-
170
-
171
-
172
-
173
-
174
-
175
-
176
-
177
-
178
-
179
-
180
-
181
-
182
-
183
-
184
-
185
-
186
-
187
-
188
-
189
-
190
-
191
-
192
-
193
-
194
-
195
-
196
-
197
-
198
-
199
-
200
-
201
-
202
-
203
-
204
-
205
-
206
-
207
-
208
-
209
-
210
-
211
-
212
-
213
-
214
-
215
-
216
-
217
-
218
-
219
-
220
-
221
-
222
-
223
-
224
-
225
-
226
-
227
-
228
-
229
-
230
-
231
-
232
-
233
-
234
-
235
-
236
-
237
-
238
-
239
-
240
-
241
-
242
-
243
-
244
-
245
-
246
-
247
-
248
-
249
-
250
-
251
-
252
-
253
-
254
-
255
-
256
-
257
-
258
-
259
-
260
-
261
-
262
-
263
-
264
-
265
-
266
-
267
-
268
-
269
-
270
-
271
-
272
-
273
-
274
-
275
 |
 |
Owner’s
Instructions
Register your product at
www.samsung.com/global/register
LN-S4095D
LN-S4695D
TFT-LCD TELEVISION
BN68-01047J-01
Contact SAMSUNG WORLD-WIDE
If you have any questions or comments relating to Samsung products, please contact the SAMSUNG
customer care center.
Comment contacter Samsung dans le monde
Si vous avez des suggestions ou des questions concernant les produits Samsung, veuillez contacter le Service
Consommateurs Samsung.
Contacte con SAMSUNG WORLD-WIDE
Si tiene alguna pregunta o comentario referente a nuestros productos, por favor contacte con nuestro Servicio de
Atención al Cliente.
Country
CANADA
U.S.A
Customer Care Center
☎
1-800-SAMSUNG (7267864)
1-800-SAMSUNG (7267864)
Address
Samsung Electronics Canada Inc., Customer Service
55 Standish Court Mississauga, Ontario L5R 4B2
Canada
Samsung Electronique Canada Inc., Service
á
la Client
é
le
55 Standish Court Mississauga, Ontario L5R 4B2
Canada
Samsung Electronics America, Inc.
105 Challenger Road
Ridgefield Park, NJ 07660-0511
Web Site
www.samsung.com/ca
www.samsung.com