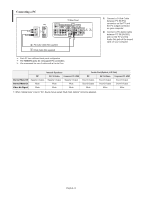
Samsung LNS4695DX User Manual (ENGLISH) - Page 18
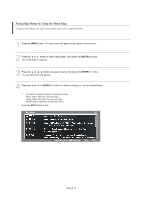
When you have finished, press the, The TV will begin memorizing all of the available channels.
 |
View all Samsung LNS4695DX manuals
Add to My Manuals
Save this manual to your list of manuals |
Page 18 highlights
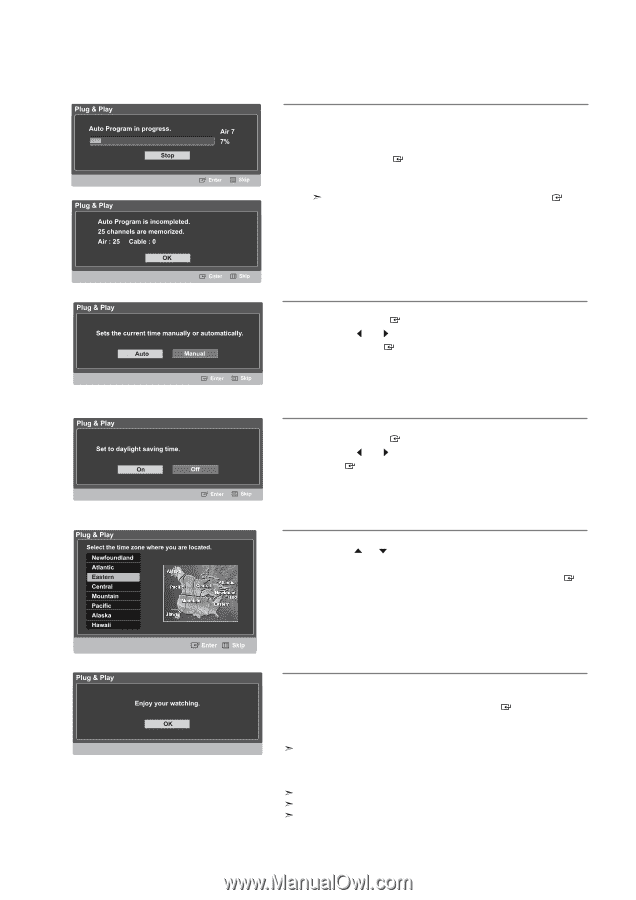
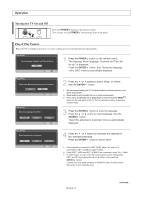
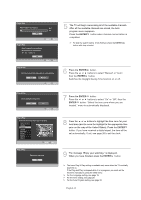
5 The TV will begin memorizing all of the available channels. After all the available channels are stored, the Auto program menu reappears. Press the ENTER button when channel memorization is completed. To stop the search before it has finished, press the ENTER button with stop selected. 6 Press the ENTER button. Press the or buttons to select "Manual" or "Auto", then the ENTER button. Switches the Daylight Saving Time function on or off. 7 Press the ENTER button. Press the or buttons to select "On" or "Off", then the ENTER button. "Select the time zone where you are located." menu is automatically displayed. 8 Press the or buttons to highlight the time zone for your local area (and to move the highlight to the appropriate time zone on the map of the United States). Press the ENTER button. If you have received a digital signal, the time will be set automatically. If not, see page 28 to set the clock. 9 The message "Enjoy your watching." is displayed. When you have finished, press the ENTER button. The basic Plug & Play setting is available only once when the TV is initially powered on. If the Plug and Play is stopped while it is in progress, you must set the functions manually by using the OSD menu. For the Language setting, see page 19. For the Time setting, see page 28. For the Auto Program setting, see page 20. English-16
-
 1
1 -
2
-
3
-
4
-
5
-
6
-
7
-
8
-
9
-
10
-
11
-
12
-
 13
13 -
 14
14 -
 15
15 -
 16
16 -
 17
17 -
 18
18 -
 19
19 -
 20
20 -
 21
21 -
 22
22 -
 23
23 -
24
-
25
-
26
-
27
-
28
-
29
-
30
-
31
-
32
-
33
-
34
-
35
-
36
-
37
-
38
-
39
-
40
-
41
-
42
-
43
-
44
-
45
-
46
-
47
-
48
-
49
-
50
-
51
-
52
-
53
-
54
-
55
-
56
-
57
-
58
-
59
-
60
-
61
-
62
-
63
-
64
-
65
-
66
-
67
-
68
-
69
-
70
-
71
-
72
-
73
-
74
-
75
-
76
-
77
-
78
-
79
-
80
-
81
-
82
-
83
-
84
-
85
-
86
-
87
-
88
-
89
-
90
-
91
-
92
-
93
-
94
-
95
-
96
-
97
-
98
-
99
-
100
-
101
-
102
-
103
-
104
-
105
-
106
-
107
-
108
-
109
-
110
-
111
-
112
-
113
-
114
-
115
-
116
-
117
-
118
-
119
-
120
-
121
-
122
-
123
-
124
-
125
-
126
-
127
-
128
-
129
-
130
-
131
-
132
-
133
-
134
-
135
-
136
-
137
-
138
-
139
-
140
-
141
-
142
-
143
-
144
-
145
-
146
-
147
-
148
-
149
-
150
-
151
-
152
-
153
-
154
-
155
-
156
-
157
-
158
-
159
-
160
-
161
-
162
-
163
-
164
-
165
-
166
-
167
-
168
-
169
-
170
-
171
-
172
-
173
-
174
-
175
-
176
-
177
-
178
-
179
-
180
-
181
-
182
-
183
-
184
-
185
-
186
-
187
-
188
-
189
-
190
-
191
-
192
-
193
-
194
-
195
-
196
-
197
-
198
-
199
-
200
-
201
-
202
-
203
-
204
-
205
-
206
-
207
-
208
-
209
-
210
-
211
-
212
-
213
-
214
-
215
-
216
-
217
-
218
-
219
-
220
-
221
-
222
-
223
-
224
-
225
-
226
-
227
-
228
-
229
-
230
-
231
-
232
-
233
-
234
-
235
-
236
-
237
-
238
-
239
-
240
-
241
-
242
-
243
-
244
-
245
-
246
-
247
-
248
-
249
-
250
-
251
-
252
-
253
-
254
-
255
-
256
-
257
-
258
-
259
-
260
-
261
-
262
-
263
-
264
-
265
-
266
-
267
-
268
-
269
-
270
-
271
-
272
-
273
-
274
-
275
 |
 |