Samsung RF28R7551SG/AA User Manual - Page 19
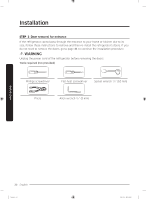
Step-by-step installation
 |
View all Samsung RF28R7551SG/AA manuals
Add to My Manuals
Save this manual to your list of manuals |
Page 19 highlights
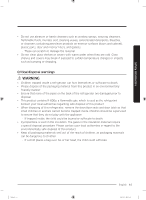
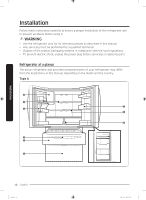
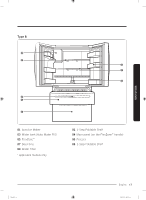
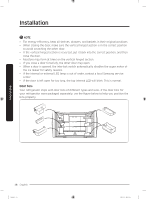
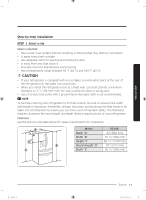
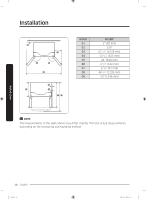
Installation Step-by-step installation STEP 1 Select a site Select a site that: • Has a solid, level surface without carpeting or flooring that may obstruct ventilation • Is away from direct sunlight • Has adequate room for opening and closing the door • Is away from any heat sources • Provides room for maintenance and servicing • Has a temperature range between 50 °F (10 °C) and 109 °F (43 °C) CAUTION • If your refrigerator is equipped with an ice maker, provide extra space at the rear of the refrigerator for the water line connection. • When you install the refrigerator next to a fixed wall, you must provide a minimum clearance of 3 3/4" (95 mm) from the wall to allow the door to swing open. • Use of an electrical outlet with a ground fault interrupter (GFI) is not recommended. NOTE To facilitate moving your refrigerator to its final location, be sure to measure the width and height of doorways, thresholds, ceilings, stairways, and anything else that needs to be taken into consideration to ensure you can move your refrigerator safely. The following diagram illustrates the exact height and depth (factory specifications) of your refrigerator. Clearance See the pictures and table below for space requirements for installation. B A E C Model RF28R* Depth "A" 34" (864 mm) Width "B" 35 3/4" (908 mm) Height "C" 68 7/8" (1749 mm) D Overall Height "D" 70" (1777 mm) Depth "E" 36 1/2" (926 mm) Untitled-5 19 English 19 2020-03-31 12:25:58
-
 1
1 -
2
-
3
-
4
-
5
-
6
-
7
-
8
-
9
-
10
-
11
-
12
-
13
-
 14
14 -
 15
15 -
 16
16 -
 17
17 -
 18
18 -
 19
19 -
 20
20 -
 21
21 -
 22
22 -
 23
23 -
 24
24 -
25
-
26
-
27
-
28
-
29
-
30
-
31
-
32
-
33
-
34
-
35
-
36
-
37
-
38
-
39
-
40
-
41
-
42
-
43
-
44
-
45
-
46
-
47
-
48
-
49
-
50
-
51
-
52
-
53
-
54
-
55
-
56
-
57
-
58
-
59
-
60
-
61
-
62
-
63
-
64
-
65
-
66
-
67
-
68
-
69
-
70
-
71
-
72
-
73
-
74
-
75
-
76
-
77
-
78
-
79
-
80
-
81
-
82
-
83
-
84
-
85
-
86
-
87
-
88
-
89
-
90
-
91
-
92
-
93
-
94
-
95
-
96
-
97
-
98
-
99
-
100
-
101
-
102
-
103
-
104
-
105
-
106
-
107
-
108
-
109
-
110
-
111
-
112
-
113
-
114
-
115
-
116
-
117
-
118
-
119
-
120
-
121
-
122
-
123
-
124
-
125
-
126
-
127
-
128
-
129
-
130
-
131
-
132
-
133
-
134
-
135
-
136
-
137
-
138
-
139
-
140
-
141
-
142
-
143
-
144
-
145
-
146
-
147
-
148
-
149
-
150
-
151
-
152
-
153
-
154
-
155
-
156
-
157
-
158
-
159
-
160
-
161
-
162
-
163
-
164
-
165
-
166
-
167
-
168
-
169
-
170
-
171
-
172
-
173
-
174
-
175
-
176
-
177
-
178
-
179
-
180
-
181
-
182
-
183
-
184
-
185
-
186
-
187
-
188
-
189
-
190
-
191
-
192
-
193
-
194
-
195
-
196
-
197
-
198
-
199
-
200
-
201
-
202
-
203
-
204
-
205
-
206
-
207
-
208
-
209
-
210
-
211
-
212
-
213
-
214
-
215
-
216
-
217
-
218
-
219
-
220
-
221
-
222
-
223
-
224
-
225
-
226
-
227
-
228
-
229
-
230
-
231
-
232
-
233
-
234
-
235
-
236
-
237
-
238
-
239
-
240
-
241
-
242
-
243
-
244
-
245
-
246
-
247
-
248
-
249
-
250
-
251
-
252
-
253
-
254
-
255
-
256
-
257
-
258
-
259
-
260
-
261
-
262
-
263
-
264
-
265
-
266
-
267
-
268
-
269
-
270
-
271
-
272
 |
 |