Samsung SCH-A645 User Manual (user Manual) (ver.f5) (English) - Page 86
By Name, By Group, By Entry, Contacts, New Entry
 |
View all Samsung SCH-A645 manuals
Add to My Manuals
Save this manual to your list of manuals |
Page 86 highlights
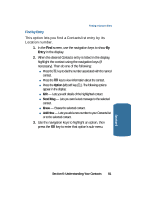
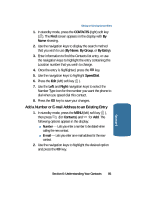
3. Enter the phone number or e-mail address for the new Contacts entry, then press the OK key. The following options appear in the display: ⅷ New Entry - Lets you create a new Contacts entry. ⅷ Find - Lets you add the number or e-mail address you just entered to an existing Contacts entry. 4. Use the navigation keys to highlight Find, then press the OK key. 5. Use the navigation keys to show the search method that you wish to use (By Name, By Group, or By Entry). 6. Enter information to find the entry and/or use the navigation keys to highlight the desired entry and press the OK key. The Select Type screen appears in the display. The following number types appear in the display: Home Office Mobile Pager Fax Section 6 - Or - The following address types appear in the display: Alias E-mail 7. Use the navigation keys to highlight the number type or address type that matches the number or e-mail address you are adding, then press the OK key. 8. Press the OK key again at the Contacts menu. The number is added to the existing entry. 86
-
 1
1 -
2
-
3
-
4
-
5
-
6
-
7
-
8
-
9
-
10
-
11
-
12
-
13
-
14
-
15
-
16
-
17
-
18
-
19
-
20
-
21
-
22
-
23
-
24
-
25
-
26
-
27
-
28
-
29
-
30
-
31
-
32
-
33
-
34
-
35
-
36
-
37
-
38
-
39
-
40
-
41
-
42
-
43
-
44
-
45
-
46
-
47
-
48
-
49
-
50
-
51
-
52
-
53
-
54
-
55
-
56
-
57
-
58
-
59
-
60
-
61
-
62
-
63
-
64
-
65
-
66
-
67
-
68
-
69
-
70
-
71
-
72
-
73
-
74
-
75
-
76
-
77
-
78
-
79
-
80
-
 81
81 -
 82
82 -
 83
83 -
 84
84 -
 85
85 -
 86
86 -
 87
87 -
 88
88 -
 89
89 -
 90
90 -
 91
91 -
92
-
93
-
94
-
95
-
96
-
97
-
98
-
99
-
100
-
101
-
102
-
103
-
104
-
105
-
106
-
107
-
108
-
109
-
110
-
111
-
112
-
113
-
114
-
115
-
116
-
117
-
118
-
119
-
120
-
121
-
122
-
123
-
124
-
125
-
126
-
127
-
128
-
129
-
130
-
131
-
132
-
133
-
134
-
135
-
136
-
137
-
138
-
139
-
140
-
141
-
142
-
143
-
144
-
145
-
146
-
147
-
148
-
149
-
150
-
151
-
152
-
153
-
154
-
155
-
156
-
157
-
158
-
159
-
160
-
161
-
162
-
163
-
164
-
165
-
166
-
167
-
168
-
169
-
170
-
171
-
172
-
173
-
174
-
175
-
176
-
177
-
178
-
179
-
180
-
181
-
182
-
183
-
184
-
185
-
186
-
187
-
188
-
189
-
190
-
191
-
192
-
193
-
194
-
195
-
196
-
197
-
198
-
199
-
200
-
201
-
202
-
203
-
204
-
205
-
206
-
207
-
208
-
209
-
210
-
211
-
212
-
213
-
214
-
215
-
216
 |
 |
