Samsung SCH-R250 User Manual (user Manual) (ver.f8) (English) - Page 50
Menu Method, Adding a Picture ID
 |
View all Samsung SCH-R250 manuals
Add to My Manuals
Save this manual to your list of manuals |
Page 50 highlights
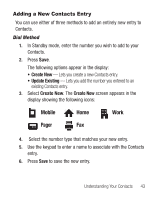
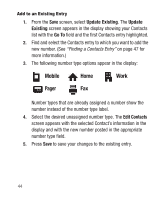
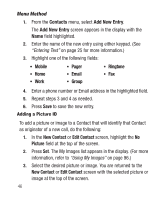
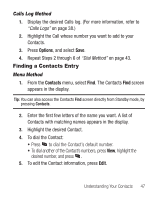
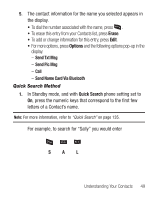
Menu Method 1. From the Contacts menu, select Add New Entry. The Add New Entry screen appears in the display with the Name field highlighted. 2. Enter the name of the new entry using either keypad. (See "Entering Text" on page 25 for more information.) 3. Highlight one of the following fields: • Mobile • Pager • Ringtone • Home • Email • Fax • Work • Group 4. Enter a phone number or Email address in the highlighted field. 5. Repeat steps 3 and 4 as needed. 6. Press Save to save the new entry. Adding a Picture ID To add a picture or image to a Contact that will identify that Contact as originator of a new call, do the following: 1. In the New Contact or Edit Contact screen, highlight the No Picture field at the top of the screen. 2. Press Set. The My Images list appears in the display. (For more information, refer to "Using My Images" on page 96.) 3. Select the desired picture or image. You are returned to the New Contact or Edit Contact screen with the selected picture or image at the top of the screen. 46
-
 1
1 -
2
-
3
-
4
-
5
-
6
-
7
-
8
-
9
-
10
-
11
-
12
-
13
-
14
-
15
-
16
-
17
-
18
-
19
-
20
-
21
-
22
-
23
-
24
-
25
-
26
-
27
-
28
-
29
-
30
-
31
-
32
-
33
-
34
-
35
-
36
-
37
-
38
-
39
-
40
-
41
-
42
-
43
-
44
-
 45
45 -
 46
46 -
 47
47 -
 48
48 -
 49
49 -
 50
50 -
 51
51 -
 52
52 -
 53
53 -
 54
54 -
 55
55 -
56
-
57
-
58
-
59
-
60
-
61
-
62
-
63
-
64
-
65
-
66
-
67
-
68
-
69
-
70
-
71
-
72
-
73
-
74
-
75
-
76
-
77
-
78
-
79
-
80
-
81
-
82
-
83
-
84
-
85
-
86
-
87
-
88
-
89
-
90
-
91
-
92
-
93
-
94
-
95
-
96
-
97
-
98
-
99
-
100
-
101
-
102
-
103
-
104
-
105
-
106
-
107
-
108
-
109
-
110
-
111
-
112
-
113
-
114
-
115
-
116
-
117
-
118
-
119
-
120
-
121
-
122
-
123
-
124
-
125
-
126
-
127
-
128
-
129
-
130
-
131
-
132
-
133
-
134
-
135
-
136
-
137
-
138
-
139
-
140
-
141
-
142
-
143
-
144
-
145
-
146
-
147
-
148
-
149
-
150
-
151
-
152
-
153
-
154
-
155
-
156
-
157
-
158
-
159
-
160
-
161
-
162
-
163
-
164
-
165
-
166
-
167
-
168
-
169
-
170
-
171
-
172
-
173
-
174
-
175
-
176
-
177
-
178
-
179
-
180
-
181
-
182
-
183
-
184
-
185
-
186
-
187
-
188
-
189
-
190
-
191
-
192
-
193
-
194
-
195
-
196
-
197
-
198
-
199
-
200
-
201
 |
 |