Samsung SPH-M910 User Manual (user Manual) (ver.f3) (English) - Page 53
Confirming Contact Synchronization
 |
View all Samsung SPH-M910 manuals
Add to My Manuals
Save this manual to your list of manuals |
Page 53 highlights
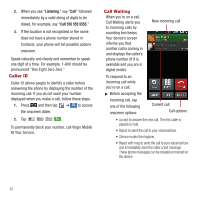
8. Tap Save to complete and store the new entry. Confirming Contact Synchronization Syncing data from your managed accounts allows you to add and manage a new or existing contact from your online or remote accounts to your device. Prior to syncing, you need an active Google or Corporate account with current Contact entries. You are also required to login to your accounts via the device. With syncing, any Contacts entries (with phone numbers, email addresses, pictures, etc.) are updated and synced with your Samsung Intercept™. For more information about syncing existing managed accounts, see "Synchronizing Accounts" on page 107. 1. Press ➔ and tap ➔ Accounts & sync. 2. Tap within the desired account field to reveal the account's synchronization settings screen. 3. To synchronize Gmail Contacts, tap Sync Contacts. A checkmark indicates the feature is enabled. - or - To synchronize Corporate Contacts, tap Sync Contacts. A checkmark indicates the feature is enabled. Note: Any change on either side (Device, Gmail, or Corporate/ Exchange Contacts), is reflected on the other side after a sync process.The process of updating your Contacts tab can take several minutes. If after 10-20 minutes, your list has not been updated, repeat steps 2-3. 4. Your Contacts tab then reflects any updated Contact information. • This update process works both ways. For example, any changes on the device are updated to your Gmail Contacts list after sync. 46
-
 1
1 -
2
-
3
-
4
-
5
-
6
-
7
-
8
-
9
-
10
-
11
-
12
-
13
-
14
-
15
-
16
-
17
-
18
-
19
-
20
-
21
-
22
-
23
-
24
-
25
-
26
-
27
-
28
-
29
-
30
-
31
-
32
-
33
-
34
-
35
-
36
-
37
-
38
-
39
-
40
-
41
-
42
-
43
-
44
-
45
-
46
-
47
-
 48
48 -
 49
49 -
 50
50 -
 51
51 -
 52
52 -
 53
53 -
 54
54 -
 55
55 -
 56
56 -
 57
57 -
 58
58 -
59
-
60
-
61
-
62
-
63
-
64
-
65
-
66
-
67
-
68
-
69
-
70
-
71
-
72
-
73
-
74
-
75
-
76
-
77
-
78
-
79
-
80
-
81
-
82
-
83
-
84
-
85
-
86
-
87
-
88
-
89
-
90
-
91
-
92
-
93
-
94
-
95
-
96
-
97
-
98
-
99
-
100
-
101
-
102
-
103
-
104
-
105
-
106
-
107
-
108
-
109
-
110
-
111
-
112
-
113
-
114
-
115
-
116
-
117
-
118
-
119
-
120
-
121
-
122
-
123
-
124
-
125
-
126
-
127
-
128
-
129
-
130
-
131
-
132
-
133
-
134
-
135
-
136
-
137
-
138
-
139
-
140
-
141
-
142
-
143
-
144
-
145
-
146
-
147
-
148
-
149
-
150
-
151
-
152
-
153
-
154
-
155
-
156
 |
 |