Samsung U940 User Manual (ENGLISH) - Page 57
Finding My Phone Number, Emergency Contacts
 |
UPC - 635753470048
View all Samsung U940 manuals
Add to My Manuals
Save this manual to your list of manuals |
Page 57 highlights
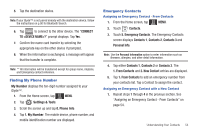
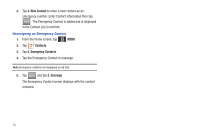
5. Tap the destination device. Note: If your Glyde™ is not paired already with the destination device, follow the instructions on p.90 for Bluetooth Search. 6. Tap CONNECT to connect to the other device. The "CONNECT TO ?" prompt displays. Tap Yes. 7. Confirm the name card transfer by selecting the appropriate key on the other device if prompted. 8. When the information is exchanged, a message will appear that the transfer is complete. Note: ** All information will be transferred except for group name, ringtone, and Emergency contact reference. Finding My Phone Number My Number displays the ten-digit number assigned to your Glyde™. 1. From the Home screen, tap MENU. MENU 2. Tap Settings & Tools. 3. Scroll the screen up and tap 0. Phone Info. 4. Tap 1. My Number. The mobile device, phone number, and mobile identification number are displayed. Emergency Contacts Assigning an Emergency Contact - From Contacts 1. From the Home screen, tap MENU. MENU 2. Touch Contacts. 3. Touch 5. Emergency Contacts. The Emergency Contacts screen displays Contacts 1, Contacts 2, Contacts 3 and Personal Info. Note: Use the Personal Information option to enter information such as illnesses, allergies, and other detail information. 4. Tap either Contacts 1, Contacts 2 or Contacts 3. The 1. From Contacts and 2. New Contact entries are displayed. 5. Tap 1. From Contacts to add an emergency number from your contacts list. Tap a Contact to assign the contact. Assigning an Emergency Contact with a New Contact 1. Repeat steps 1 through 4 in the previous section. See "Assigning an Emergency Contact - From Contacts" on page 54. Understanding Your Contacts 54
-
 1
1 -
2
-
3
-
4
-
5
-
6
-
7
-
8
-
9
-
10
-
11
-
12
-
13
-
14
-
15
-
16
-
17
-
18
-
19
-
20
-
21
-
22
-
23
-
24
-
25
-
26
-
27
-
28
-
29
-
30
-
31
-
32
-
33
-
34
-
35
-
36
-
37
-
38
-
39
-
40
-
41
-
42
-
43
-
44
-
45
-
46
-
47
-
48
-
49
-
50
-
51
-
 52
52 -
 53
53 -
 54
54 -
 55
55 -
 56
56 -
 57
57 -
 58
58 -
 59
59 -
 60
60 -
 61
61 -
 62
62 -
63
-
64
-
65
-
66
-
67
-
68
-
69
-
70
-
71
-
72
-
73
-
74
-
75
-
76
-
77
-
78
-
79
-
80
-
81
-
82
-
83
-
84
-
85
-
86
-
87
-
88
-
89
-
90
-
91
-
92
-
93
-
94
-
95
-
96
-
97
-
98
-
99
-
100
-
101
-
102
-
103
-
104
-
105
-
106
-
107
-
108
-
109
-
110
-
111
-
112
-
113
-
114
-
115
-
116
-
117
-
118
-
119
-
120
-
121
-
122
-
123
-
124
-
125
-
126
-
127
-
128
-
129
-
130
-
131
-
132
-
133
-
134
-
135
-
136
-
137
-
138
-
139
-
140
-
141
-
142
-
143
-
144
-
145
-
146
-
147
-
148
-
149
-
150
-
151
-
152
-
153
-
154
-
155
-
156
 |
 |