Samsung UN55C9000 User Manual - Page 15
Changing the Input Source, Basic Features, How to Navigate Menus
 |
View all Samsung UN55C9000 manuals
Add to My Manuals
Save this manual to your list of manuals |
Page 15 highlights
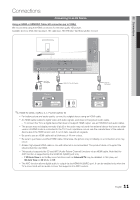
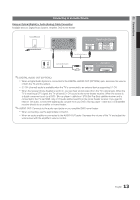
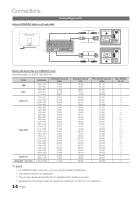
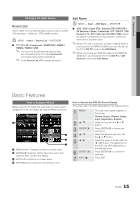
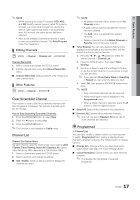
02 Connections Changing the Input Source Source List Use to select TV or an external input sources such as a DVD / Blu-ray player / cable box / STB satellite receiver. OO MENU → Input → Source List → ENTERE ■■ TV / PC / AV / Component / HDMI1/DVI / HDMI2 / HDMI3 / HDMI4 / USB ✎✎ You can only choose external devices that are connected to the TV. In the Source List, connected inputs will be highlighted. ✎✎ In the Source List, PC is always activated. Edit Name OO MENU → Input → Edit Name → ENTERE ■■ VCR / DVD / Cable STB / Satellite STB / PVR STB / AV Receiver / Game / Camcorder / PC / DVI PC / DVI Devices / TV / IPTV / Blu-ray / HD DVD / DMA: Name the device connected to the input jacks to make your input source selection easier. ✎✎When a PC with a resolution of 1920 x 1080 @ 60Hz is connected to the HDMI IN 1(DVI) port, you should set the TV to DVI PC mode under Edit Name. ✎✎When connecting an HDMI/DVI cable to the HDMI IN 1(DVI) port, you should set the TV to DVI PC or DVI Devices mode under Edit Name. Basic Features How to Navigate Menus Before using the TV, follow the steps below to learn how to navigate the menu and select and adjust different functions. Keyboard TV Control Services CONTENT MENU INTERNET @TV 1 Keyboard TV Control Services 2 3 Navigation 4 1 MENU button: Displays the main on-screen menu. 2 ENTERE / Direction button: Move the cursor and select an item. Confirm the setting. 3 EXIT button: Exits the on-screen menu. 4 RETURN button: Returns to the previous menu. How to Operate the OSD (On Screen Display) The access step may differ depending on the selected menu. 1 MENU 2 ▲/▼ 3 ENTERE 4 ▲/▼ 5 ◄/► 6 ENTER E 7 EXIT e The main menu options appear on the screen: Picture, Sound, Channel, Setup, Input, Application, Support. Select an icon with the ▲ or ▼ button. Press ENTERE to access the sub-menu. Select the desired submenu with the ▲ or ▼ button. Adjust the value of an item with the ◄ or ► button. The adjustment in the OSD may differ depending on the selected menu. Press ENTERE to confirm the selection. Press EXIT. 15 English
-
 1
1 -
2
-
3
-
4
-
5
-
6
-
7
-
8
-
9
-
 10
10 -
 11
11 -
 12
12 -
 13
13 -
 14
14 -
 15
15 -
 16
16 -
 17
17 -
 18
18 -
 19
19 -
 20
20 -
21
-
22
-
23
-
24
-
25
-
26
-
27
-
28
-
29
-
30
-
31
-
32
-
33
-
34
-
35
-
36
-
37
-
38
-
39
-
40
-
41
-
42
-
43
-
44
-
45
-
46
-
47
-
48
-
49
-
50
-
51
-
52
-
53
-
54
-
55
-
56
-
57
-
58
-
59
-
60
-
61
-
62
-
63
-
64
-
65
-
66
-
67
-
68
-
69
-
70
-
71
-
72
-
73
-
74
-
75
-
76
-
77
-
78
-
79
-
80
-
81
-
82
-
83
-
84
-
85
-
86
-
87
-
88
-
89
-
90
-
91
-
92
-
93
-
94
-
95
-
96
-
97
-
98
-
99
-
100
-
101
-
102
-
103
-
104
-
105
-
106
-
107
-
108
-
109
-
110
-
111
-
112
-
113
-
114
-
115
-
116
-
117
-
118
-
119
-
120
-
121
-
122
-
123
-
124
-
125
-
126
-
127
-
128
-
129
-
130
-
131
-
132
-
133
-
134
-
135
-
136
-
137
-
138
-
139
-
140
-
141
-
142
-
143
-
144
-
145
-
146
-
147
-
148
-
149
-
150
-
151
-
152
-
153
-
154
-
155
-
156
-
157
-
158
-
159
-
160
-
161
-
162
-
163
-
164
-
165
-
166
-
167
-
168
-
169
-
170
-
171
-
172
-
173
-
174
-
175
-
176
-
177
-
178
-
179
-
180
-
181
-
182
-
183
-
184
-
185
-
186
-
187
-
188
-
189
-
190
-
191
-
192
-
193
-
194
-
195
-
196
-
197
-
198
-
199
-
200
-
201
-
202
-
203
-
204
-
205
 |
 |