Samsung UN55C9000 User Manual - Page 5
Viewing the Control Panel, 3D Emitter - tv
 |
View all Samsung UN55C9000 manuals
Add to My Manuals
Save this manual to your list of manuals |
Page 5 highlights
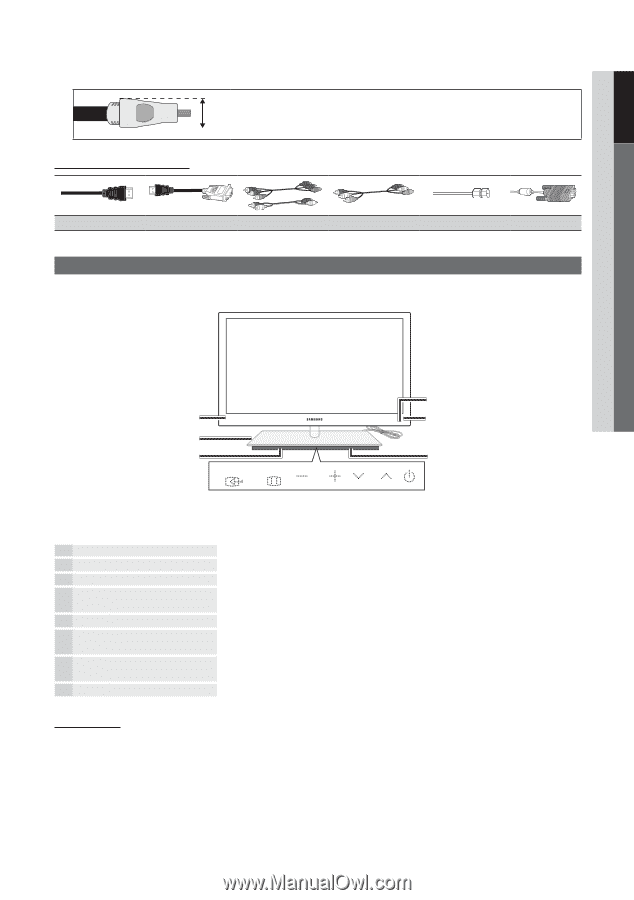
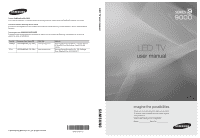
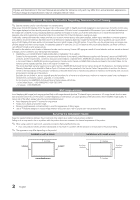
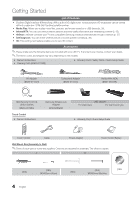
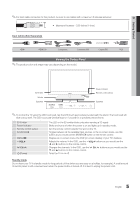
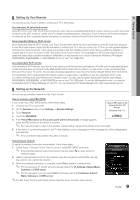
01 Getting Started ✎✎For best cable connection to this product, be sure to use cables with a maximum thickness as below: yy Maximum thickness - 0.55 inches (14mm) Input Cables (Sold Separately) HDMI HDMI-DVI Component Composite (AV) Coaxial (RF) VGA Viewing the Control Panel ✎✎The product color and shape may vary depending on the model. 3D Emitter Woofer Speakers SOURCE MENU VOL CH Power Indicator Remote control sensor Speakers ✎✎To control the TV using the LED touch pad, tap the LED touch pad centered underneath the stand. The touch pad will slide out by itself. The LED touch pad will slide back in if unused for a specified period of time. 3D Emitter Power Indicator Remote control sensor SOURCEE MENUm y z P (Power) The LED on the 3D emitter blinks only when sending a 3D signal. Blinks and turns off when the power is on and lights up in standby mode. Aim the remote control towards this spot on the TV. Toggles between all the available input sources. In the on-screen menu, use this button as you would use the ENTERE button on the remote control. Displays an on-screen menu, the OSD (on screen display) of your TV's features. Adjusts the volume. In the OSD, use the y buttons as you would use the ◄ and ► buttons on the remote control. Changes the channels. In the OSD, use the z buttons as you would use the ▼ and ▲ buttons on the remote control. Turns the TV on or off. Standby mode Do not leave your TV in standby mode for long periods of time (when you are away on a holiday, for example). A small amount of electric power is still consumed even when the power button is turned off. It is best to unplug the power cord. 5 English
-
 1
1 -
 2
2 -
 3
3 -
 4
4 -
 5
5 -
 6
6 -
 7
7 -
 8
8 -
 9
9 -
 10
10 -
 11
11 -
12
-
13
-
14
-
15
-
16
-
17
-
18
-
19
-
20
-
21
-
22
-
23
-
24
-
25
-
26
-
27
-
28
-
29
-
30
-
31
-
32
-
33
-
34
-
35
-
36
-
37
-
38
-
39
-
40
-
41
-
42
-
43
-
44
-
45
-
46
-
47
-
48
-
49
-
50
-
51
-
52
-
53
-
54
-
55
-
56
-
57
-
58
-
59
-
60
-
61
-
62
-
63
-
64
-
65
-
66
-
67
-
68
-
69
-
70
-
71
-
72
-
73
-
74
-
75
-
76
-
77
-
78
-
79
-
80
-
81
-
82
-
83
-
84
-
85
-
86
-
87
-
88
-
89
-
90
-
91
-
92
-
93
-
94
-
95
-
96
-
97
-
98
-
99
-
100
-
101
-
102
-
103
-
104
-
105
-
106
-
107
-
108
-
109
-
110
-
111
-
112
-
113
-
114
-
115
-
116
-
117
-
118
-
119
-
120
-
121
-
122
-
123
-
124
-
125
-
126
-
127
-
128
-
129
-
130
-
131
-
132
-
133
-
134
-
135
-
136
-
137
-
138
-
139
-
140
-
141
-
142
-
143
-
144
-
145
-
146
-
147
-
148
-
149
-
150
-
151
-
152
-
153
-
154
-
155
-
156
-
157
-
158
-
159
-
160
-
161
-
162
-
163
-
164
-
165
-
166
-
167
-
168
-
169
-
170
-
171
-
172
-
173
-
174
-
175
-
176
-
177
-
178
-
179
-
180
-
181
-
182
-
183
-
184
-
185
-
186
-
187
-
188
-
189
-
190
-
191
-
192
-
193
-
194
-
195
-
196
-
197
-
198
-
199
-
200
-
201
-
202
-
203
-
204
-
205
 |
 |