Samsung WF457ARGSGR/A2 User Manual Ver.1.0 (English, French, Spanish) - Page 24
STEP 5, Powering your washing machine, STEP 6, Calibration mode
 |
View all Samsung WF457ARGSGR/A2 manuals
Add to My Manuals
Save this manual to your list of manuals |
Page 24 highlights
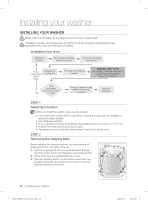
Installing your washer STEP 5 Powering your washing machine Plug the power cord into a wall socket, an AC 120V / 60Hz approved electrical outlet protected by a 15-amp fuse or circuit breaker. (For more information on the electrical and grounding requirements, refer to the "Electrical supply and grounding" section on page 17.) When the power plug is connected, the Samsung logo is displayed for about 15 seconds before the screen turns off. Press the Power button to use your washer. The process shown in this figure is a preparation step for using your washer. It is not an indication of a failure. STEP 6 Calibration mode Before using Calibration mode, be sure to take all items out of the drum. Your Samsung washing machine automatically detects the weight of the laundry. For a more accurate weight detection, please run Calibration Mode after the installation. To run Calibration Mode, follow these steps: 1. Turn on the washer. 2. Tab Settings and then Calibration Mode. 3. Remove any contents in the tub and close the door. 4. Tab Calibration Ready 5. Press the Start/Pause button to run Calibration Mode. 6. The drum rotates clockwise and counterclockwise for approximately 3 minutes. 7. When Calibration Mode is finished, the "Cycle complete" message appears on the display and the washing machine turns off automatically. The washing machine is now ready for use. 24_ Installing your washer WF457ARG-03153A-04_EN.indd 24 2012-08-31 12:30:22
-
 1
1 -
2
-
3
-
4
-
5
-
6
-
7
-
8
-
9
-
10
-
11
-
12
-
13
-
14
-
15
-
16
-
17
-
18
-
 19
19 -
 20
20 -
 21
21 -
 22
22 -
 23
23 -
 24
24 -
 25
25 -
 26
26 -
 27
27 -
 28
28 -
 29
29 -
30
-
31
-
32
-
33
-
34
-
35
-
36
-
37
-
38
-
39
-
40
-
41
-
42
-
43
-
44
-
45
-
46
-
47
-
48
-
49
-
50
-
51
-
52
-
53
-
54
-
55
-
56
-
57
-
58
-
59
-
60
-
61
-
62
-
63
-
64
-
65
-
66
-
67
-
68
-
69
-
70
-
71
-
72
-
73
-
74
-
75
-
76
-
77
-
78
-
79
-
80
-
81
-
82
-
83
-
84
-
85
-
86
-
87
-
88
-
89
-
90
-
91
-
92
-
93
-
94
-
95
-
96
-
97
-
98
-
99
-
100
-
101
-
102
-
103
-
104
-
105
-
106
-
107
-
108
-
109
-
110
-
111
-
112
-
113
-
114
-
115
-
116
-
117
-
118
-
119
-
120
-
121
-
122
-
123
-
124
-
125
-
126
-
127
-
128
-
129
-
130
-
131
-
132
-
133
-
134
-
135
-
136
-
137
-
138
-
139
-
140
-
141
-
142
-
143
-
144
-
145
-
146
-
147
-
148
-
149
-
150
-
151
-
152
-
153
-
154
-
155
-
156
-
157
-
158
-
159
-
160
-
161
-
162
-
163
-
164
-
165
-
166
-
167
-
168
-
169
-
170
-
171
-
172
-
173
-
174
-
175
-
176
-
177
-
178
-
179
-
180
-
181
-
182
-
183
-
184
-
185
-
186
-
187
-
188
-
189
-
190
-
191
-
192
-
193
-
194
-
195
-
196
-
197
-
198
-
199
-
200
-
201
-
202
-
203
-
204
-
205
-
206
-
207
-
208
-
209
-
210
-
211
-
212
-
213
-
214
-
215
-
216
-
217
-
218
-
219
-
220
-
221
-
222
-
223
-
224
-
225
-
226
-
227
-
228
 |
 |
