Samsung YP-700H User Manual (user Manual) (ver.2.0) (English) - Page 30
Uploading Files (PC), Uploading Files (Mac - audio player
 |
View all Samsung YP-700H manuals
Add to My Manuals
Save this manual to your list of manuals |
Page 30 highlights
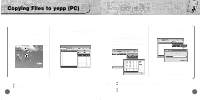
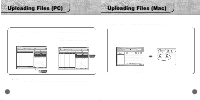
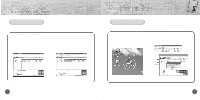
Uploading Files (PC) Before uploading files, turn on the yepp and connect yepp to PC. 1 Double click the yepp Audio Manager. 2 Select [Refresh] 3 On the right side window, check the file that you'd like to transfer to PC. q Click on the [Upload From Portable]. Uploading Files (Mac) Before uploading files, execute iTunes. Connect yepp to Mac, turn on the yepp and then proceed. 1 Run iTunes. 2 Select files to save in Mac and Drag & drop files to folder to want to save. ◗ Note : q You cannot transfer music files back from the yepp to the PC (due to copyright protection). q Files recorded as VOC on the player are converted into WAV when they are stored on PC. ✽ In case of uploading VOC in Mac, it is saved in VOC. 58 59
-
 1
1 -
2
-
3
-
4
-
5
-
6
-
7
-
8
-
9
-
10
-
11
-
12
-
13
-
14
-
15
-
16
-
17
-
18
-
19
-
20
-
21
-
22
-
23
-
24
-
 25
25 -
 26
26 -
 27
27 -
 28
28 -
 29
29 -
 30
30 -
 31
31 -
 32
32 -
 33
33 -
 34
34 -
 35
35 -
36
-
37
-
38
-
39
-
40
-
41
-
42
-
43
-
44
 |
 |

59
Uploading Files (Mac)
58
Uploading Files (PC)
Before uploading files, turn on the yepp and connect yepp to PC.
Before uploading files, execute iTunes.
Connect yepp to Mac, turn on the yepp and then proceed.
Double click the yepp Audio
Manager.
1
Select
[Refresh]
2
On the right side window, check
the file that you’d like to transfer
to PC.
●
Click on the
[Upload From Portable]
.
3
N
o
t
e
:
●
You cannot
transfer music files back from the yepp to the PC (due to copyright protection).
●
Files recorded as VOC on the player are converted into WAV when they are stored on PC.
In case of uploading VOC in Mac, it is saved in VOC.
Run iTunes.
1
Select files to save in Mac and Drag & drop files to folder to want to save.
2
◗