Sanyo CE42LM4WPN-NA Owner's Manual for POA-LN01 - Page 8
Check package, Installation, Network configuration, Flow of installation - review
 |
UPC - 086483065156
View all Sanyo CE42LM4WPN-NA manuals
Add to My Manuals
Save this manual to your list of manuals |
Page 8 highlights
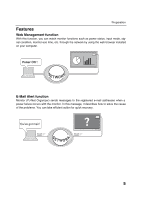
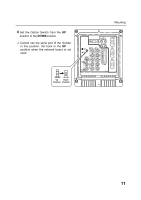
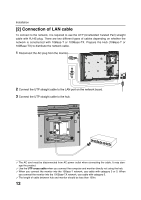
Installation Flow of installation The following are instructions for attaching this product to the monitor and connecting it to the network. Please review the entire procedure to become familiar with it. 1 Check package (p.9) Please check the contents of a package. This product contains a network board, and an ownerʼs manual (this manual). Also please check the name and function of each part. 2 Installation (p.10-12) 1. Mount this product onto the monitor and connect the interface cable between this product and the monitor. 2. Set the option switch on the monitor to down (Net-Organizer mode). 3. Connect the LAN cable and join it to the network. 3 Network configuration (p.13-19) Configure the network with the computer. Setting up is completed. The preparation is completed to control the monitor connected to the network. At next step, set up and control the monitor via the network by using the web browser installed on your computer. Please see "Basic setting and operation" on page 21. 8
-
 1
1 -
2
-
 3
3 -
 4
4 -
 5
5 -
 6
6 -
 7
7 -
 8
8 -
 9
9 -
 10
10 -
 11
11 -
 12
12 -
 13
13 -
14
-
15
-
16
-
17
-
18
-
19
-
20
-
21
-
22
-
23
-
24
-
25
-
26
-
27
-
28
-
29
-
30
-
31
-
32
-
33
-
34
-
35
-
36
-
37
-
38
-
39
-
40
-
41
-
42
-
43
-
44
-
45
-
46
-
47
-
48
-
49
-
50
-
51
-
52
 |
 |