Sanyo H1340 Operating Instructions - Page 11
Press P eject
 |
View all Sanyo H1340 manuals
Add to My Manuals
Save this manual to your list of manuals |
Page 11 highlights
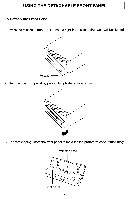
4. MONO/STEREO Press MON button (4) to select monaural or stereo (Mono reception for radio stations) You can sometimes improve reception of distant stations by selecting mono operation 5. FACEPLATE RELEASE Press REL button (5) to detach the removable faceplate 6. LOUDNESS Press LOU button (6) to increase bass output and display will show "LOUD" 7. SET THE CLOCK Press and hold the DSP button (7), then press the TUNE/SKIP + /b> button (16) to change minutes or TUNE/SKIPd - button (15) to change hours 8. EJECT Push a CD into slot The CD will begin to play Press P (eject) button (8) to stop CD play and eject CD from slot Receiver switches to radio operation 9 &IO. SELECT MODE Press PUSH SELECT button (9) to move display through bass, treble, balance, fader and volume functions Use AUDIO ADJUST KNOB (10) to adjust the selected mode When mode has not been adjusted for several seconds, display returns to normal radio or CD display BAS --) (Bass) TRE --) (Treble) BAL --, (Balance) FAD ----) VOL (Fader) 1 (Volume) Bass Press PUSH SELECT button (9) one time Adjust bass level by rotating AUDIO fDD;ST KNOB (10) Press PUSH SELECT button (9) two times Adjust treble level by rotating AUDIO ;,9Ja;lz; KNOB (10) Press PUSH SELECT button (9) three times Adjust sound balance between left ;n,dd;rht speakers by rotating AUDIO ADJUST KNOB (10) Press PUSH SELECT button (9) four times Adjust sound balance between front and rear speakers by rotating AUDIO ADJUST KNOB (10) Volume Press PUSH SELECT button (9) five times Adjust volume level by rotating AUDIO ADJUST KNOB (10) 11. EQUALIZATION Press EQ button (11) to turn on equalization function and to select desired audio mode There are four kinds of mode as below FLAT - ROCK - CLASSIC - POP r 1 12. BAND Press BND button (12) to change between three FM bands and two AM bands Each band stores up to six preset stations r I FM1 ----) FM2 ---) FM3 4 AM1 --) 1 AM2 I 13. ELECT LISTENING MODE Press MOD button (13) to choose desired listening mode (e g radio mode to CD mode) 9
-
 1
1 -
2
-
3
-
4
-
5
-
 6
6 -
 7
7 -
 8
8 -
 9
9 -
 10
10 -
 11
11 -
 12
12 -
 13
13 -
 14
14 -
 15
15 -
 16
16
 |
 |
