Sanyo H1340 Operating Instructions - Page 12
Press a TUNE/SKIP<=I
 |
View all Sanyo H1340 manuals
Add to My Manuals
Save this manual to your list of manuals |
Page 12 highlights
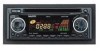
14. LIQUID CRYSTAL DISPLAY The LCD (14) can show the current state of the unit 15 & 16. SELECT STATIONS Press and release a TUNE/SKIPd - button (15) or TUNE/SKIP + /B button (16) immediately to move radio frequency number down or up on step Press and hold a TUNE/SKIPd - button (15) or TUNE/SKIP + /D> button (16) for several seconds to seek the next clear station 15 & 16. SKIP TRACKS Press a TUNE/SKIPd - button (15) or TUNE/SKIP + /W button (16) to move to the previous track or the following track Track number shows on the display 15 & 16. FAST FORWARD AND FAST REVERSE Press a TUNE/SKIP button (16) to fast reverse or fast forward CD play starts from when you release the button 17. PRESET STATIONS Six number buttons (17) store and recall stations for each band Store a station Select a band (12) (if needed) Select a station Hold a preset button for several seconds Recall a station Select a band (12) (if needed) Press a preset button to select stored station 16. TOP: PLAY THE FIRST TRACK Press TOP button (18) to play the first track of the current disc 19. REPEAT THE SAME TRACK Press RPT button (19) to continuously repeat the same track Press again to stop repeat 20. INTRO: PREVIEW ALL TRACKS Press SCN button (20) to play first several seconds of each track on the current disc Press again to stop intro and listen to track 21. RANDOM: PLAY ALL TRACKS Press RND button (21) to play all tracks on CD in random the function Press again to cancel 22. AUTOMATICALLY STORING & PROGRAM SCANNING Automatically Storing Press and hold AS/PS button (22) for several seconds to toggle automatically storing function It starts searching next frequency and stores the clear station into the preset memory At the end of automatically storing operation, mode is changed to Preset Scan Preset Scanning Press ASIPS button (22) shortly to toggle preset scanning function During the scanning, it will stop at every stored station for several seconds and the number of the channel being scanned flashes on the display Press it again to stop scanning 23. RESET BUTTON FUNCTION RESET button (23) is placed on the housing and must be activated with either a ball point pen or thin metal object The reset button is to be activated for the following reasons l Initial installation of the unit when all wiring is completed l All the function buttons do not operate l Error symbol on the display Note: If RESET button (23) is pressed and the unit doesn't work yet, please use a cotton swab soaked in isopropyl alcohol to clean the socket on the back of the front panel 10
-
 1
1 -
2
-
3
-
4
-
5
-
6
-
 7
7 -
 8
8 -
 9
9 -
 10
10 -
 11
11 -
 12
12 -
 13
13 -
 14
14 -
 15
15 -
 16
16
 |
 |
