Sanyo PLC-XR70N Installation - Page 3
Assemble bottom cabinet - projector
 |
View all Sanyo PLC-XR70N manuals
Add to My Manuals
Save this manual to your list of manuals |
Page 3 highlights
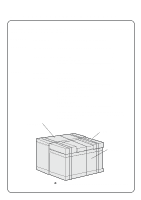
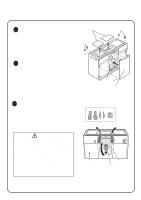
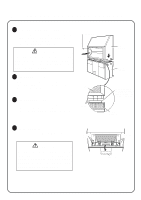
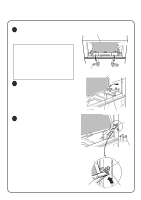
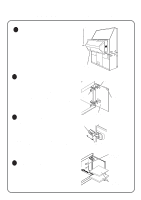
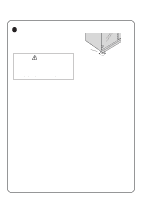
2 ASSEMBLE BOTTOM CABINET 1 Remove Joint Bolts and Cover Plates Remove the 4 Joint Bolts on the Bottom Cabinet. Keep these bolts for later use. They are necessary for joint the Top and Bottom Cabinets. Remove the 2 Cover Plates on the top of the Bottom Cabinet. Keep the Cover Plates for later use. Replace those plates, when the appliance needs to be transported. Cover Plates (2 pcs) Joint Bolts (4 pcs) Joint Bolts (4 pcs) 2 Install Center Panel Install the Center Panel to the Bottom Cabinet. Be sure to meet the Center Panel and the Bottom Cabinet at the upper part first, and insert the 6 legs of Center Panel to the holes of the Bottom Cabinet. Be sure to set the Center Panel securely. Hole Leg Center Panel Meet the Center Panel and the Bottom Cabinet at the upper part first and push in the Panel securely. 3 Remove Protection Pads There are the 5 Protection Pads inside of the Bottom Cabinet for protection against shock or vibration. Remove the 4 Pads supporting at the upper side of the Bottom Cabinet first. And then, remove the pad(A) supporting at the lower side of the projector. When removing the pad(A), pull downward first and remove the pad. CAUTION WHEN REMOVING THE PROTECTION PADS, BE CAREFUL NOT TO BROKE THE WIRING INSIDE OF THE BOTTOM CABINET. BE SURE TO REMOVE ALL THE PROTECTION PADS INSIDE OF THE CABINET. AND BE CAREFUL NOT TO LEAVE ANY PAD OR FRAGMENT IN THE CABINET. IT MAY RESULT IN FIRE HAZARDS. Protection Pads (5 pcs) The back side of the Bottom Cabinet. Projector Pad(A) Pull the pad(A) to downward first and remove the pad.
-
 1
1 -
 2
2 -
 3
3 -
 4
4 -
 5
5 -
 6
6 -
 7
7 -
 8
8
 |
 |
