Schwinn 102 Upright Bike Owner's Manual - Page 12
Operation
 |
View all Schwinn 102 Upright Bike manuals
Add to My Manuals
Save this manual to your list of manuals |
Page 12 highlights
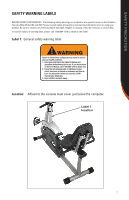
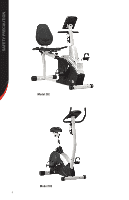
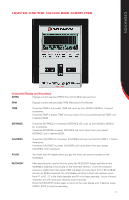
OPERATION HOW TO USE THE 102/202 BIKE Seat adjustment Proper seat adjustment helps ensure maximum exercise efficiency and comfort, while reducing the risk of injury. 1. Place one pedal in the forward position and center the ball of your foot over the center of the pedal. Your leg should be slightly bent at the knee. 2. If your leg is too straight or your foot cannot touch the pedal, you will need to move the seat down on the 102 or forward on the 202 bike. If your leg is bent too much, you will need to move the seat up on the 102 or backward on the 202 bike. 3. Adjust the 102 seat by first dismounting the bike, then pulling out the adjustment knob on the seat tube and releasing the locking pin. Lower or raise the seat to the desired height. Release the seat knob, engaging the locking pin. Be sure that the pin is fully secured in a seat post hole. To adjust the 202 seat, pull the seat knob up with your right hand to release the seat. Slide the seat forward or backward to the desired position. The knob will "pop" up into the next hole; turn the knob to ensure a tight fit. 4. The 102 also features a fore / aft adjustment. To move the seat closer to, or away from the console, loosen the knob, slide the seat forward or rearward to the desired position and re-tighten. Foot positioning/pedal strap adjustment Place the ball of each foot on the pedals. Rotate the pedals until one foot is within arms reach. Then, reach down carefully and fasten the rubber strap over your shoe and secure it to the pedal by slipping the nub at the end of the pedal through one of the slots in the strap. Pull down on the strap until it snaps into place. Repeat for the other foot. Point your toes and knees directly forward to ensure maximum pedal efficiency. Pedal straps can be left in place for subsequent workouts. Handlebar Adjustment The 102 offers an adjustable handlebar to ensure a variety of comfortable hand positions. To adjust the angle of the handlebars, loosen knob, adjust the handlebars to the desired position and re-tighten. Resistance adjustment Using the console, you have control over the levels of resistance integrated into your workout. Typically, lower resistance levels enable you to move at a faster pace, placing increased demand on your cardiovascular system. Higher resistance levels will typically deliver more of a muscle/ endurance workout at lower RPMs. But everyone is different! So experiment and find the beginning of resistance that is comfortable for you. Lower body workout Once you are in position and sitting comfortably, slowly begin pedaling, with your arms relaxed at your sides and with your hands resting on the top of your thighs or on the hand grips. Pedal at an easy pace, at a low resistance level until you feel secure and comfortable. As you feel more comfortable, experiment with the range of resistance levels available via the console. 10
-
 1
1 -
2
-
3
-
4
-
5
-
6
-
 7
7 -
 8
8 -
 9
9 -
 10
10 -
 11
11 -
 12
12 -
 13
13 -
 14
14 -
 15
15 -
 16
16 -
 17
17 -
18
-
19
-
20
-
21
-
22
-
23
-
24
-
25
-
26
-
27
-
28
-
29
 |
 |
