Schwinn 810 Treadmill Quick Start Manual - Page 8
Step 2.
 |
View all Schwinn 810 Treadmill manuals
Add to My Manuals
Save this manual to your list of manuals |
Page 8 highlights
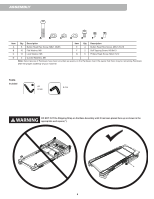
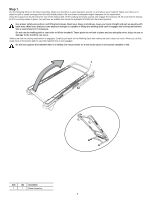
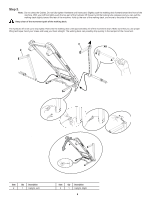
Step 2. Note: Do not crimp the Cables. Do not fully tighten Hardware until instructed. Slightly push the walking deck forward toward the front of the machine. With your left foot lightly push the top part of the hydraulic lift forward until the locking tube releases and you can pull the walking deck slightly toward the rear of the machine. Hold up the rear of the walking deck, and move to the side of the machine. Keep clear of the movement path of the walking deck. The hydraulic lift is set up to drop lightly. Hold onto the walking deck until approximately 2/3 of the movement down. Make sure that you use proper lifting technique; bend your knees and keep your back straight. The walking deck can possibly drop quickly in the last part of the movement. 3 X8 2 BC A Item Qty Description 2 1 Upright, Left Item Qty Description 3 1 Upright, Right 8
-
 1
1 -
2
-
 3
3 -
 4
4 -
 5
5 -
 6
6 -
 7
7 -
 8
8 -
 9
9 -
 10
10 -
 11
11 -
 12
12 -
 13
13 -
14
-
15
-
16
-
17
-
18
-
19
-
20
-
21
-
22
-
23
-
24
 |
 |
