Schwinn Network 3.0 Schwinn Owner's Manual - Page 34
Assembly
 |
View all Schwinn Network 3.0 manuals
Add to My Manuals
Save this manual to your list of manuals |
Page 34 highlights
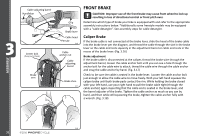
ASSEMBLY Brake pad aligned Brakewipthadthaelrigimnesudrface wPitahdtahned rim surface rim should be parallel Check the brake pads to be sure they are square to the rim, and do not contact the tire when the brake is applied. Adjust brake pads if needed. Then squeeze and release the brake several times squeezing as hard as you can. After this the cable may "stretch" and need to be tightened further. If so, repeat cable tightening steps. (Fig. 3.19) Pad an1d-2rimmm should be parallel Correct 1-2 mm Incorrect 3.19 Rim Centering brake If you squeeze the brake and one side moves more than the other, or one side does not move at all, then the brake is not centered, or the wheel is not centered. First determine if the wheel is centered. Look at the gap between the tire and the fork or frame on either side. If it is not even, loosen wheel axle nuts and center the wheel, then proceed to centering the brake. (Fig. 3.20) 3.20 If the brake is not centered; loosen the nut on the back of the brake. Squeeze the brake and hold the brake lever closed, while re-tightening the lock nut on the back of the brake. Watch the brake, if it begins to shift or rotate, then release the brake lever, and use your hand to rotate the brake caliper back until both sides of the brake move equally. Sometimes it is necessary to over rotate the brake slightly, so that as you tighten the locknut, the brake will end up centered. Repeat the steps until the brake is centered. Brake is correctly adjusted when: • The brake pads do not drag on the rim when the brake is open. Equal space • Both brake pads move away from the rim equally when the brake is released. atbnhedettwbhreeaekrneim • When the brake is reaches about 1/3 applied, the brake pads contact the rim of the way to the handlebar. (Fig. 3.21) before the brake lever After adjusting brake, squeeze the brake lever as hard as you can several times and 3.21 re-inspect the brake pads, centering, and brake lever travel. If the brake pads are no longer square to the rim, repeat brake pad adjustments. Be sure that brake pads return to a centered position by spinning the wheel and listening for the brake pad rubbing the rim on either side. Readjust as needed. Check that the brake cable tension allows the brake lever about 1/3 of the travel before the brake pads contact the rim. If the cable has stretched or slipped, readjust brake cable tension by loosening cable anchor bolt and pulling more cable through the anchor or use brake adjustment barrels for fine tuning brake cable tension. 3.22 ©2010 33
-
 1
1 -
2
-
3
-
4
-
5
-
6
-
7
-
8
-
9
-
10
-
11
-
12
-
13
-
14
-
15
-
16
-
17
-
18
-
19
-
20
-
21
-
22
-
23
-
24
-
25
-
26
-
27
-
28
-
 29
29 -
 30
30 -
 31
31 -
 32
32 -
 33
33 -
 34
34 -
 35
35 -
 36
36 -
 37
37 -
 38
38 -
 39
39 -
40
-
41
-
42
-
43
-
44
-
45
-
46
-
47
-
48
-
49
-
50
-
51
-
52
-
53
-
54
-
55
-
56
-
57
-
58
-
59
-
60
-
61
-
62
-
63
-
64
-
65
-
66
-
67
 |
 |
