Seiko 6A32 Technical Guide - Page 17
How to set the minute hand, How to set the second hand, Hand installation check ups - 00
 |
View all Seiko 6A32 manuals
Add to My Manuals
Save this manual to your list of manuals |
Page 17 highlights
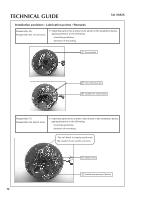
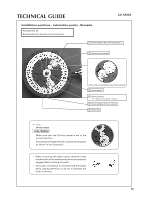
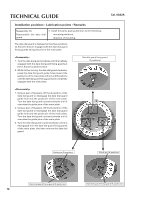
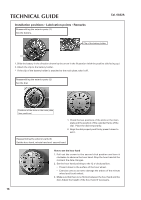
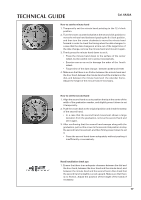
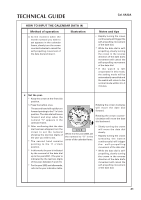
TECHNICAL GUIDE Cal. 6A32A How to set the minute hand 1. Temporarily set the minute hand pointing to the 12 o'clock position. 2. Turn the crown counterclockwise at the second click position to move the minute hand backward passing the 9 o'clock position, and then turn the crown clockwise to move the minute hand forward in order to check the timing when the date changes. In a case that the date changes at a time out of the target time of the date change, remove the minute hand and mount it again. 3. Firmly press the minute hand down to set it. • Press the minute hand down to the surface of the center wheel, but be careful not to press it excessively. • Exercise care so as not to damage the arbor of the fourth wheel. • Target time of the date change: between 23:00 and 01:00 4. Make sure that there is no friction between the minute hand and the hour hand, between the minute hand and the markers on the dial, and between the minute hand and the calendar frame. Adjust the height of the minute hand if necessary. How to set the second hand 1. Align the second hand so as to position the tip at the center of the width of the graduation marker, and slightly press it down to set it temporarily. 2. Push the crown back to the original position and check the sweep of the second hand. • In a case that the second hand movement shows a large deviation from the graduation, remove the second hand and set it again. 3. After confirming that the second hand sweeps along with the graduation, pull out the crown to the second click position to stop the second hand movement, and then firmly press it down to set it. • Press the second hand down adequately without pushing it insufficiently or excessively. Hand installation check ups 1. Ensure that there is an adequate clearance between the dial and the hour hand, between the hour hand and the minute hand, and between the minute hand and the second hand. Also check that the second hand is slightly curved upward. Make sure that there is no friction. Adjust the position of the height of the hands if necessary. 17
-
 1
1 -
2
-
3
-
4
-
5
-
6
-
7
-
8
-
9
-
10
-
11
-
 12
12 -
 13
13 -
 14
14 -
 15
15 -
 16
16 -
 17
17 -
 18
18 -
 19
19 -
 20
20 -
 21
21 -
 22
22 -
23
-
24
 |
 |
