Sennheiser ADN C1 Instructions for Use - Page 43
Using the media control system, Switching the conference system off
 |
View all Sennheiser ADN C1 manuals
Add to My Manuals
Save this manual to your list of manuals |
Page 43 highlights
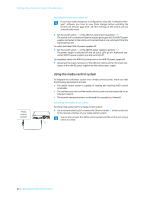
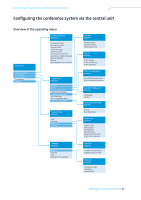
Putting the conference system into operation Switching the conference system off If you have made changes to a configuration using the "Conference Manager" software, you have to save these changes before switching the central unit off (see page 103). All other settings of the central unit are automatically saved. ̈ Set the on/off switch 1 of the ADN CU1 central unit to position "0". The central unit is switched off and the display panel goes off. All ADN PS power supplies connected to the central unit and switched on are switched off and the status LEDs go off. To switch individual ADN PS power supplies off: ̈ Set the on/off switch 2 of the ADN PS power supply to position "0". The power supply is switched off and all status LEDs go off. Additional connected ADN PS power supplies are also switched off. To completely switch the ADN CU1 central unit or the ADN PS power supply off: ̈ Disconnect the mains connector of the ADN CU1 central unit or the mains con- nector of the ADN PS power supply from the mains power supply. Media control system Using the media control system To integrate the conference system into a media control system, make sure that the following requirements are met: • The media control system is capable of sending and receiving ASCII control commands. • The conference system and the media control system are interconnected via an Ethernet network. • The network communication is not blocked (for example by a firewall). IN -- AUDIO -- OUT PORT II PORT I 2x 52.8V 1.75A 100-240V~ 50/60Hz 240W B Connecting the media control system To connect the central unit to a media control system: ̈ Use a network cable (Cat5) to connect the Ethernet socket B of the central unit to the network interface of your media control system. You can also connect the media control system and the central unit using a switch or similar. 42 | ADN Digital Conference System
-
 1
1 -
2
-
3
-
4
-
5
-
6
-
7
-
8
-
9
-
10
-
11
-
12
-
13
-
14
-
15
-
16
-
17
-
18
-
19
-
20
-
21
-
22
-
23
-
24
-
25
-
26
-
27
-
28
-
29
-
30
-
31
-
32
-
33
-
34
-
35
-
36
-
37
-
 38
38 -
 39
39 -
 40
40 -
 41
41 -
 42
42 -
 43
43 -
 44
44 -
 45
45 -
 46
46 -
 47
47 -
 48
48 -
49
-
50
-
51
-
52
-
53
-
54
-
55
-
56
-
57
-
58
-
59
-
60
-
61
-
62
-
63
-
64
-
65
-
66
-
67
-
68
-
69
-
70
-
71
-
72
-
73
-
74
-
75
-
76
-
77
-
78
-
79
-
80
-
81
-
82
-
83
-
84
-
85
-
86
-
87
-
88
-
89
-
90
-
91
-
92
-
93
-
94
-
95
-
96
-
97
-
98
-
99
-
100
-
101
-
102
-
103
-
104
-
105
-
106
-
107
-
108
-
109
-
110
-
111
-
112
-
113
-
114
-
115
-
116
-
117
-
118
-
119
-
120
-
121
-
122
-
123
-
124
-
125
-
126
-
127
-
128
-
129
-
130
-
131
-
132
-
133
-
134
-
135
-
136
-
137
-
138
-
139
-
140
-
141
-
142
-
143
-
144
-
145
-
146
-
147
-
148
-
149
-
150
-
151
-
152
-
153
-
154
-
155
-
156
-
157
-
158
-
159
-
160
-
161
-
162
-
163
-
164
-
165
-
166
-
167
-
168
-
169
 |
 |
