Sennheiser SK 300 G3 Instructions for Use - Page 23
The extended menu “Advanced Menu”, The extended menu
 |
View all Sennheiser SK 300 G3 manuals
Add to My Manuals
Save this manual to your list of manuals |
Page 23 highlights
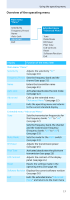
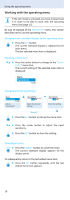
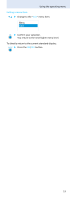
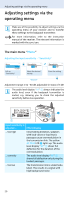
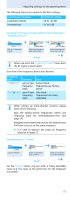
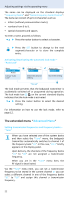
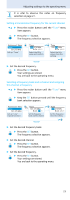
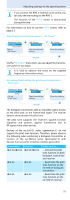
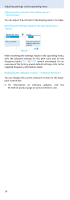
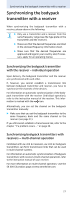
Adjusting settings via the operating menu The name can be displayed on the standard displays "Frequency/Name" and "Name/Frequency bank/Channel". The name can consist of up to 8 characters such as: • letters (without pronounciation marks), • numbers from 0 to 9, • special characters and spaces. To enter a name, proceed as follows: ̈ Press the rocker button to select a character. ̈ Press the SET button to change to the next segment/character or to store the complete entry. Activating/deactivating the automatic lock mode - "Auto Lock" Menu Auto Lock Active Call up "Auto Lock" Auto Lock Active Select the desired setting Auto Lock Inactive Store the setting "Stored" The lock mode prevents that the bodypack transmitter is accidentally switched off or programed during operation. The lock mode icon ቦ on the current standard display indicates that the lock mode is activated. ̈ Press the rocker button to select the desired setting. For information on how to use the lock mode, refer to page 12. The extended menu "Advanced Menu" Setting transmission frequencies and frequency banks - "Tune" When you have selected one of the system banks and then select the "Tune" menu, the bodypack transmitter automatically switches to channel 1 of the frequency bank "U1". In this case, "U1.1" briefly appears on the display panel. Upon delivery, the channels of the frequency banks "U1" to "U6" are not assigned a transmission frequency. When you are in the "Tune" menu item, the RF signal is deactivated. Via the "Tune" menu item, you can set a transmission frequency to be stored in the current channel or you can select a different channel in one of the frequency banks "U1" to "U6" and assign this channel a transmission frequency. 22
-
 1
1 -
2
-
3
-
4
-
5
-
6
-
7
-
8
-
9
-
10
-
11
-
12
-
13
-
14
-
15
-
16
-
17
-
 18
18 -
 19
19 -
 20
20 -
 21
21 -
 22
22 -
 23
23 -
 24
24 -
 25
25 -
 26
26 -
 27
27 -
 28
28 -
29
-
30
-
31
-
32
-
33
-
34
-
35
-
36
-
37
-
38
-
39
-
40
-
41
 |
 |
