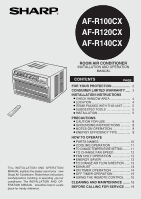
Sharp AF-R100CX AF-R100CX , AF-R120CX , AF-R140CX Operation Manual
Sharp AF-R100CX Manual
 |
View all Sharp AF-R100CX manuals
Add to My Manuals
Save this manual to your list of manuals |
Sharp AF-R100CX manual content summary:
- Sharp AF-R100CX | AF-R100CX , AF-R120CX , AF-R140CX Operation Manual - Page 1
AF-R100CX AF-R120CX AF-R140CX This INSTALLATION AND OPERATION MANUAL explains the proper use of your new Sharp Air Conditioner. Read these instructions carefully before installing or operating your air conditioner. The INSTALLATION AND OPERATION MANUAL should be kept in a safe place for handy - Sharp AF-R100CX | AF-R100CX , AF-R120CX , AF-R140CX Operation Manual - Page 2
State Zip Telephone TO PHONE: Dial 1-800-BE-SHARP (237-4277) for: SERVICE (for your nearest Sharp Authorized Servicer) PARTS (for your Authorized Parts Distributor) ACCESSORIES ADDITIONAL CUSTOMER INFORMATION TO WRITE: For service problems, warranty information, missing items and other assistance - Sharp AF-R100CX | AF-R100CX , AF-R120CX , AF-R140CX Operation Manual - Page 3
From Warranty Coverage (If any): Where to Obtain Service: What to Do to Obtain Service: AF-R100CX, AF-R120CX or AF-R140CX Room Air Conditioner. Be sure to have this information available when you need service for your Product. One (1) year parts and labor from date of purchase. The warranty period - Sharp AF-R100CX | AF-R100CX , AF-R120CX , AF-R140CX Operation Manual - Page 4
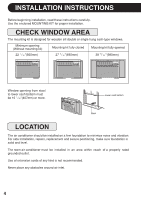
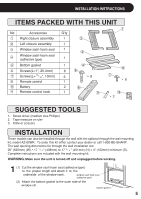
Before beginning installation, read these instructions carefully. Use the enclosed MOUNTING KIT for proper installation. CHECK WINDOW AREA The mounting kit is designed for wooden sill double or single hung sash- - Sharp AF-R100CX | AF-R100CX , AF-R120CX , AF-R140CX Operation Manual - Page 5
order this kit either contact your dealer or call 1-800-BE-SHARP. The wall opening dimensions for through the wall installation are: 25" (635mm) (W) 17 1 / 4 " (438mm) to 17 3 / 4 " (451mm) (H) 4" (102mm) minimum (D). Complete instructions are included with the wall mounting kit. WARNING: Make sure - Sharp AF-R100CX | AF-R100CX , AF-R120CX , AF-R140CX Operation Manual - Page 6
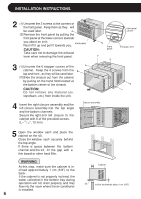
INSTALLATION INSTRUCTIONS 2 (1) Unscrew the 2 screws at the corners of the front panel. Keep them as they will be used later. (2)Remove the front panel by pulling the - Sharp AF-R100CX | AF-R100CX , AF-R120CX , AF-R140CX Operation Manual - Page 7
INSTALLATION INSTRUCTIONS 6 Insert the closure assemblies on both sides into the rails of the jamb. Closure assembly (Left) Jamb (Left) Indoor side 1/2 inch (13mm) Sill Closure assembly ( - Sharp AF-R100CX | AF-R100CX , AF-R120CX , AF-R140CX Operation Manual - Page 8
the air conditioner by following the installation instructions given in the previous section of this manual. • Make sure the unit is the correct capacity for the area you want to cool. • Do not modify any part of this product. • Do not insert objects into any part - Sharp AF-R100CX | AF-R100CX , AF-R120CX , AF-R140CX Operation Manual - Page 9
PRECAUTIONS NOTES ON OPERATION • Allow 3 minutes for the compressor to restart cooling. If you turn the air conditioner off and immediately restart it, allow three minutes for the compressor to restart cooling. There is an electronic device in the unit that keeps the compressor off three minutes for - Sharp AF-R100CX | AF-R100CX , AF-R120CX , AF-R140CX Operation Manual - Page 10
OPERATION INSTRUCTIONS PARTS NAMES UNIT 4 3 2 1 1 Front panel 2 Air inlet (Indoor side) 3 Louvers 4 Air outlet (Indoor side) 5 Exhaust lever 6 Control panel 56 7 8 9 10 11 12 7 Cabinet 8 Air outlet (Outdoor - Sharp AF-R100CX | AF-R100CX , AF-R120CX , AF-R140CX Operation Manual - Page 11
HOW TO OPERATEOPERATION INSTRUCTIONS COOLING OPERATION Procedure 1 Touch POWER ON/OFF pad. • The unit is preset at 74°F and HIGH COOL. This will show in the display when the - Sharp AF-R100CX | AF-R100CX , AF-R120CX , AF-R140CX Operation Manual - Page 12
HOW TO OPERATE TO CHANGE FAN SPEED Procedure During operation Touch SELECTOR pad and select the desired fan speed. Pad SELECTOR Display / Indicator • SELECTOR indicator will light in order as you touch. HIGH COOL MED COOL LOW COOL FAN ONLY NOTES ON FAN SPEED HIGH COOL MED COOL Fan and cooling - Sharp AF-R100CX | AF-R100CX , AF-R120CX , AF-R140CX Operation Manual - Page 13
HOW TO OPERATE ENERGY SAVER During normal operation, the thermostat automatically controls cooling and the fan runs continuously. When the ENERGY SAVER is selected, the thermostat automatically controls cooling and the fan automatically stops when the compressor is not operating. (Fan will stop 30 - Sharp AF-R100CX | AF-R100CX , AF-R120CX , AF-R140CX Operation Manual - Page 14
HOW TO OPERATE ON TIMER OPERATION • This unit has a built-in timer that can be programmed to start the unit up to 12 hours in advance. • You can set the timer to start in increments of 30 minutes (0.5 hours) up to 9.5 hours in advance of the start time, or in 1 hour increments from 10 to 12 hours - Sharp AF-R100CX | AF-R100CX , AF-R120CX , AF-R140CX Operation Manual - Page 15
HOW TO OPERATE OFF TIMER OPERATION • This unit has a built-in timer that can be programmed to shut the unit off up to 12 hours in advance. • You can set the timer to stop in increments of 30 minutes (0.5 hours) up to 9.5 hours in advance of the stop time, or in 1 hour increments from 10 to 12 - Sharp AF-R100CX | AF-R100CX , AF-R120CX , AF-R140CX Operation Manual - Page 16
HOW TO OPERATE USING THE REMOTE CONTROL INSTALLING BATTERIES Use two size-AAA (R03) batteries. 1 Remove the battery compartment cover. 2 Insert the batteries in the compartment, making sure the and polarities are properly aligned. Battery compart- 3 Replace the cover. ment cover NOTES: • - Sharp AF-R100CX | AF-R100CX , AF-R120CX , AF-R140CX Operation Manual - Page 17
HOW TO OPERATE OPERATING WITH THE REMOTE CONTROL TRANSMITTER POWER ON/OFF TEMP. TEMP. SELECTOR SET TIMER/OFF POWER ON / OFF button Push to start or stop the operation. TEMPERATURE setting button TEMP. ---Raise temp. setting 1°F at a time. TEMP. ---Lower temp. setting 1°F at a time. SELECTOR - Sharp AF-R100CX | AF-R100CX , AF-R120CX , AF-R140CX Operation Manual - Page 18
. Avoid splashing the unit with water. Excess water can damage electrical insulation and result in danger. Never use harsh chemicals or abrasive cleaners on any part of the unit. To avoid damage to the unit, do not use hot water (120°F(50°C) or more) when cleaning. OILING OF THE COMPRESSOR AND - Sharp AF-R100CX | AF-R100CX , AF-R120CX , AF-R140CX Operation Manual - Page 19
BEFORE CALLING FOR SERVlCE IF YOUR AIR CONDITIONER DOES NOT OPERATE PROPERLY, PLEASE CHECK THE FOLLOWING ITEMS BEFORE CALLING FOR SERVICE. AIR CONDITIONER DOES NOT OPERATE AT ALL • Is the unit plugged in or is the plug loose? • Is the fuse blown or the circuit breaker - Sharp AF-R100CX | AF-R100CX , AF-R120CX , AF-R140CX Operation Manual - Page 20
SHARP ELECTRONICS CORPORATION Sharp Plaza, Mahwah, New Jersey 07430-2135 SHARP CORPORATION Osaka, Japan 20 Printed in Thailand TINSEA297JBRZ 01LO TL 1
-
 1
1 -
 2
2 -
 3
3 -
 4
4 -
 5
5 -
 6
6 -
 7
7 -
8
-
9
-
10
-
11
-
12
-
13
-
14
-
15
-
16
-
17
-
18
-
19
-
20
 |
 |
ROOM AIR CONDITIONER
INSTALLATION AND OPERATION
MANUAL
PAGE
CONTENTS
This INSTALLATION AND OPERATION
MANUAL explains the proper use of your
new
Sharp Air Conditioner. Read these instructions
carefully before installing
or operating
your air
conditioner. The INSTALLATION
AND
OP-
ERATION
MANUAL
should be kept in a safe
place for handy reference.
FOR YOUR PROTECTION
....................
2
CONSUMER LIMITED WARRANTY
.....
3
INSTALLATION INSTRUCTIONS
• CHECK WINDOW AREA
........................
4
• LOCATlON
..............................................
4
• ITEMS PACKED WITH THlS UNIT
.........
5
• SUGGESTED TOOLS
............................
5
• INSTALLATION
.......................................
5
PRECAUTIONS
•
CAUTION FOR USE
............................
8
• GROUNDING INSTRUCTIONS
...........
8
• NOTES ON OPERATION
....................
9
• ENERGY EFFICIENCY TIPS
...............
9
HOW TO OPERATE
• PARTS NAMES
...................................
10
•
COOLING OPERATION
......................
11
•
TO CHANGE TEMPERATURE SETTING
..........
11
• TO CHANGE FAN SPEED
..................
12
• FAN ONLY OPERATION
.....................
12
• ENERGY SAVER
.................................
13
•
TO CHANGE AIR FLOW DIRECTION
.......
13
• EXHAUST
............................................
13
• ON TIMER OPERATION
.....................
14
• OFF TIMER OPERATION
....................
15
• USING THE REMOTE CONTROL
.......
16
CLEANING AND MAINTENANCE
........
18
BEFORE CALLING FOR SERVlCE
......
19
AF-R100CX
AF-R120CX
AF-R140CX