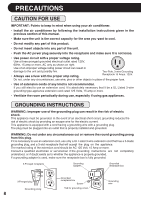
Sharp AF-S125EX AF-R100EX , AF-R120EX Operation Manual - Page 7
CAUTION, haust lever through the opening
 |
View all Sharp AF-S125EX manuals
Add to My Manuals
Save this manual to your list of manuals |
Page 7 highlights
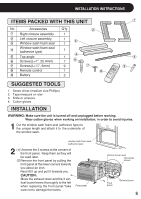
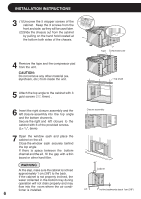
INSTALLATION INSTRUCTIONS 8 Insert the closure assemblies on both sides into the rails of the jamb. Closure assembly (Left) Jamb (Left) Indoor side 1/2 inch (13mm) Sill Stool 9 (1) Secure the cabinet to the window stool with 2 screws (L=1", 25.4mm), working from the inside of the cabinet. Closure assembly (Left) Top angle (2) Secure the top angle and the closure assemblies to the window sash with 3 screws (L=1", 25.4mm). (3) Secure the closure assemblies to the sill with 2 screws (L=1", 25.4mm). Normal screw 10 (1) Slide the chassis back into the cabinet. (2) Replace the 3 screws removed in step 3 to the Front and side of the cabinet . 11 (1) Replace the front panel. Slip the exhaust lever through the opening between the horizontal louver and the front panel then, hook the cabinet top. CAUTION: Move the exhaust lever and the 3 vertical louver levers thoroughly to the left when replacing the front panel.Take care not to damage the levers. (2)Screw the front cabinet on at the bottom corners with 2 screws removed in step 2. 12 Cut the window sash foam seal to the proper length and seal the opening between the top of the inside window sash and the outside window sash. Scratching screw for grounding. Serration Vertical louver lever Horizontal Louver Front Panel Exhaust Lever Window sash foam seal 7
-
 1
1 -
 2
2 -
 3
3 -
 4
4 -
 5
5 -
 6
6 -
 7
7 -
 8
8 -
 9
9 -
 10
10 -
 11
11 -
 12
12 -
13
-
14
-
15
-
16
-
17
-
18
-
19
-
20
 |
 |
