Sharp AN-PHCM20 Installation Instructions - Page 8
When Raising It Up In Order To Hang It In Place.
 |
View all Sharp AN-PHCM20 manuals
Add to My Manuals
Save this manual to your list of manuals |
Page 8 highlights
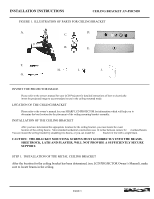
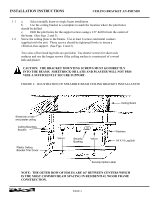
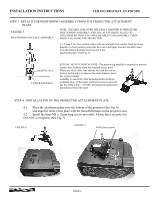
INSTALLATION INSTRUCTIONS CEILING BRACKET AN-PHCM20 STEP 6 HANGING THE PROJECTOR FROM POSITIONING ASSEMBLY IT IS RECOMMENDED THAT TWO PERSONS SUPPORT THE PROJECTOR WHEN RAISING IT UP IN ORDER TO HANG IT IN PLACE. 6.1 Raise the projector with the mounting plate attached and slide the fitting (See Fig. 9) over the support stud on the hanging position. 6.2 Replace the locking nut and split lock washer (removed in step 3.1). Using the 9/16" run the nut up but do not tighten all the way. box wrench FIGURE 9 STEP 7 AIM THE PROJECTOR CAUTION: DO NOT OVER-TIGHTEN THE POSITIONING NUTS. When doing image positioning alignment, tighten the nuts until the split ring washer flattens out and then only just enough additional tightening to hold the set position. 7.1 After the projector has been property wired, turn it on and loosen the positioning assembly adjustment nuts just enough so that you can move the projector fairly easily. (See Fig. 10) DO NOT COMPLETELY LOOSEN THE NUTS. 7.2 Set the Horizontal Centering by loosening the ceiling locking nut, move the projector to center the image and tighten the nut. (Use 3/4" open end wrench). 7.3 Set the vertical centering and secure the lower positioning adjustment nut. (See Fig. 10) 7.4 Set the Horizontal tilt and secure the upper positioning adjustment nut. (See Fig. 10) SECURITY: The ceiling plate and the projector attachment plate of this model mounting bracket kit are equipped with attachment facilities that enable the use of a SHARP Model AN-CMCSS16 or AN-CMCSS46 theft prevention security cable optional accessory. PAGE 8 Threaded hole lines up with center hole in lock base. Anti-spin hole aligns with anti-spin pin on lock base.
-
 1
1 -
2
-
 3
3 -
 4
4 -
 5
5 -
 6
6 -
 7
7 -
 8
8 -
 9
9 -
 10
10 -
 11
11 -
 12
12 -
 13
13
 |
 |
