Sharp CD-ES777 CD-ES777 Operation Manual - Page 12
System connections continued - main unit only
 |
UPC - 074000368217
View all Sharp CD-ES777 manuals
Add to My Manuals
Save this manual to your list of manuals |
Page 12 highlights
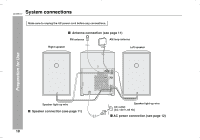
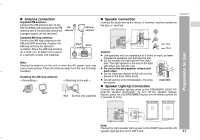
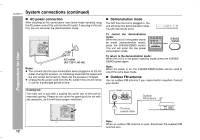
CD-ES777 System connections (continued) AC power connection After checking all the connections have been made correctly, plug the AC power cord of this unit into the AC outlet. If you plug in the unit first, the unit will enter the demonstration mode. AC INPUT AC outlet (AC 120 V, 60 Hz) Notes: The unit will start the tape initialization when plugged in to the AC outlet. During this process, an initializing sound will be heard and the unit cannot be turned on. Wait until the process is finished. Unplug the AC power cord from the AC outlet if the unit will not be in use for a prolonged period of time. Demonstration mode The first time the unit is plugged in, the unit will enter the demonstration mode. You will see words scroll. To cancel the demonstration mode: When the unit is in the power standby mode (demonstration mode), press the X-BASS/DEMO button. The unit will enter the low power consumption mode. To return to the demonstration mode: When the unit is in the power stand-by mode, press the X-BASS/ DEMO button again. Note: When the power is on, the X-BASS/DEMO button can be used to select the extra bass mode. Outdoor FM antenna Use an outdoor FM antenna if you require better reception. Consult your dealer. Preparation for Use Cooling fan: The main unit is built with a cooling fan at the rear of the unit for improved cooling. Please do not cover the opening of the fan with any obstacles, as this will block proper ventilation. ANTENNA FM GND AM 75 OHMS Outdoor FM antenna 75 ohms coaxial cable AC INPUT 12 Note: When an outdoor FM antenna is used, disconnect the supplied FM antenna wire.
-
 1
1 -
2
-
3
-
4
-
5
-
6
-
 7
7 -
 8
8 -
 9
9 -
 10
10 -
 11
11 -
 12
12 -
 13
13 -
 14
14 -
 15
15 -
 16
16 -
 17
17 -
18
-
19
-
20
-
21
-
22
-
23
-
24
-
25
-
26
-
27
-
28
-
29
-
30
-
31
-
32
-
33
-
34
-
35
-
36
 |
 |
