Sharp DV-RW340U Operation Manual - Page 20
Channel setting cont'd
 |
View all Sharp DV-RW340U manuals
Add to My Manuals
Save this manual to your list of manuals |
Page 20 highlights
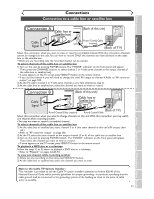
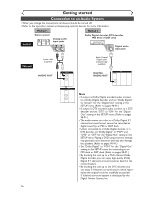
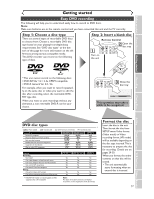
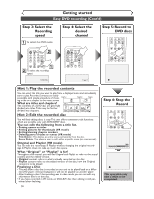
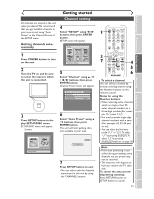
Getting started Channel setting (cont'd) Adding/deleting channels The channels you no longer receive or seldom watch can be deleted from the memory.You also may add channels into memory. 4 Select "Manual Preset" using K / L buttons, then press ENTER button. Manual Preset menu will appear. POWER REC MODE REC SPEED AUDIO OPEN/CLOSE .@/: ABC DEF 1 2 3 GHI JKL MNO CH 4 5 6 1 Press SETUP button to display SETUP/DISC menu. SETUP/DISC menu will appear. Setup > Channel Preset > Manual Preset CH2 Add Delete PQRS 7 DISPLAY TUV 8 SPACE 0 VCR WXYZ VIDEO/TV 9 SLOW DVD PAUSE PLAY Screen: 1 STOP REC/OTR SETUP TIMER PROG. 5 7 REC MONITOR ENTER MENU/LIST TOP MENU RETURN CLEAR/C.RESET ZOOM SKIP SKIP 2 3 Setup Menu Select the channel number to SEARCH MODE CM SKIP 4 add or delete. Press { button to move to a 5 lower channel number. 2 Press B button to move to a higher channel number. 6 Select "SETUP" using { / B buttons, then press ENTER button. SETUP menu will appear. Setup > Channel Preset > Manual Preset CH18 Add Delete Setup Playback Setting 3 Select "Channel" using K / L / { / B buttons, then press ENTER button. Channel Preset menu will appear. Setup > Channel Preset VCR DVD Auto Preset Manual Preset TV Audio Select Stereo 6 Select "Add" or "Delete" using K / L buttons, then press ENTER button. The channel number will be added or deleted from the channel memory.Then, the next channel number will appear so that you can continue adding or deleting channels. 7 Press SETUP button to exit. 20
-
 1
1 -
2
-
3
-
4
-
5
-
6
-
7
-
8
-
9
-
10
-
11
-
12
-
13
-
14
-
 15
15 -
 16
16 -
 17
17 -
 18
18 -
 19
19 -
 20
20 -
 21
21 -
 22
22 -
 23
23 -
 24
24 -
 25
25 -
26
-
27
-
28
-
29
-
30
-
31
-
32
-
33
-
34
-
35
-
36
-
37
-
38
-
39
-
40
-
41
-
42
-
43
-
44
-
45
-
46
-
47
-
48
-
49
-
50
-
51
-
52
-
53
-
54
-
55
-
56
-
57
-
58
-
59
-
60
-
61
-
62
-
63
-
64
-
65
-
66
-
67
-
68
-
69
-
70
-
71
-
72
-
73
-
74
-
75
-
76
-
77
-
78
-
79
-
80
-
81
-
82
-
83
-
84
-
85
-
86
-
87
-
88
-
89
-
90
-
91
-
92
-
93
-
94
-
95
-
96
-
97
-
98
-
99
-
100
-
101
-
102
-
103
-
104
-
105
-
106
-
107
-
108
-
109
-
110
-
111
-
112
 |
 |
