Sharp GX30 Service Manual - Page 29
RF calibration,
 |
View all Sharp GX30 manuals
Add to My Manuals
Save this manual to your list of manuals |
Page 29 highlights
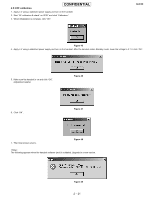
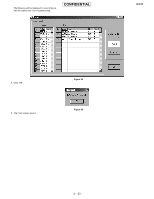
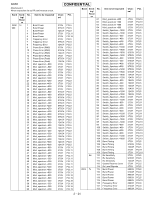
CONFIDENTIAL 4.5.3 RF calibration 1. Apply 4 V using a stabilized power supply and turn on the handset. 2. Start "RF calibration & check" on SPST and click "Calibration". 3. When initialization is complete, click "OK". GX30 Figure 45 4. Apply 4 V using a stabilized power supply and turn on the handset. After the handset enters Standby mode, lower the voltage to 3.7 V, click "OK". 5. Make sure the handset is on and click "OK". (Adjustment starts.) Figure 46 6. Click "OK". Figure 47 7. The initial screen returns. Figure 48 The following appears when the handset software (mot) is outdated. Upgrade to a new version. Figure 49 2 - 21
-
 1
1 -
2
-
3
-
4
-
5
-
6
-
7
-
8
-
9
-
10
-
11
-
12
-
13
-
14
-
15
-
16
-
17
-
18
-
19
-
20
-
21
-
22
-
23
-
 24
24 -
 25
25 -
 26
26 -
 27
27 -
 28
28 -
 29
29 -
 30
30 -
 31
31 -
 32
32 -
 33
33 -
 34
34 -
35
-
36
-
37
-
38
-
39
-
40
-
41
-
42
-
43
-
44
-
45
-
46
-
47
-
48
-
49
-
50
-
51
-
52
-
53
-
54
-
55
-
56
-
57
-
58
-
59
-
60
-
61
-
62
-
63
-
64
-
65
-
66
-
67
-
68
-
69
-
70
-
71
-
72
-
73
-
74
-
75
-
76
-
77
-
78
-
79
-
80
-
81
-
82
-
83
-
84
-
85
-
86
-
87
-
88
-
89
-
90
-
91
-
92
-
93
-
94
-
95
-
96
-
97
-
98
-
99
-
100
-
101
-
102
-
103
-
104
-
105
-
106
-
107
-
108
-
109
-
110
-
111
-
112
-
113
-
114
-
115
-
116
-
117
-
118
-
119
-
120
-
121
-
122
-
123
-
124
-
125
-
126
-
127
-
128
-
129
-
130
-
131
-
132
-
133
-
134
-
135
-
136
-
137
-
138
-
139
-
140
-
141
-
142
-
143
-
144
-
145
-
146
-
147
-
148
-
149
-
150
-
151
-
152
-
153
-
154
-
155
-
156
-
157
-
158
-
159
-
160
-
161
-
162
-
163
-
164
-
165
-
166
 |
 |

GX30
2 – 21
CONFIDENTIAL
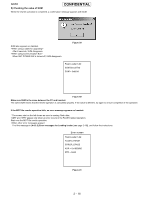
4.5.3 RF calibration
1.
Apply 4 V using a stabilized power supply and turn on the handset.
2.
Start “RF calibration & check” on SPST and click “Calibration”.
3.
When initialization is complete, click “OK”.
Figure 45
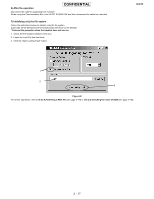
4.
Apply 4 V using a stabilized power supply and turn on the handset. After the handset enters Standby mode, lower the voltage to 3.7 V, click “OK”.
Figure 46
5.
Make sure the handset is on and click “OK”.
(Adjustment starts.)
Figure 47
6.
Click “OK”.
Figure 48
7.
The initial screen returns.
<Note>
The following appears when the handset software (mot) is outdated. Upgrade to a new version.
Figure 49